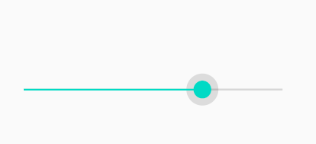
시크바란?
시크바는 사용자가 범위 내에서 값을 선택할 수 있도록 도와주는 막대 형태의 뷰입니다.
음량/밝기 조절, 이미지 필터 적용, 동영상 재생 등 다양한 곳에 활용됩니다.
시크바 공식문서
developer.android.com/reference/android/widget/SeekBar
SeekBar | Android 개발자 | Android Developers
developer.android.com
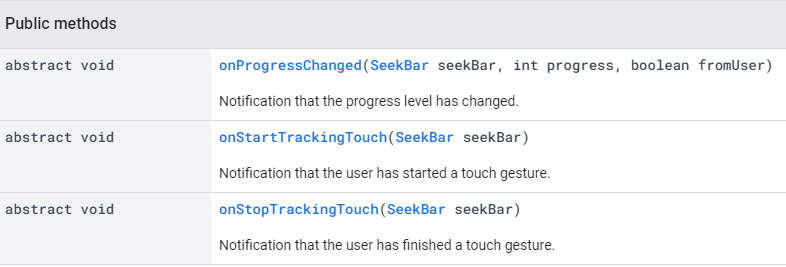
시크바 이벤트 리스너를 활용하면, 사용자가 시크바에서 선택한 값을 알 수 있습니다.
(1) onProgressChanged: 시크바를 조작하고 있는 중에 발생
(2) onStartTrackingTouch: 시크바를 처음 터치했을 때 발생
(3) onStopTrackingTouch: 시크바 터치가 끝났을 때 발생
시크바 리스너 함수
이번에는 시크바 터치가 끝났을 때, 유저가 선택한 값을 TextView에 띄우는 예제를 만들어 보겠습니다.
<activity_main.xml>
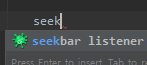
먼저 xml에 seek까지 입력하면, 시크바 xml 코드를 자동완성 해주는 코드가 나옵니다.

자동완성된 코드를 상황에 맞게 수정해줍니다.
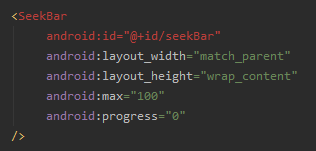
SeekBar는 android:max 속성을 활용해 최대값을 설정할 수 있습니다.
그리고 android:thumb를 통해서 기본으로 선택되어있는 값을 설정할 수도 있습니다.
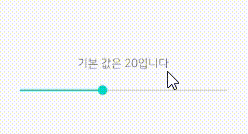
예제에서는 최대값을 50으로, 기본 선택 값을 20으로 설정하게 xml 코드를 수정해줍습니다.
또한, 시크바 선택값을 출력할 수 있도록 시크바 위에 TextView를 추가해줍니다.

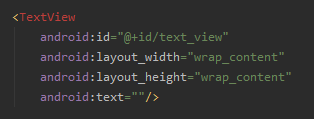
텍스트뷰의 text 속성에는 "기본 값은 20입니다" 라고 표기해보았습니다.
그리고 다른 속성도 상황에 맞게 수정해줍니다.
완성된 전체 코드입니다.
<?xml version="1.0" encoding="utf-8"?>
<androidx.constraintlayout.widget.ConstraintLayout
    xmlns:android="http://schemas.android.com/apk/res/android"
    xmlns:app="http://schemas.android.com/apk/res-auto"
    xmlns:tools="http://schemas.android.com/tools"
    android:layout_width="match_parent"
    android:layout_height="match_parent"
    tools:context=".MainActivity"
    android:orientation="vertical">

    <SeekBar
        android:id="@+id/seekBar"
        android:layout_width="match_parent"
        android:layout_height="wrap_content"
        android:layout_marginStart="60dp"
        android:layout_marginEnd="60dp"
        android:max="50"
        android:progress="20"
        app:layout_constraintBottom_toBottomOf="parent"
        app:layout_constraintEnd_toEndOf="parent"
        app:layout_constraintHorizontal_bias="1.0"
        app:layout_constraintStart_toStartOf="parent"
        app:layout_constraintTop_toTopOf="parent"
        />

    <TextView
        android:id="@+id/textView"
        android:layout_width="wrap_content"
        android:layout_height="wrap_content"
        android:layout_marginBottom="16dp"
        android:text="기본 값은 20입니다"
        app:layout_constraintBottom_toTopOf="@+id/seekBar"
        app:layout_constraintEnd_toEndOf="parent"
        app:layout_constraintStart_toStartOf="parent" />

</androidx.constraintlayout.widget.ConstraintLayout><MainActivity>
이제 Main Activity에서 시크바의 선택값을 Toast로 띄울 수 있도록 코드를 추가해봅시다.
텍스트뷰와 시크바를 findViewById로 선언해주고, 시크바에 리스너를 부여주어야합니다.
스틱코드를 활용하면 간편하게 코드 작성이 가능합니다.
먼저, textView를 선언하고 fin까지 입력하면 findViewById를 간편하게 할 수 있습니다.


다음으로, onCreate에서 seek까지 입력하고, 시크바 리스너를 자동완성 시켜주는 코드를 불러옵니다.

onStopTrackingTouch에서 선택된 값을 받아오고, TextView에 띄워줄 코드를 추가해줍니다.
seekbarP까지 입력하면 시크바의 선택된 값을 받아올 수 있는 코드가 자동완성 됩니다.
이를 활용해, TextView에 해당 내용이 출력되도록 코드를 수정해줍니다.


완성된 MainActivity 코드입니다
public class MainActivity extends AppCompatActivity {

    TextView textView;

    @Override
    protected void onCreate(Bundle savedInstanceState) {
        super.onCreate(savedInstanceState);
        setContentView(R.layout.activity_main);

        textView = findViewById(R.id.textView);

        SeekBar seekBar = findViewById(R.id.seekBar);
        seekBar.setOnSeekBarChangeListener(new SeekBar.OnSeekBarChangeListener() {
            @Override
            public void onProgressChanged(SeekBar seekBar, int progress, boolean fromUser) {

            }

            @Override
            public void onStartTrackingTouch(SeekBar seekBar) {

            }

            @Override
            public void onStopTrackingTouch(SeekBar seekBar) {

                textView.setText(String.format("선택 값은 %d 입니다.", seekBar.getProgress()));
            }
        });

    }

}
<완성된 예제>
<활용 스틱코드>
시크바> stickode.com/detail.html?no=2036
스틱코드
stickode.com
findViewById > https://stickode.com/detail.html?no=682
'안드로이드 자바' 카테고리의 다른 글
| [Java][Android] 가로형, 그리드형 리싸이클러뷰 만들기 (0) | 2021.04.19 |
|---|---|
| [Java][Android] Floating Action Menu 만들기 (2) | 2021.04.18 |
| [Java][Android] JSON 데이터 사용해보기 (0) | 2021.04.13 |
| [Java][Android] Swipe Refresh 레이아웃 적용 (0) | 2021.04.12 |
| [Java][Android] 모바일 네트워크 연결 상태 확인 (0) | 2021.04.10 |


