안녕하세요.~
이번시간에는 안드로이드 자바로 Bottom Sheet를 만들어보겠습니다.
스틱코드 (stickode.com/mainlogin.html)
이번에도 역시 빠르게 만들기 위해 스틱코드 플러그인을 사용해서 만들어보겠습니다.
스틱코드는 자주쓰는 코드를 저장해서 쉽고 빠르게 사용할 수 있고,
다른사람들의 코드도 즐겨찾기를 통해 쉽게 내코드로 등록하여 사용할 수 있어 사용하는 사람이 늘어나고,
좋은 코드가 쌓일수록 강력해지는 플러그인 입니다.
프로젝트 생성

새로운 프로젝트를 생성 했고,
XML 파일 설정 (레이아웃)
activity_main.xml
<?xml version="1.0" encoding="utf-8"?>
<androidx.constraintlayout.widget.ConstraintLayout xmlns:android="http://schemas.android.com/apk/res/android"
    xmlns:app="http://schemas.android.com/apk/res-auto"
    xmlns:tools="http://schemas.android.com/tools"
    android:layout_width="match_parent"
    android:layout_height="match_parent"
    tools:context=".MainActivity">

    <TextView
        android:id="@+id/txt_result"
        android:layout_width="wrap_content"
        android:layout_height="wrap_content"
        android:layout_marginStart="16dp"
        android:layout_marginLeft="16dp"
        android:layout_marginTop="16dp"
        android:text="바텀시트 숨겨짐"
        android:textSize="18sp"
        app:layout_constraintStart_toStartOf="parent"
        app:layout_constraintTop_toTopOf="parent" />

    <Button
        android:id="@+id/btn_open_bt_sheet"
        android:layout_width="wrap_content"
        android:layout_height="wrap_content"
        android:text="Show Bottom Sheet"
        app:layout_constraintBottom_toBottomOf="parent"
        app:layout_constraintLeft_toLeftOf="parent"
        app:layout_constraintRight_toRightOf="parent"
        app:layout_constraintTop_toTopOf="parent" />

</androidx.constraintlayout.widget.ConstraintLayout>
bottom_sheet_layout.xml
<?xml version="1.0" encoding="utf-8"?>
<androidx.constraintlayout.widget.ConstraintLayout
    xmlns:android="http://schemas.android.com/apk/res/android"
    xmlns:app="http://schemas.android.com/apk/res-auto"
    android:layout_width="match_parent"
    android:layout_height="match_parent">

    <TextView
        android:id="@+id/textView"
        android:layout_width="wrap_content"
        android:layout_height="wrap_content"
        android:layout_marginTop="16dp"
        android:text="바텀 시트 다이얼로그 입니다."
        android:textSize="18sp"
        app:layout_constraintEnd_toEndOf="parent"
        app:layout_constraintStart_toStartOf="parent"
        app:layout_constraintTop_toTopOf="parent" />


    <Button
        android:id="@+id/btn_hide_bt_sheet"
        android:layout_width="wrap_content"
        android:layout_height="wrap_content"
        android:layout_marginBottom="16dp"
        android:text="Hide Bottom Sheet"
        app:layout_constraintBottom_toBottomOf="parent"
        app:layout_constraintEnd_toEndOf="parent"
        app:layout_constraintStart_toStartOf="parent"
        app:layout_constraintTop_toBottomOf="@+id/textView" />

</androidx.constraintlayout.widget.ConstraintLayout>
메인 레이아웃과 바텀시트 레이아웃 두개를 준비합니다.
바텀시트 프래그먼트 클래스 파일 셋팅
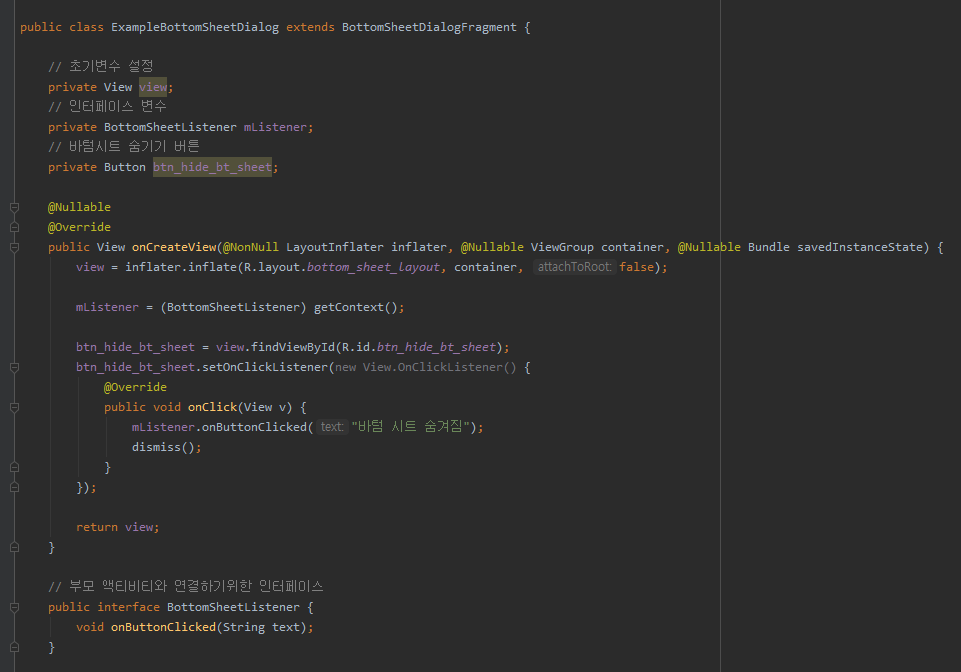
그리고 다음과 같이 바텀시트 다이얼로그 프래그먼트를 클래스 파일로 만들어줍니다.


이렇게 생성된 ExampleBottomSheetDialog.class 파일에
바텀시트 프래그먼트
프래그먼트셋팅 + 인터페이스 설정 + 버튼 동작처리
이것들을 한번에 설정해주는 스틱코드를 사용하여 빠르게 ExampleBottomSheetDialog를 셋팅해보도록하겠습니다.

다음과같이 스틱코드를 사용하면

간단히 완성되었습니다.
바텀시트 프래그먼트 셋팅은 전부 완료가 되었고, 이제 부모액티비티인 메인액티비티에서
처리만 남았습니다.
메인 액티비티 셋팅
메인액티비티에서 버튼을 누르면 바텀시트가 올라오도록 처리해보겠습니다.
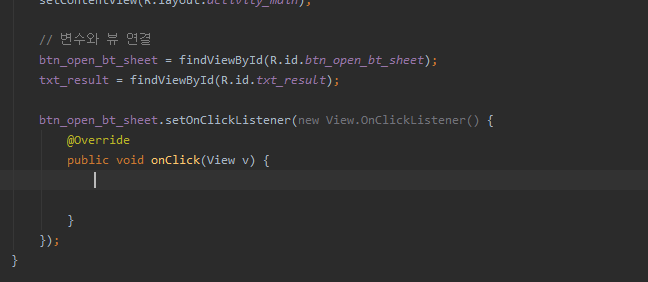
뷰를 선언하고, 클릭 리스너를 추가합니다.

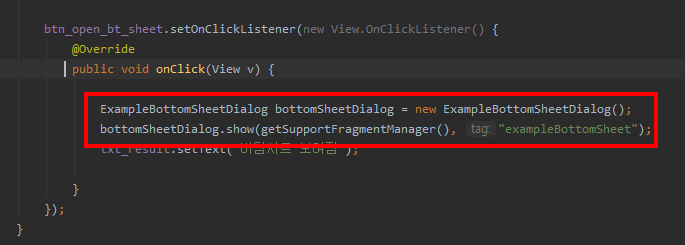
그리고 스틱코드를 사용하여 바텀시트가 보여지는 코드를 완성해보겠습니다.

다음과같이 스틱코드를 사용하면

이렇게 완성되는것을 볼 수 있습니다.
이제 메인 액티비티에서 인터페이스를 통해 바텀시트 프래그먼트와 연결해
값을 받아오도록 셋팅해보겠습니다.

다음과 같이 인터페이스를 상속받고,

인터페이스 메소드를 오버라이딩 합니다.
이제 준비가 완료되었습니다.
아래 코드는 MainActivity.class전문입니다.
package com.example.bottomsheetexample;

import androidx.appcompat.app.AppCompatActivity;

import android.os.Bundle;
import android.view.View;
import android.widget.Button;
import android.widget.TextView;

public class MainActivity extends AppCompatActivity implements ExampleBottomSheetDialog.BottomSheetListener {

    // 초기변수 설정
    // 바텀 다이얼로그 띄우기 버튼
    private Button btn_open_bt_sheet;
    // 결과 텍스트뷰
    private TextView txt_result;
    @Override
    protected void onCreate(Bundle savedInstanceState) {
        super.onCreate(savedInstanceState);
        setContentView(R.layout.activity_main);

        // 변수와 뷰 연결
        btn_open_bt_sheet = findViewById(R.id.btn_open_bt_sheet);
        txt_result = findViewById(R.id.txt_result);

        btn_open_bt_sheet.setOnClickListener(new View.OnClickListener() {
            @Override
            public void onClick(View v) {

                ExampleBottomSheetDialog bottomSheetDialog = new ExampleBottomSheetDialog();
                bottomSheetDialog.show(getSupportFragmentManager(), "exampleBottomSheet");
                txt_result.setText("바텀시트 보여짐");

            }
        });
    }

    // ExampleBottomSheetDialog 인터페이스 메소드
    @Override
    public void onButtonClicked(String text) {
        txt_result.setText("바텀시트 숨겨짐");
    }
}
아래 코드는 MainActivity.class전문입니다.
테스트를 진행보도록 하겠습니다.

잘동작하네요~
이렇게 스틱코드를 사용해 Bottom Sheet를 구현해보았습니다.
이 예제에서 사용된 스틱코드
출처 : stickode.com/detail.html?no=2073 - 바텀시트 다이얼로그 프래그먼트 만들기
감사합니다.
'안드로이드 자바' 카테고리의 다른 글
| [JAVA][Android] 권한 설정하기 (0) | 2021.05.01 |
|---|---|
| [JAVA][안드로이드] 토스트 메시지 & 팝업창 띄우기 (0) | 2021.04.30 |
| [Java][Android] Chip EditText 만들기 (0) | 2021.04.27 |
| [Java][Android] 토글 버튼(ToggleButton) 사용법 (0) | 2021.04.26 |
| [Java][Android] 예외처리하기 (0) | 2021.04.25 |


