오늘은 이전에 만든 UI 버튼을 통해 오브젝트를 생성하는 예제에서 오브젝트를 배치 가능한 구역을 제한하는 예제를 만들어 보겠습니다.
방식은 간단합니다.
- 오브젝트를 제한된 구역에 배치하려고 할 경우 오브젝트의 색을 눈에 띄게 빨간색으로 변경합니다.
- 오브젝트를 제한된 구역에 배치 시 마우스 버튼에서 손을 떼면 오브젝트가 사라집니다.
- 오브젝트를 제한되지 않은 구역에 배치하려고 할 경우 오브젝트의 기존 색으로 변경해줍니다.
- 오브젝트를 제한되지 않은 구역에 배치 시 이전 예제처럼 오브젝트가 해당구역에 배치됩니다.
아래 링크는 이전 예제입니다.
https://stickode.tistory.com/860
먼저 Project창에서 Create -> C# script "ObjectGround"를 생성합니다.
ObjectGround 스크립트 내 코드는 아래와 같이 작성합니다.
using System.Collections;
using System.Collections.Generic;
using UnityEngine;

public class ObjectGround : MonoBehaviour
{
    public Vector3 ground_right; // 땅의 오른쪽 끝 x좌표
    public Vector3 ground_left; // 땅의 왼쪽 끝 x좌표
    public Vector3 ground_forward; // 땅의 위쪽 끝 z좌표
    public Vector3 ground_back; // 땅의 아래쪽 끝 z좌표

    void Awake() {
        // 현재 해당 스크립트가 적용된 Plane 오브젝트의 컴포넌트 중 MeshCollider를 변수 mc에 초기화한다
        MeshCollider mc = GetComponent<MeshCollider>();

        // MeshCollider의 중심에서 각 축의 경계 좌표를 갖고 있는 Vector3 객체 선언
        Vector3 ground_extents = mc.bounds.extents;

        // MeshCollider의 중심을 기준으로 Plane의 x와 z의 경계 좌표 초기화
        ground_right = mc.bounds.center +  new Vector3(ground_extents.x, 0, 0);
        ground_left = mc.bounds.center + new Vector3(-ground_extents.x, 0, 0);
        ground_forward = mc.bounds.center + new Vector3(0, 0, ground_extents.z);
        ground_back = mc.bounds.center + new Vector3(0, 0, -ground_extents.z);
    }
}
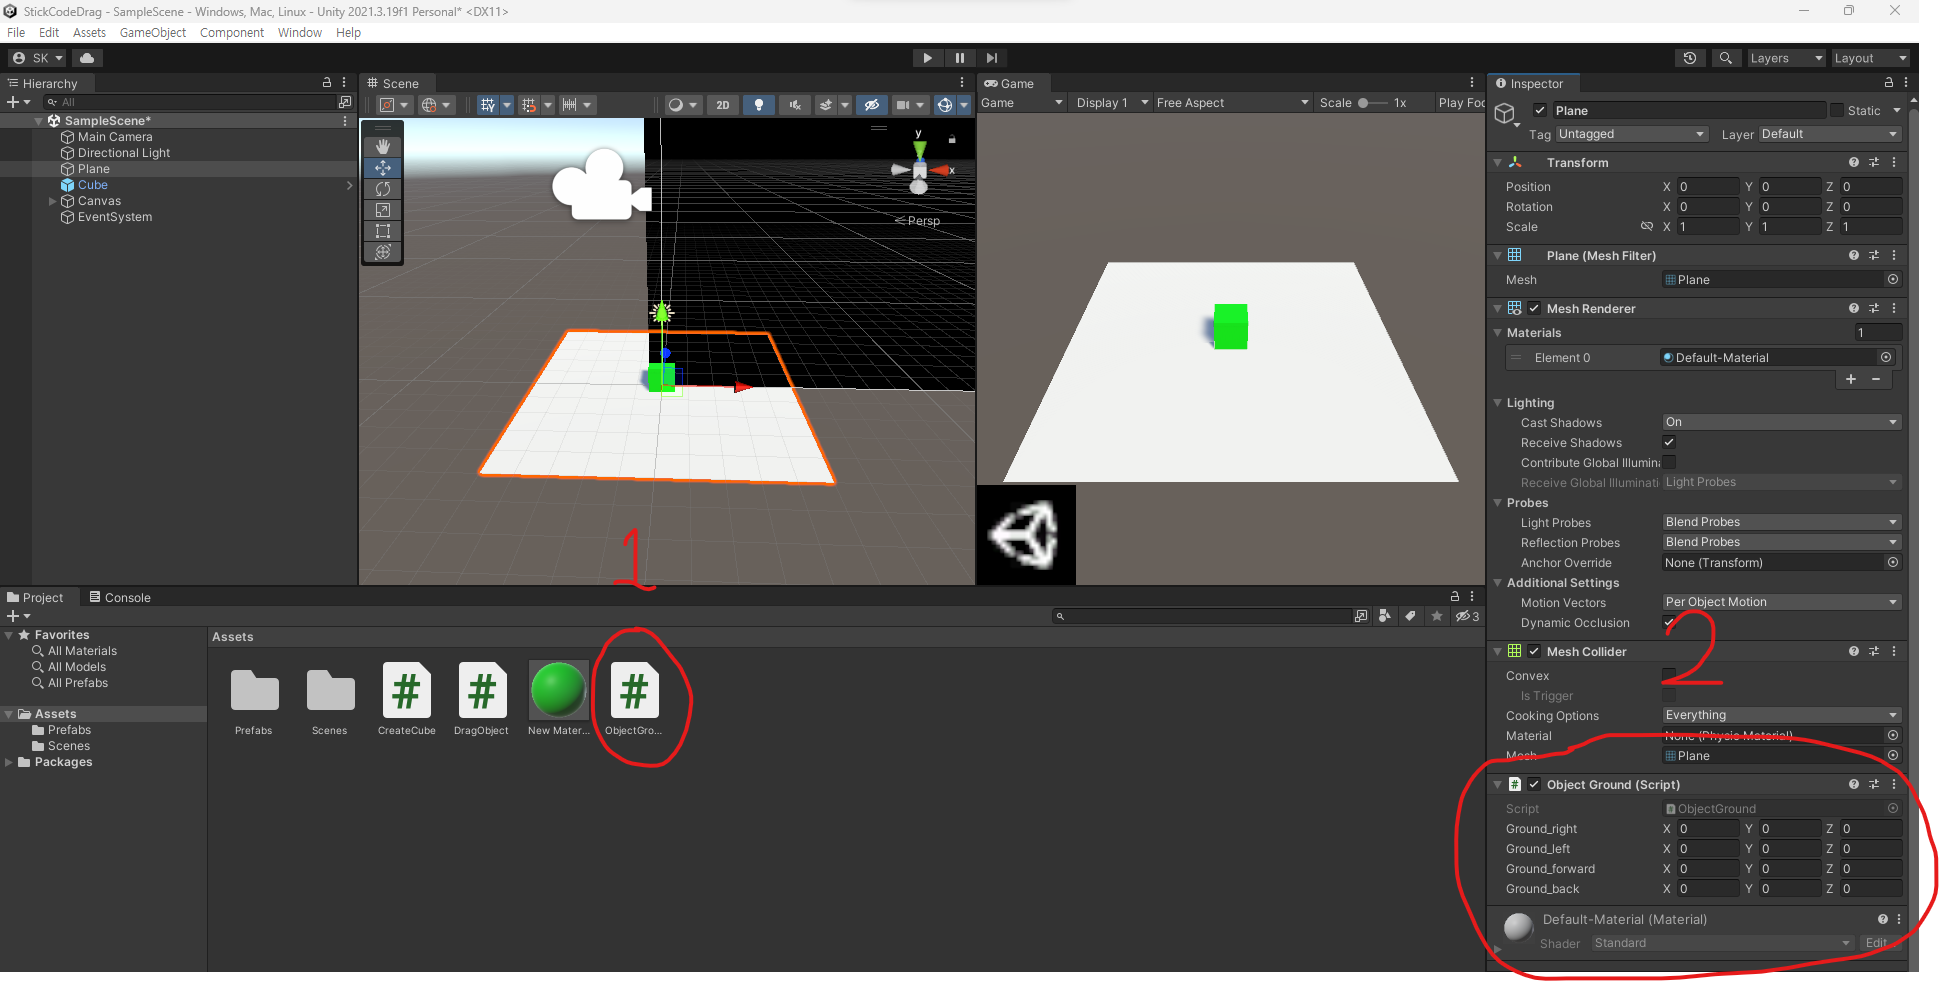
그리고 생성한 ObjectGround 스크립트를 바닥의 역할을 하고 있는 Plane의 Inspector창으로 옮겨주면 해당 스크립트가 적용이 된 것을 확인할 수 있습니다.
이제 이전 예제에서 만들었던 DragObject 스크립트를 수정하겠습니다.
주석이 달린 코드들이 수정되고 추가된 코드입니다.
using System.Collections;
using System.Collections.Generic;
using UnityEngine;

public class DragObject : MonoBehaviour
{
    public bool setable; // 현재 설치가 가능한지 확인하는 코드

    public bool draggable;
    public CreateCube createCube;

    ObjectGround objectGround; // 땅의 역할을 하고있는 plane의 스크립트를 참조할 ObjectGround 변수
    BoxCollider bc; // 해당 스크립트가 적용된 Cube 오브젝트의 BoxCollider 컴포넌트를 저장할 변수
    Vector3 cube_extents; // BoxCollider 중심에서 각 축의 경계 좌표를 저장할 Vector3 변수
    public Vector3 cube_right; // cube 오른쪽 끝 x좌표
    public Vector3 cube_left; // cube 왼쪽 끝 x좌표
    public Vector3 cube_forward; // cube 위쪽 끝 z좌표
    public Vector3 cube_back; // cube 아래쪽 끝 z좌표
    public Material[] mat = new Material[2]; // Cube의 원래 색 Material과 빨간색 Material을 저장할 변수

	// Cube 오브젝트가 활성화되면 Update메소드가 실행되기 전 한번 실행되는 메소드
    void Start(){
    	// Find 메소드를 사용해 Scene에 존재하는 Plane이라는 이름을 가진 GameObject를 찾아서 ground 변수에 저장
        GameObject ground = GameObject.Find("Plane");
        // 해당 오브젝트에서 경계좌표들을 갖고 있는 ObjectGround 스크립트를 따로 변수에 저장
        objectGround = ground.GetComponent<ObjectGround>();

        // 현재 해당 스크립트가 적용된 Cube 오브젝트의 컴포넌트 중 BoxCollider를 변수 bc에 초기화한다
        bc = GetComponent<BoxCollider>();

        // BoxCollider를 중심에서 각 축의 경계 좌표를 갖고 있는 Vector3 객체 선언
        cube_extents = bc.bounds.extents;
    }

    void Update()
    {
        if(Input.GetMouseButtonDown(0)){
            RaycastHit hit = CastRay();

            if(hit.transform == transform){
                draggable = true;
            }
        }

        if(Input.GetMouseButtonUp(0)){

            if(createCube != null){
                createCube.cube = null;
                createCube = null;
            }

            if(setable){ // 현재 배치가 가능한 상태일 경우 if문 내 코드 실행

                draggable = false; // if(Input.GetMouseButtonUp(0)) 바로 밑에 위치했던 코드 이동

            }else{ // 현재 배치가 불가능한 상태일 경우 else 내 코드 실행

                Destroy(this.gameObject); // 해당 cube 오브젝트 삭제

            }
        }


        if(draggable){
            Vector3 position = new Vector3(Input.mousePosition.x, Input.mousePosition.y, Camera.main.WorldToScreenPoint(transform.position).z);
            Vector3 worldPosition = Camera.main.ScreenToWorldPoint(position);
            transform.position = new Vector3(worldPosition.x, 0.5f, worldPosition.z);

            // 현재 cube 오브젝트가 배치 가능한 위치인지 확인하는 메소드 실행
            CheckSetable();
            if(CheckSetable()){
                // 배치 가능 여부를 저장하는 setable을 true로 변환
                setable = true;
                // 배치가 가능할 경우 원래 cube 색으로 변경
                GetComponent<MeshRenderer>().material = mat[0];
            }else{
                // 배치 가능 여부를 저장하는 setable을 false로 변환
                setable = false;
                // 배치가 불가능할 경우 빨간색으로 변경
                GetComponent<MeshRenderer>().material = mat[1];
            }
        }
    }

    // 현재 cube 오브젝트가 배치 가능한 위치인지 확인하는 메소드
    bool CheckSetable(){
        // BoxCollider를 중심을 기준으로 cube의 x와 z의 경계 좌표 초기화
        cube_right = bc.bounds.center +  new Vector3(cube_extents.x, 0, 0);
        cube_left = bc.bounds.center + new Vector3(-cube_extents.x, 0, 0);
        cube_forward = bc.bounds.center + new Vector3(0, 0, cube_extents.z);
        cube_back = bc.bounds.center + new Vector3(0, 0, -cube_extents.z);

        // cube의 오른쪽 경계 좌표가 Plane의 오른쪽 경계 좌표와 같거나 작지 않다면 false 반환
        if(!(objectGround.ground_right.x >= cube_right.x)){
            return false;
        }
        // cube의 왼쪽 경계 좌표가 Plane의 왼쪽 경계 좌표와 같거나 크지 않다면 false 반환
        if(!(objectGround.ground_left.x <= cube_left.x)){
            return false;
        }
        // cube의 앞쪽 경계 좌표가 Plane의 앞쪽 경계 좌표와 같거나 작지 않다면 false 반환
        if(!(objectGround.ground_forward.z >= cube_forward.z)){
            return false;
        }
        // cube의 뒤쪽 경계 좌표가 Plane의 뒤쪽 경계 좌표와 같거나 크지 않다면 false 반환
        if(!(objectGround.ground_back.z <= cube_back.z)){
            return false;
        }

        // cube의 사방 경계 좌표가 Plane의 사방 경계 좌표 안에 있다면 true 반환
        return true;
    }


    private RaycastHit CastRay(){
        Vector3 screenMousePosFar = new Vector3(
            Input.mousePosition.x,
            Input.mousePosition.y,
            Camera.main.farClipPlane);

        Vector3 screenMousePosNear = new Vector3(
            Input.mousePosition.x,
            Input.mousePosition.y,
            Camera.main.nearClipPlane);

        Vector3 worldMousePosFar = Camera.main.ScreenToWorldPoint(screenMousePosFar);
        Vector3 worldMousePosNear = Camera.main.ScreenToWorldPoint(screenMousePosNear);

        RaycastHit hit;
        Physics.Raycast(worldMousePosNear, worldMousePosFar-worldMousePosNear, out hit);

        return hit;
    }


}
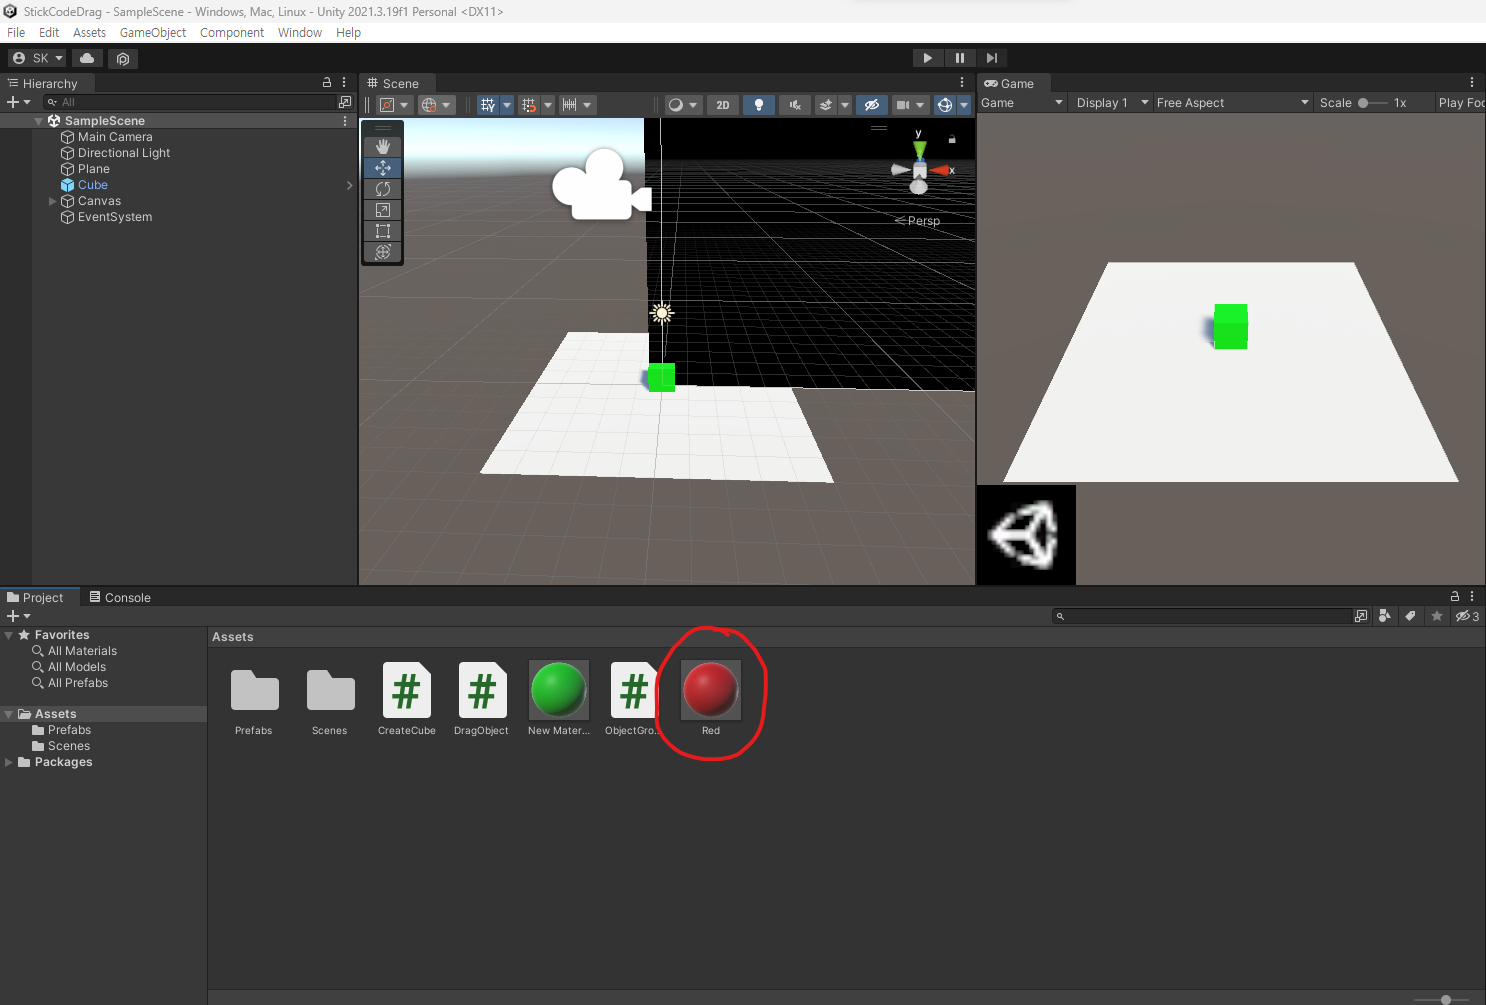
이제 하단 Project창으로 가 마우스 우클릭을 한 뒤 Create -> Material로 Red를 생성하고 해당 Material 클릭 후 우측 Inspector 창에서 Albedo 속성 우측 색상 바를 클릭하고 빨간색으로 변경해줍니다.
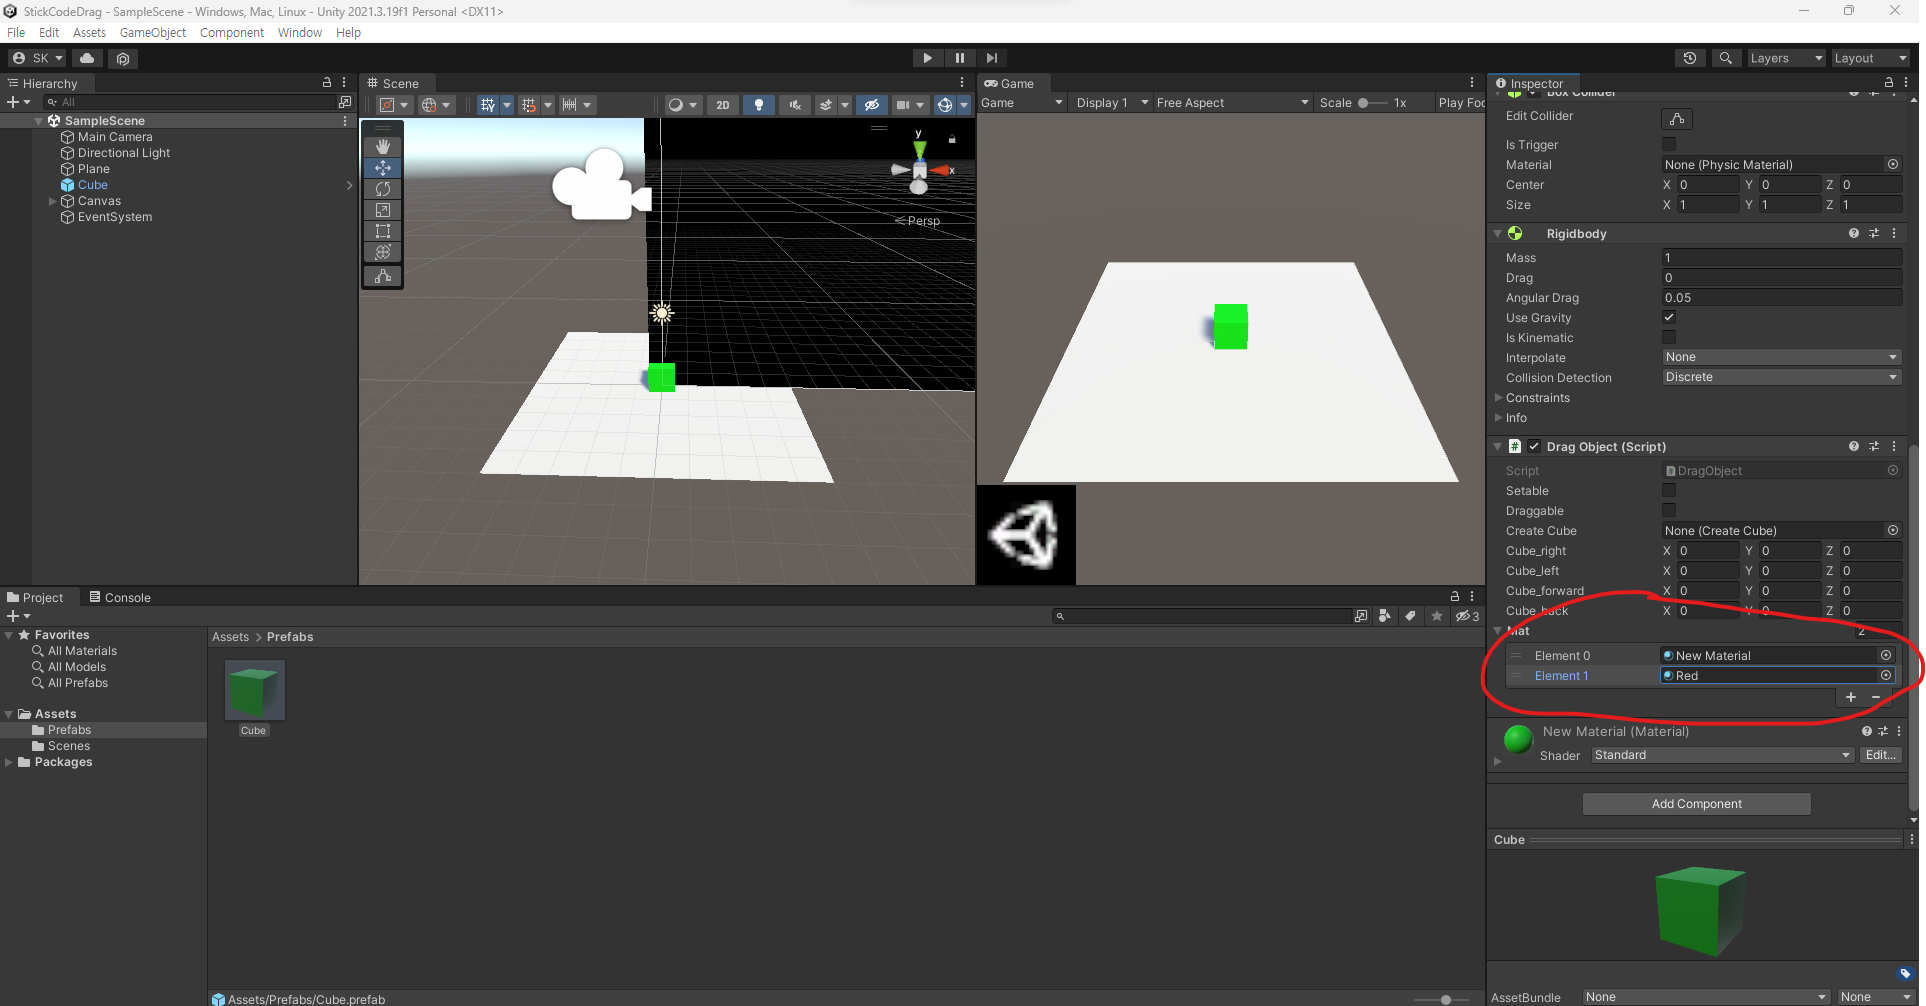
그리고 Prefabs 폴더로 이동해 Cube를 클릭한 뒤 Inspector창에서 Drag Object 스크립트 내 Mat Element 0 에는 이전 예제에서 사용한 New Material을 넣고 Element 1에는 방금 만든 Red를 넣어줍니다.
여기까지 하면 예제가 완성되었고 Plane 안에 있을 경우에만 Cube를 배치할 수 있게 되었습니다!
'C#' 카테고리의 다른 글
| [C#][Unity] 더블클릭 이벤트로 오브젝트 변경하기 (0) | 2023.08.08 |
|---|---|
| [C#][Unity] 내비게이션 시스템 (2) 동적 NavMeshLink 생성 (0) | 2023.08.03 |
| [C#][Unity] 내비게이션 시스템(1) (0) | 2023.07.19 |
| [C#][Unity] UI 이미지를 드래그해서 오브젝트 생성 (0) | 2023.07.11 |
| [C#][Unity] 마우스로 오브젝트 드래그 앤 드랍 (0) | 2023.07.10 |


