728x90
안녕하세요.
오늘은 텐서플로우로 분류모델 전이학습하는 예제를 진행하겠습니다.
전이학습(Transfer learning)은 어떤 목적을 이루기위해 학습된 모델을 다른작업에 이용하는 것을 말합니다.
자세하게 말하면, 전이학습은 ImageNet 등의 대량의 데이터로 사전학습(pre-train) 되어있는 모델을 불러와서 레이어 뒤에 FC층 (Fully Connected Layer) 을 붙여서 FC층에만 학습을 새로 시켜서 이용하는 것을 말합니다.
전이학습을 사용하게 되면 다음과 같은 장점이 있습니다.
- 학습이 빠르게 진행될 수 있습니다. 사전 학습을 통해 이미 입력되는 데이터에 대해 특징을 효율적으로 추출하기 때문에, 새로 학습할 데이터의 특징을 추출하기 위한 학습을 별도로 하지 않아도 되기 때문입니다.
- 작은 데이터셋에을 학습할 때, 과적합(over-fitting) 가능성을 낮출 수 있습니다. 적은 데이터로 특징을 추출하기 위한 학습을 하게 되면, 새로 학습시킬 데이터 양에 비해 모델의 가중치가 많을 수 있어 미세한 특징까지 모두 학습할 수 있습니다. 전이 학습으로 마지막 레이어만 새로 학습한다면, 학습할 가중치 수가 줄어 과접합이 이루어지지 않게 할 수 있습니다.
먼저, 구글 colab을 이용해서 예제를 진행하겠습니다.
데이터셋은 대표적인 예제인 개고양이 데이터셋을 사용하겠습니다.
#데이터셋 불러오기
import os
import zipfile

!wget --no-check-certificate \
https://storage.googleapis.com/mledu-datasets/cats_and_dogs_filtered.zip \
-O /content/cats_and_dogs_filtered.zip

local_zip = '/content/cats_and_dogs_filtered.zip'

zip_ref = zipfile.ZipFile(local_zip, 'r')

zip_ref.extractall('/content')
zip_ref.close()
# 기본 경로
base_dir = '/content/cats_and_dogs_filtered'
train_dir = os.path.join(base_dir, 'train')
validation_dir = os.path.join(base_dir, 'validation')
개고양이 데이터셋에서 데이터 증강은 따로하지 않겠습니다.
datagen = tf.keras.preprocessing.image.ImageDataGenerator(rescale = 1./255,)train_set = datagen.flow_from_directory(directory = train_dir,
target_size = (224,224),
class_mode='categorical',
batch_size = 32)
valid_set = datagen.flow_from_directory(directory = validation_dir,
target_size = (224,224),
class_mode='categorical',
batch_size = 32)
이제 데이터를 학습시킬 모델을 불러오겠습니다.
모델은 ResNet50을 사용하겠습니다.
import os
import tensorflow as tf
import matplotlib.pyplot as plt
from tensorflow.keras.layers import Dense, Flatten
from tensorflow.keras.applications.resnet50 import ResNet50
from tensorflow.keras import Input
x= 이후에 넣는 값들은 fc층을 구현하는 것입니다. fc층을 기존 모델에 붙임으로서 fc층에만 학습을 새로 시키는 것입니다.
지금은 가장 기본적인 flatten과 Dense(2) 를 붙여보겠습니다. 마지막은 항상 클래스의 개수만큼 설정하시면됩니다.
예를들어 클래스를 5개라면 Dense(5) 가 되겠죠. 출력층인 만큼 softmax를 대부분 사용하지만 이진 분류일 경우에는 sigmoid를 사용해도 됩니다.
#모델불러오기
INPUT_SHAPE = (224, 224, 3)
base_model = ResNet50(include_top=False, pooling='avg', input_shape=INPUT_SHAPE, weights='imagenet')
base_model.trainable = False

inputs = Input(shape=INPUT_SHAPE)
x = tf.keras.applications.resnet50.preprocess_input(inputs)
x = base_model(x, training=False)
x = Flatten()(x)
outputs = Dense(2, activation='softmax')(x)

model = tf.keras.Model(inputs, outputs)
model.compile(optimizer=tf.keras.optimizers.Adam(learning_rate=0.001),
                  loss='categorical_crossentropy',
                  metrics=['accuracy'])
학습은 가볍게 5회만 시도하겠습니다.
#모델 학습
epochs=5
history = model.fit(
  train_set,
  validation_data=valid_set,
  epochs=epochs
)
import cv2
import numpy as np
import matplotlib.pyplot as plt
from google.colab.patches import cv2_imshow

test_dir = '/content/test_image/test.jpg'
img = cv2.imread(test_dir)
dst = cv2.resize(img, dsize=(224, 224), interpolation=cv2.INTER_AREA)
cv2_imshow(dst)
sample_square = np.array(dst)
pred = model.predict(tf.expand_dims(sample_square, 0))
pred = pred[0]
print(pred)

cat = round(pred[0],3)
dog = round(pred[1],3)

print("cat : ", cat)
print("dog : ", dog)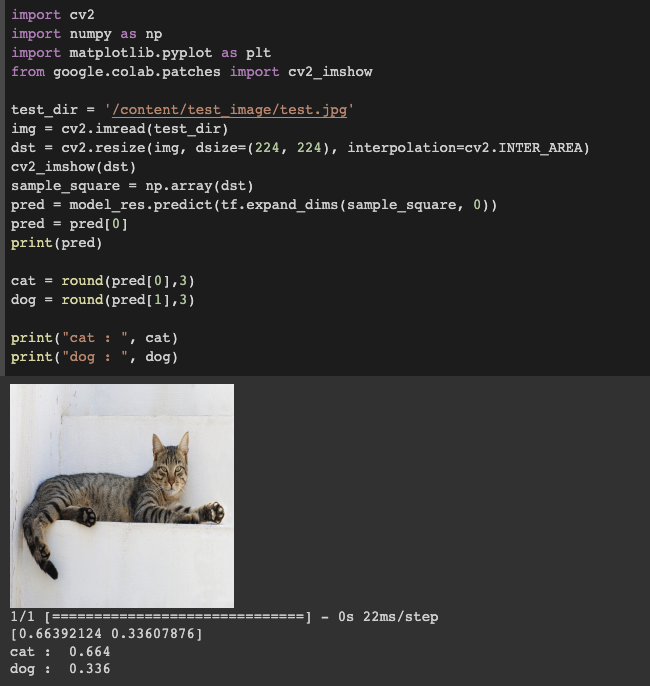
'Python' 카테고리의 다른 글
| [Python] pymysql 라이브러리로 MariaDB 사용하기 (0) | 2023.04.24 |
|---|---|
| [Python] Python으로 막대 그래프 그리기 (0) | 2023.04.09 |
| [Python] venv로 가상 환경 사용하기 (0) | 2023.02.26 |
| [Python] Tensorflow 로 데이터셋 증강하기 (0) | 2023.02.21 |
| [Python] decimal 모듈을 사용해서 부동소수점 오차 해결하기 (0) | 2023.02.17 |


