이전 게시글 '[PHP] 게시판 목록 화면 만들기' 글의 다음 글입니다.
이전글을 먼저 보고와주세요. (https://stickode.tistory.com/465)
오늘은 섬머노트를 사용해서 게시글 작성화면을 만들어보도록 하겠습니다.
섬머노트는 WYSIWYG 편집기를 만들 수 있도록 도와주는 자바스크립트 라이브러리입니다.
라이센스는 MIT 로 사용하시는데 크게 문제 없어 보입니다.
https://github.com/summernote/summernote
GitHub - summernote/summernote: Super simple WYSIWYG editor
Super simple WYSIWYG editor. Contribute to summernote/summernote development by creating an account on GitHub.
github.com
그럼 이제 시작해보도록 하겠습니다.
먼저 이전에 만들어두었던 index.php 화면에서 글쓰기 버튼을 누르면 글작성 화면으로 이동하도록 만들어주세요.
index.php
//기존
//<button>글쓰기</button>

변경
<button onclick="location.href='/newpost.php'">글쓰기</button>
그리고 서버 루트 폴더에 newpost.php 파일을 만들어주세요.
newpost.php
<!DOCTYPE html>
<html lang="en">

<head>
    <meta charset="UTF-8">
    <title>글쓰기</title>
    <!-- include libraries(jQuery, bootstrap) -->
    <link href="http://netdna.bootstrapcdn.com/bootstrap/3.3.5/css/bootstrap.css" rel="stylesheet">
    <script src="http://cdnjs.cloudflare.com/ajax/libs/jquery/3.2.1/jquery.js"></script>
    <script src="http://netdna.bootstrapcdn.com/bootstrap/3.3.5/js/bootstrap.js"></script>

    <!-- include summernote css/js-->
    <link href="http://cdnjs.cloudflare.com/ajax/libs/summernote/0.8.8/summernote.css" rel="stylesheet">
    <script src="http://cdnjs.cloudflare.com/ajax/libs/summernote/0.8.8/summernote.js"></script>

    <style>
    body {
        padding: 1rem;
    }

    h1 {
        text-align: center;
    }

    button {
        float: right;
    }

    #userInfoContainer {
        display: flex;
        justify-content: flex-end;
        gap: 1rem;
    }

    #inputTitle {
        width: 100%;
        font-size: xx-large;
    }
    </style>

</head>

<body>

    <h1>게시글 작성</h1>
    <div id="userInfoContainer">
        <div>
            <label for="inputNickname">
                닉네임 :
            </label>
            <input id="inputNickname" />
        </div>
        <div>
            <label for="inputPassword">
                비밀번호 :
            </label>
            <input id="inputPassword" type='password' />
        </div>
    </div>
    <input id="inputTitle" placeholder="제목을 작성해주세요" />
    <div id="summernote"></div>
    <button>완료</button>


    <script>
    // 메인화면 페이지 로드 함수
    $(document).ready(function() {
        $('#summernote').summernote({
            placeholder: '내용을 작성하세요',
            height: 400,
            maxHeight: 400
        });
    });
    </script>
</body>

</html>
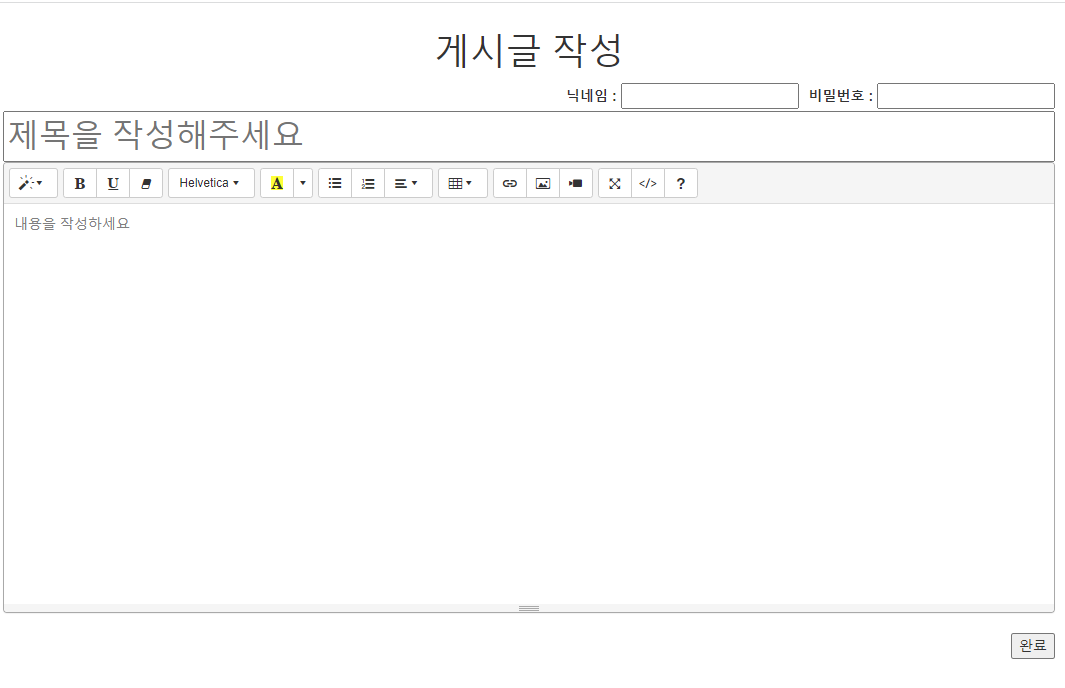
내용을 붙여넣으신 후 nexpost.php 를 요청하시면 이렇게 보이실 거예요.

다음으로 우측하단에 완료 버튼을 누르면 입력받은 내용을 디비에 등록하는 코드를 작성해보도록 하겠습니다.
newpost.php
<!DOCTYPE html>
<html lang="en">

<head>
    <meta charset="UTF-8">
    <title>글쓰기</title>
    <!-- include libraries(jQuery, bootstrap) -->
    <link href="http://netdna.bootstrapcdn.com/bootstrap/3.3.5/css/bootstrap.css" rel="stylesheet">
    <script src="http://cdnjs.cloudflare.com/ajax/libs/jquery/3.2.1/jquery.js"></script>
    <script src="http://netdna.bootstrapcdn.com/bootstrap/3.3.5/js/bootstrap.js"></script>

    <!-- include summernote css/js-->
    <link href="http://cdnjs.cloudflare.com/ajax/libs/summernote/0.8.8/summernote.css" rel="stylesheet">
    <script src="http://cdnjs.cloudflare.com/ajax/libs/summernote/0.8.8/summernote.js"></script>

    <style>
    body {
        padding: 1rem;
    }

    h1 {
        text-align: center;
    }

    button {
        float: right;
    }

    #userInfoContainer {
        display: flex;
        justify-content: flex-end;
        gap: 1rem;
    }

    #inputTitle {
        width: 100%;
        font-size: xx-large;
    }
    </style>

</head>

<body>

    <h1>게시글 작성</h1>
    <div id="userInfoContainer">
        <div>
            <label for="inputNickname">
                닉네임 :
            </label>
            <input id="inputNickname" />
        </div>
        <div>
            <label for="inputPassword">
                비밀번호 :
            </label>
            <input id="inputPassword" type='password' />
        </div>
    </div>
    <input id="inputTitle" placeholder="제목을 작성해주세요" />
    <div id="summernote"></div>
    <button onclick="summit()">완료</button>


    <script>
    // 메인화면 페이지 로드 함수
    $(document).ready(function() {
        $('#summernote').summernote({
            placeholder: '내용을 작성하세요',
            height: 400,
            maxHeight: 400
        });
    });

    // summit 함수 만들기
    function summit() {

        const button = event.srcElement;
        button.disabled = true;

        // nickname, password, content를 가지고와서 formdata 로 전송
        const nickname = document.getElementById('inputNickname').value;
        const password = document.getElementById('inputPassword').value;
        const title = document.getElementById('inputTitle').value;
        const content = $('#summernote').summernote('code');

        const formData = new FormData;
        formData.append("nickname", nickname);
        formData.append("password", password);
        formData.append("title", title);
        formData.append("content", content);
        console.log(content);

        const httpRequest = new XMLHttpRequest();
        httpRequest.onreadystatechange = () => {
            if (httpRequest.readyState === XMLHttpRequest.DONE) {
                if (httpRequest.status === 200) {
                    console.log(httpRequest.response);
                    location.href = "/index.php";
                } else {
                    alert("게시물 등록중 오류가 발생했습니다.");
                    button.disabled = false;
                }
            }
        }
        httpRequest.open('post', '/summitPost.php', true);
        httpRequest.send(formData);

    }
    </script>
</body>

</html>
변경된 부분은 button 에 onclick 이벤트를 summit()과 연결해주었고 summit() 을 정의했습니다.
다음으로 서버에서 받아서 저장하는 코드를 작성해보도록 하겠습니다.
summitPost.php 파일을 생성해주세요.
<?php

$nickname = $_POST['nickname'];
// 비밀번호 암호화
$password = password_hash($_POST['password'], PASSWORD_DEFAULT);
$title = $_POST['title'];
$content = $_POST['content'];

// 비밀번호 hash 후 길이 60( 궁금하면 echo 찍어보면 됨 )
$length = strlen($password);

include("../db.php");
$stmt = $mysqli->prepare("insert into board(nickname,password,title,content) values(?,?,?,?)");
// 닉네임(s), 컨텐츠(s), 패스워드(s) 를 각각 입력(sql 인젝션 방어 코드)
$stmt->bind_param("ssss", $nickname, $password, $title, $content);
$stmt->execute();
$stmt->close();

echo "성공";
newpost.php 파일 summit()에서 보낸 formData 를 받아서 DB에 저장하도록 만들었습니다.
다음으로 include("../db.php"); 코드가 작동할 수 있게 db.php 파일을 만들어야합니다.
서버의 루트 ( 우분투에서 apm 자동 설치를 했다면 /var/www/html ) 에서 상위 폴더(/var/www)
에 db.php 파일을 생성해주시면 됩니다.
db.php
<?php
// mysqli_connect 인자값 ( DB 접속 주소, DB 접속 유저명, 유저 비밀번호, 디비명 )

$mysqli = new mysqli("localhost", "root", "1234", "main");
이렇게 하는 이유는 db 정보를 한번 더 감추기 위해서 입니다.
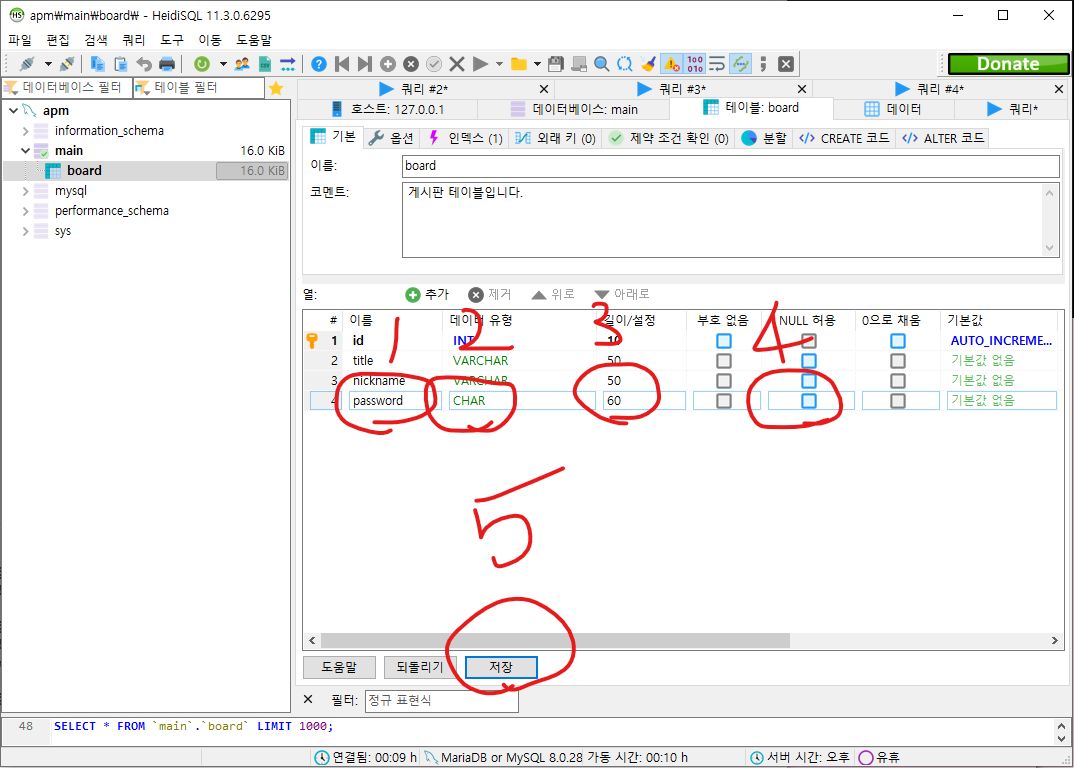
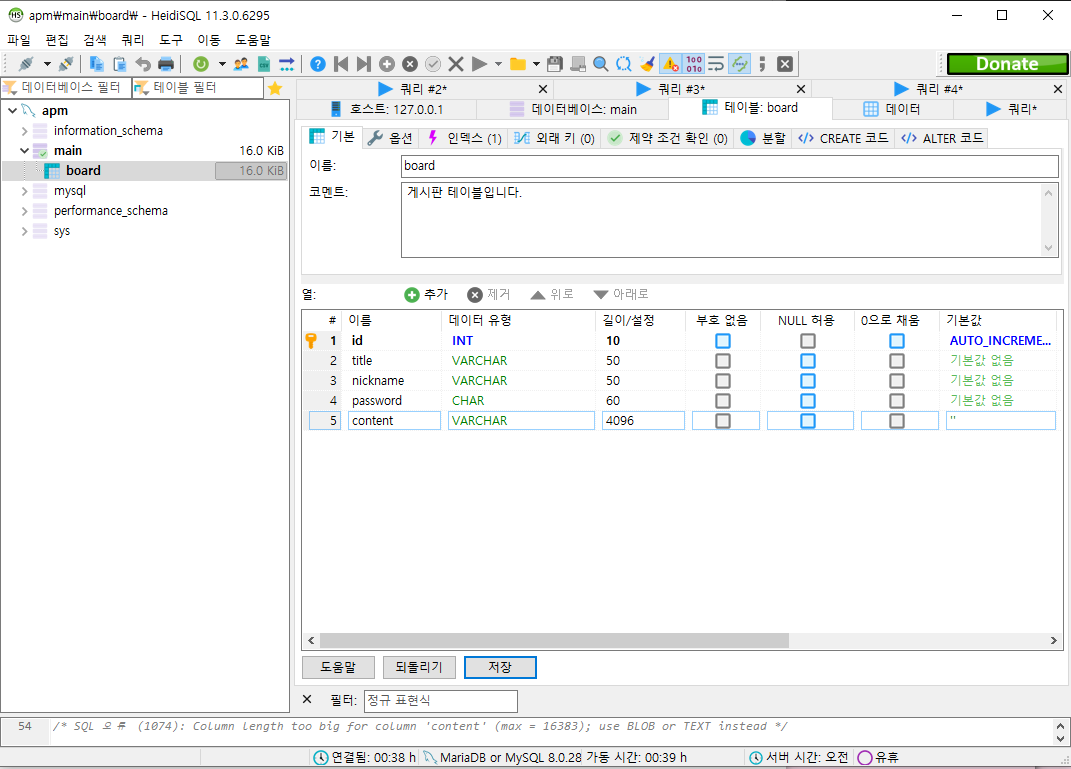
다음으로 DB 에 password 와 content 가 들어갈 칼럼을 생성하도록 하겠습니다.


password 는 위에 보이는 번호 순서대로 진행하시면 됩니다.
index.php 에서 글쓰기 버튼 클릭후 게시물 등록까지 진행해보시면 됩니다.
결과 )
'PHP' 카테고리의 다른 글
| [PHP] Session 을 이용해서 로그인정보 가져오기 (0) | 2022.06.15 |
|---|---|
| [PHP] 섬머노트(Summernote) 이미지, 영상 등록 (0) | 2022.05.26 |
| [PHP] 게시판 목록 화면 만들기 (0) | 2022.05.22 |
| [PHP] 확장자 없는 파일명 추출하기 (0) | 2022.04.04 |
| [PHP] 정규식으로 파일 확장자 추출하기 (0) | 2022.03.23 |

