바인드 서비스를 사용해서 데이터를 받아보겠습니다.
하단 스틱코드 링크에서 즐겨찾기 후 사용할 수 있습니다.
https://stickode.com/detail.html?no=2759
https://stickode.com/detail.html?no=2759
stickode.com
바인드서비스를 만들어 보기전에 먼저 서비스가 무엇인지와 서비스의 종류에 대해서 알아보겠습니다.
서비스는 무엇일까요? 화면없이 백그라운드에서 실행되는 하나의 단위를 서비스라 부릅니다.
서비스가 시작되면 이를 시작한 구성요소와 독립적인 수명주기를 가지게 됩니다.
서비스에는 세가지 유형이 있습니다.
포그라운드 서비스
포그라운드 서비스는 사용자에게 잘 보이는 몇몇 작업을 수행합니다. 예를 들어 오디오 앱이라면 오디오 트랙을 재생할때 포그라운드 서비스를 사용합니다. 포그라운드 서비스는 알림을 표시해야합니다. 포그라운드 서비스는 사용자가 앱과 상호작용을 하지 않을때에도 계속 실행됩니다.
백그라운드 서비스
백그라운드 서비스는 사용자에게 직접 보이지 않는 작업을 수행합니다. 어느 앱이 저장소를 압축하는데 서비스를 사용했다면 이것은 대게 백그라운드 서비스입니다.
바인드 서비스
바인드는 묶다, 제본하다라는 뜻으로, 바인드 서비스란 구성요소가 서로 상호작용하게 하며, 결과를 받을 수도 있습니다. 바인딘됭 서비스는 클라이언트 - 서버 인터페이스를 제공합니다. 여러개의 구성요소가 한꺼번에 바인딩될 수 있지만, 바인딩이 해제되면 해당서비스는 소멸됩니다.
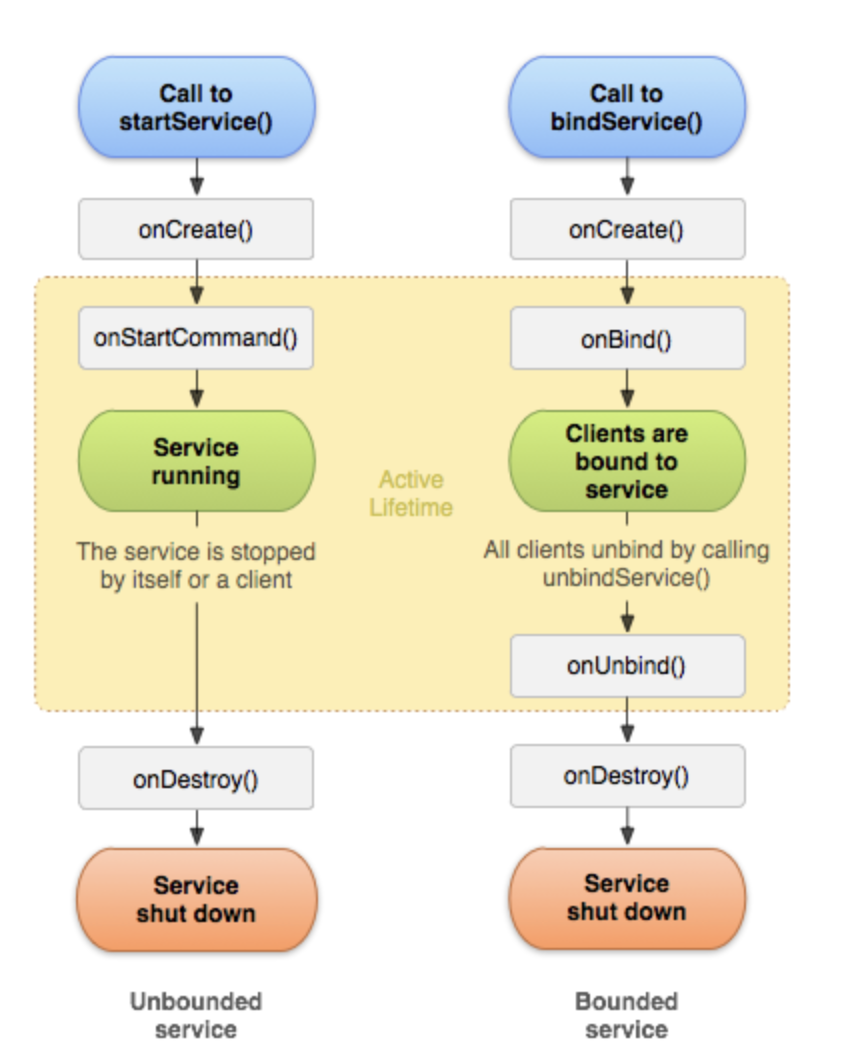
바인딩된 서비스는 bindService()를 호출하여 애플리케이션 구성 요소를 서비스에 바인딩하고 오래 유지되는 연결을 설정하는 것입니다. 일반적으로는 startService()를 호출하더라도 구성 요소가 서비스를 시작하도록 허용하지 않습니다.
액티비티와 애플리케이션의 다른 구성 요소에서 서비스와 상호작용하기를 원하는 경우 바인딩된 서비스를 생성해야 합니다. 아니면 애플리케이션의 기능 몇 가지를 프로세스 간 통신(IPC)을 통해 다른 애플리케이션에 노출하고자 하는 경우에도 좋습니다.
바인딩된 서비스를 생성하려면 onBind() 콜백 메서드를 구현하여 서비스와의 통신을 위한 인터페이스를 정의하는 IBinder를 반환하도록 해야 합니다. 그러면 다른 애플리케이션 구성 요소가 bindService()를 호출하여 해당 인터페이스를 검색하고, 서비스에 있는 메서드를 호출하기 시작할 수 있습니다. 서비스는 자신에게 바인딩된 애플리케이션 구성 요소에 도움이 되기 위해서만 존재하는 것이므로, 서비스에 바인딩된 구성 요소가 없으면 시스템이 이를 소멸시킵니다. 바인딩된 서비스는 서비스를 onStartCommand()를 통해 시작했을 때와 같은 방식으로 중단하지 않아도 됩니다.
바인딩된 서비스를 생성하려면 클라이언트가 서비스와 통신할 수 있는 방법을 나타내는 인터페이스를 정의해야 합니다. 서비스와 클라이언트 사이에서 쓰이는 이 인터페이스는 반드시 IBinder의 구현이어야 하며 이를 서비스가 onBind() 콜백 메서드에서 반환해야 합니다. 클라이언트가 IBinder를 수신하면 해당 인터페이스를 통해 서비스와 상호작용을 시작할 수 있습니다.
여러 클라이언트가 서비스에 한꺼번에 바인딩될 수 있습니다. 클라이언트가 서비스와의 상호작용을 완료하면 이는 unbindService()를 호출하여 바인딩을 해제합니다. 서비스에 바인딩된 클라이언트가 하나도 없으면 시스템이 해당 서비스를 소멸시킵니다.
https://developer.android.com/guide/components/services?hl=ko#CreatingBoundService
서비스 개요 | Android 개발자 | Android Developers
서비스 개요 Service는 백그라운드에서 오래 실행되는 작업을 수행할 수 있는 애플리케이션 구성 요소이며 사용자 인터페이스를 제공하지 않습니다. 다른 애플리케이션 구성 요소가 서비스를 시
developer.android.com
동영상 서비스가 종료되어 해당 콘텐츠를 재생할 수 없습니다.
어떻게 진행할지 동영상을 미리 보겠습니다.
서비스 시작 버튼을 누르기전에, 서비스로부터 데이터 확인 하기 버튼을 누르면 -> 데이터를 확인할수 없다는 토스트가 생성
서비스 시작 버튼을 누르고, 서비스로부터 데이터 확인 하기 버튼을 누르면 -> 임의의 숫자데이터가 담긴 토스트 생성
https://bitsoul.tistory.com/149 예제 출처
진행순서
1. 매니페스트에 서비스를 등록한다.
2.액티비티를 준비한다. xml
3. 서비스를 만든다.
4.액티비티에서 서비스를 시작하고, 서비스로 부터 데이터를 전달받는다.
- 메니페스트에 서비스를 등록합니다.
<application
    android:allowBackup="true"
    android:icon="@mipmap/ic_launcher"
    android:label="@string/app_name"
    android:supportsRtl="true"
    android:theme="@style/AppTheme">
    <activity android:name=".Main2Activity">
        <intent-filter>
            <action android:name="android.intent.action.MAIN" />

            <category android:name="android.intent.category.LAUNCHER" />
        </intent-filter>
    </activity>
    <service android:name="MyService"></service>
</application>
- 액티비티 xml 를 작성합니다.
서비스시작 버튼, 종료버튼, 바인드 서비스로 부터 데이터를 받아오는 버튼 3개를 생성합니다.
<RelativeLayout xmlns:android="http://schemas.android.com/apk/res/android"
    xmlns:tools="http://schemas.android.com/tools"
    android:layout_width="match_parent"
    android:layout_height="match_parent"
>

    <Button
        android:id="@+id/button1"
        android:layout_width="wrap_content"
        android:layout_height="wrap_content"
        android:layout_below="@+id/textView1"
        android:layout_alignParentLeft="true"
        android:layout_marginLeft="153dp"
        android:layout_marginTop="45dp"
        android:text="서비스시작" />

    <TextView
        android:id="@+id/textView1"
        android:layout_width="wrap_content"
        android:layout_height="wrap_content"
        android:layout_alignParentTop="true"
        android:layout_centerHorizontal="true"
        android:layout_marginTop="34dp"
        android:text="서비스로 부터  데이터 전달 받기"
        android:textAppearance="?android:attr/textAppearanceLarge" />

    <Button
        android:id="@+id/button2"
        android:layout_width="wrap_content"
        android:layout_height="wrap_content"
        android:layout_alignLeft="@+id/button1"
        android:layout_below="@+id/button1"
        android:layout_marginTop="15dp"
        android:text="서비스종료" />

    <Button
        android:id="@+id/button3"
        android:layout_width="wrap_content"
        android:layout_height="wrap_content"
        android:layout_below="@+id/button2"
        android:layout_alignLeft="@+id/button2"
        android:layout_marginLeft="-61dp"
        android:layout_marginTop="27dp"
        android:text="서비스로부터 데이터 확인하기" />

</RelativeLayout>
Myservice.java - 서비스 클래스를 만듭니다.
외부로 데이터를 전달하려면 바인더를 사용해야합니다.
IBinder는 액티비티에서 bindService()를 실행하면 호출이 됩니다. 리턴한 IBinder객체는 서비스와 클라이언트 사이의 인터페이스를 정의하고, 서비스 객체를 리턴해줍니다. 클라이언트가 IBinder를 받으면 이 인터페이스를 통해 주고 받는 것이 가능해집니다.
package com.example.myapplication.Chat;

import android.app.Service;
import android.content.Intent;
import android.os.Binder;
import android.os.IBinder;

import java.util.Random;

public class MyService extends Service {
    // 외부로 데이터를 전달하려면 바인더 사용

    // Binder 객체는 IBinder 인터페이스 상속구현 객체입니다
    //public class Binder extends Object implements IBinder

    IBinder mBinder = new MyBinder();

    class MyBinder extends Binder {
        MyService getService() { // 서비스 객체를 리턴
            return MyService.this;
        }
    }

    @Override
    public IBinder onBind(Intent intent) {
        // 액티비티에서 bindService() 를 실행하면 호출됨
        // 리턴한 IBinder 객체는 서비스와 클라이언트 사이의 인터페이스 정의한다
        return mBinder; // 서비스 객체를 리턴
    }

    int getRan() { // 임의 랜덤값을 리턴하는 메서드
        return new Random().nextInt();
    }
    @Override
    public void onCreate() {
        super.onCreate();
    }
    public int onStartCommand(Intent intent, int flags, int startId) {
        return super.onStartCommand(intent, flags, startId);
    }
    @Override
    public void onDestroy() {
        super.onDestroy();
    }
}
Main2Activity 메인액티비티에서 서비스를 실행하고, 데이터를 받아와 토스트를 띄웁니다.
서비스 시작하기 버튼을 눌러야만 서비스가 시작되며, 이버튼을 누르기전에는 서비스가 시작되지 않기 때문에, 데이터를 전달 받을 수 없습니다. 서비스 시작하기 버튼을 누르고 나서야 바인드 서비스로 부터 데이터를 전달 받을 수 있습니다.
package com.example.myapplication.Chat;

import android.content.ComponentName;
import android.content.Context;
import android.content.Intent;
import android.content.ServiceConnection;
import android.os.Bundle;
import android.os.IBinder;
import android.view.View;
import android.widget.Button;
import android.widget.Toast;

import androidx.appcompat.app.AppCompatActivity;

import com.example.myapplication.R;

public class Main2Activity extends AppCompatActivity {
    MyService ms; // 서비스 객체
    boolean isService = false; // 서비스 중인 확인용

    ServiceConnection conn = new ServiceConnection() {
        public void onServiceConnected(ComponentName name,
                                       IBinder service) {
// 서비스와 연결되었을 때 호출되는 메서드
// 서비스 객체를 전역변수로 저장
            MyService.MyBinder mb = (MyService.MyBinder) service;
            ms = mb.getService(); // 서비스가 제공하는 메소드 호출하여
// 서비스쪽 객체를 전달받을수 있음
            isService = true;// 서비스가 실행중이면 true
        }
        public void onServiceDisconnected(ComponentName name) {
// 서비스와 연결이 끊겼을 때 호출되는 메서드
            isService = false;
        }
    };

    @Override
    protected void onCreate(Bundle savedInstanceState) {
        super.onCreate(savedInstanceState);
        setContentView(R.layout.activity_main6);
// 데이터를 전달할 수 있는 서비스 사용하기
// 1. 다음 Service (*.java)를 작성한다
// 2. Service 를 등록한다 AndroidManifest.xml
// 3. Service 를 시작한다

        Button b1 = (Button) findViewById(R.id.button1);// 서비스시작 버튼
        Button b2 = (Button) findViewById(R.id.button2);// 서비스 종료 버튼
        Button b3 = (Button) findViewById(R.id.button3);// 데이터받기 버튼

        b1.setOnClickListener(new View.OnClickListener() {
            public void onClick(View v) { // 서비스 시작
                Intent intent = new Intent(
                        Main2Activity.this, // 현재 화면
                        MyService.class); // 다음넘어갈 컴퍼넌트

                bindService(intent, // intent 객체
                        conn, // 서비스와 연결에 대한 정의
                        Context.BIND_AUTO_CREATE);
            }
        });
        b2.setOnClickListener(new View.OnClickListener() {
            public void onClick(View v) { // 서비스 종료

                unbindService(conn); // 서비스 종료
            }
        });
        b3.setOnClickListener(new View.OnClickListener() {
            public void onClick(View v) {//서비스데이터확인
                if (!isService) { // 서비스가 실행중이아니라면
                    Toast.makeText(getApplicationContext(),
                            "서비스중이 아닙니다, 데이터받을수 없음",
                            Toast.LENGTH_LONG).show();
                    return;
                }
                int num = ms.getRan();// 서비스쪽 메소드로 값 전달 받아 호출받음
                Toast.makeText(getApplicationContext(),
                        "받아온 데이터 : " + num,
                        Toast.LENGTH_LONG).show();
            }
        });
    } // end of onCreate
} // end of class
https://stickode.com/detail.html?no=2759
https://stickode.com/detail.html?no=2759
stickode.com
스틱코드를 활용해보세요~
'안드로이드 자바' 카테고리의 다른 글
| [JAVA][Android] Flexbox Layout 사용해보기 (0) | 2022.02.06 |
|---|---|
| [JAVA][Android]사라지는 AppBar 구현하기 (0) | 2022.02.05 |
| [JAVA][Android] 원형 그래프 만들기 (0) | 2022.01.31 |
| [JAVA][Android] Volley+를 이용해서 이미지 파일 값을 보내고 응답받기 (4) | 2022.01.29 |
| [Java][Android] MPAndroidChart (0) | 2022.01.26 |

