안녕하세요.
시간을 입력하는 커스텀 다이얼로그를 빠르게 만드는 방법을 공유하겠습니다!
이번에는 한번 만들어본 커스텀 다이얼로그를 필요할 때마다 그때그때 만드는 것보다
스틱 코드에 등록해서 필요하면 불러오기 기능으로 빠르게 만드는 방법입니다.
사전 준비 사항
1. 스틱코드 회원가입
(https://stickode.com/signup.html)
2. 안드로이드 스튜디오에 스틱 코드 설치 및 로그인
(https://stickode.com/howto.html#jetbrains_installation)
1. 스틱코드에 파일 업로드 하기


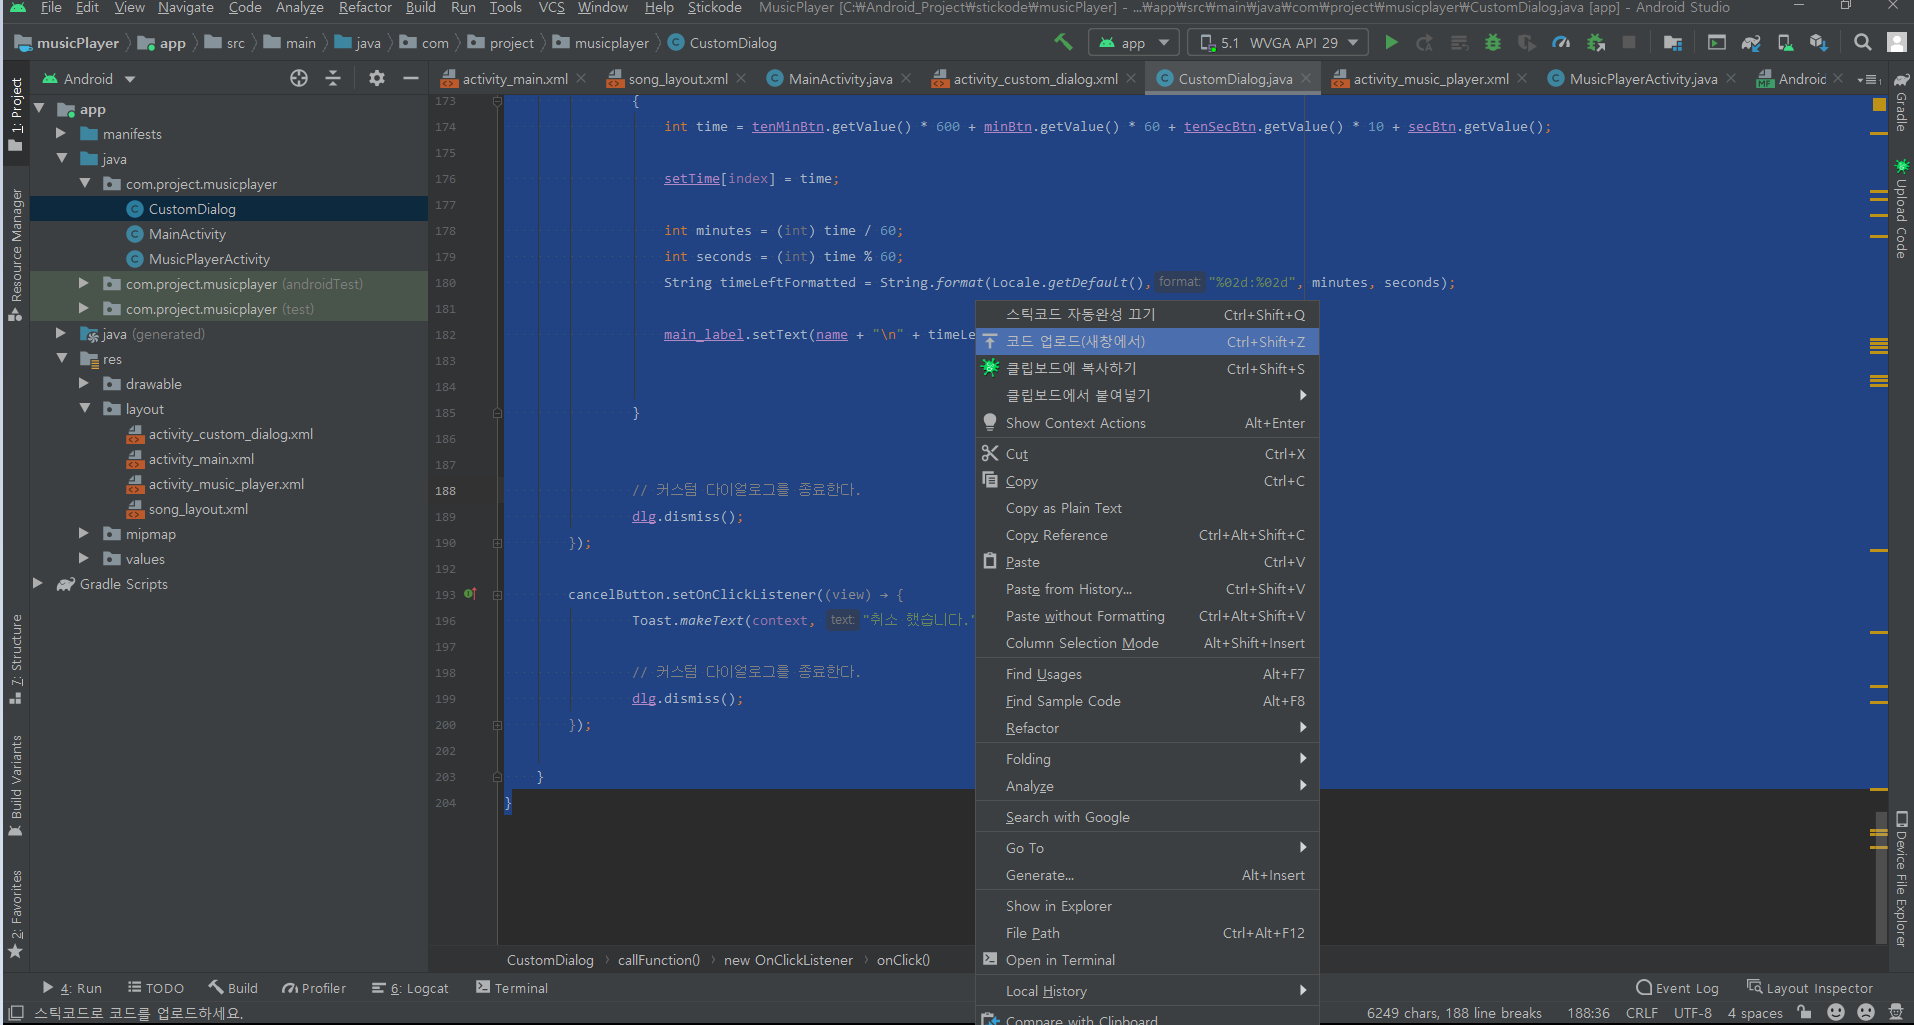
업로드할 코드를 드래그한 후 오른쪽 마우스 - 코드 업로드(새창에서) 클릭
언어, 코드이름, 태그를 입력한 후 업로드 버튼 클릭
위와 같은 방법으로 커스텀 다이얼로그의 java 파일과 xml 파일을 업로드한다.

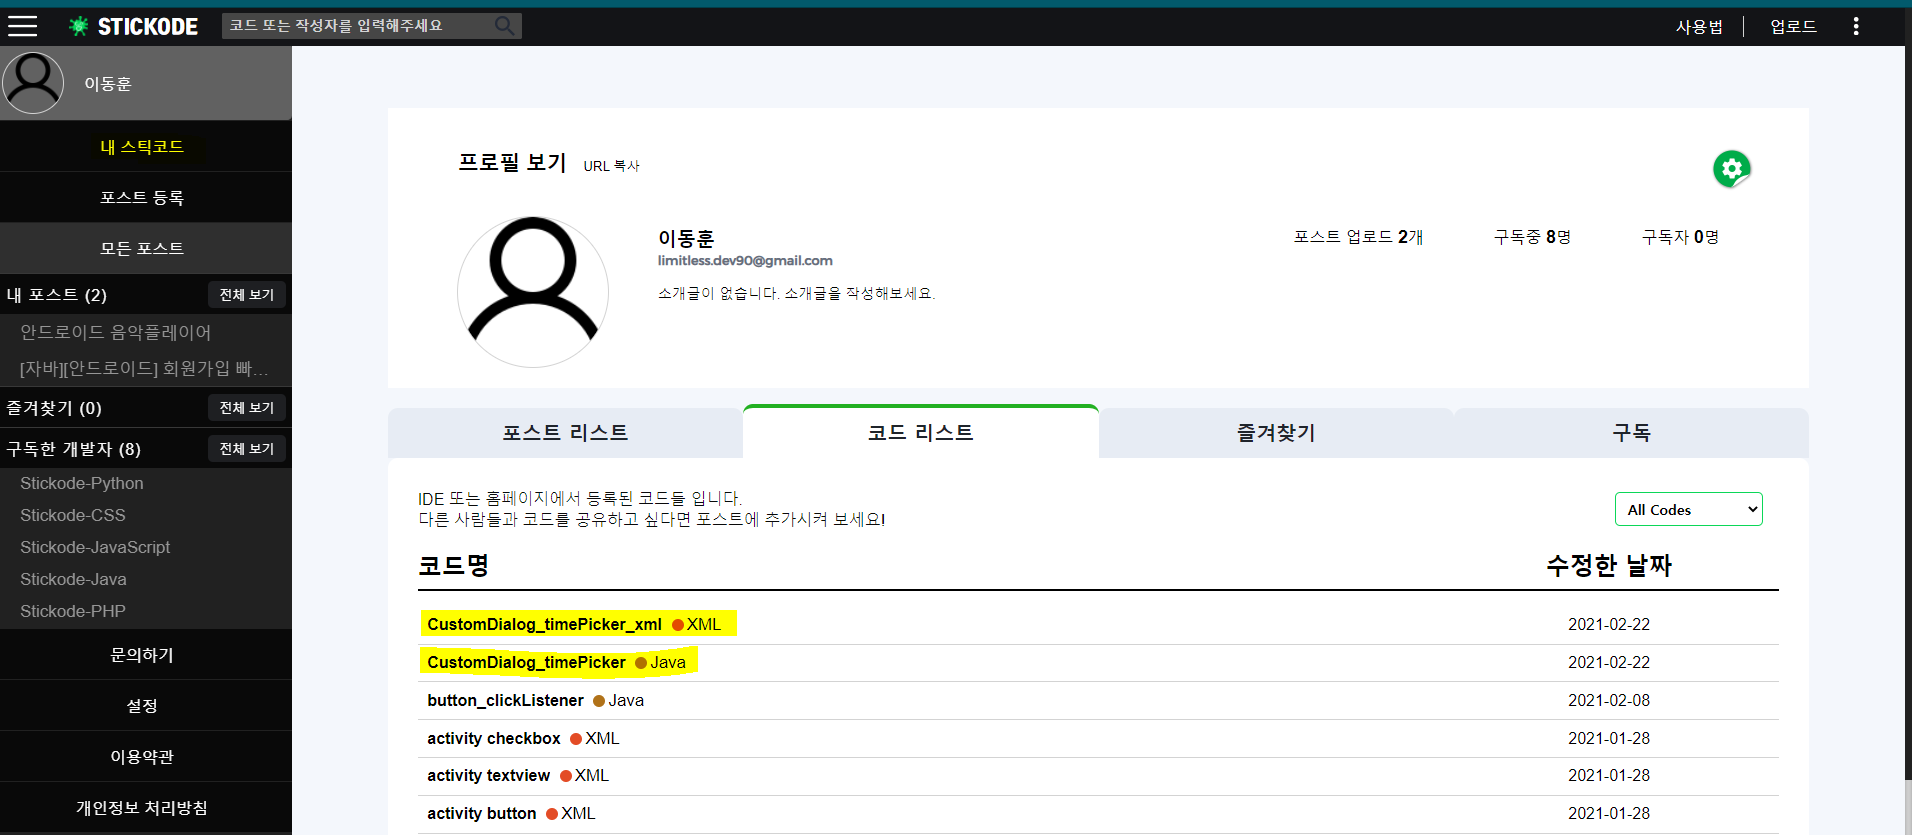
스틱 코드 로그인 후 좌측 사이드바 내 스틱코드 클릭
코드 리스트에 보면 업로드한 코드를 확인할 수 있습니다.
CustomDialog_timePicker
2. 커스텀 다이얼로그 불러오기


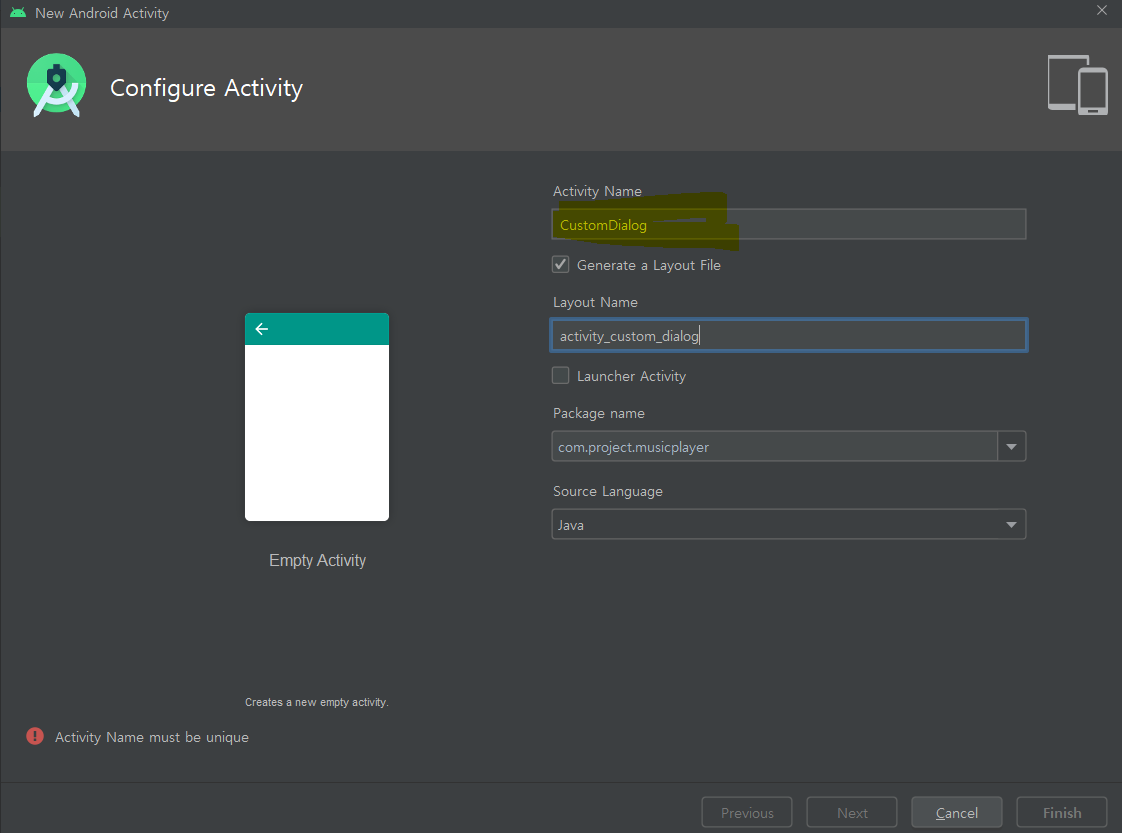
새로운 액티비티를 생성한다.

CustomDialog java 파일에서 java코드 불러오기

CustomDialog xml파일에서 xml 코드 불러오기
3. 메인 액티비티에 TextView를 만들어서 커스텀 다이얼로그 호출하기
//onCreate() 위에 추가
TextView customDig_tv;
public static int[] setTime = new int[]{10, 10, 10};  //준비, 운동, 휴식

//onCreate() 안에추가
customDig_tv = findViewById(R.id.customDigTv);

//커스텀다이얼로그 호출하는 클릭 리스너 셋팅
//기능: 다이얼로그를 메인 액티비티에 띄운다.
customDig_tv.setOnClickListener(new View.OnClickListener() {
     @Override
     public void onClick(View v) {
         // 커스텀 다이얼로그를 생성한다. 사용자가 만든 클래스이다.
         CustomDialog customDialog = new CustomDialog(MainActivity.this);

         // 커스텀 다이얼로그를 호출한다.
         // 커스텀 다이얼로그의 결과를 출력할 TextView를 매개변수로 같이 넘겨준다.
         customDialog.callFunction(customDig_tv, "준비", setTime);

         Log.v("readyText : ", Integer.toString(setTime[0]));
     }
 });
4. 전체 코드
CustomDialog.java
package com.project.musicplayer;

import android.app.Dialog;
import android.content.Context;
import android.view.View;
import android.view.Window;
import android.widget.Button;
import android.widget.LinearLayout;
import android.widget.NumberPicker;
import android.widget.TextView;
import android.widget.Toast;

import java.util.Locale;

public class CustomDialog   {

    private int index;
    private int[] setDetailTime;
    private Context context;
    private String timerName;

    private boolean bSetDetail = false; //해당 타이머가 SET 고급설정이 되어 있다면 true

    public CustomDialog()
    {}

    public CustomDialog(Context context) {
        this.context = context;
    }

    public CustomDialog(Context context, String name, int[] setTime, boolean setDetailYN)
    {
        this.context = context;
        this.timerName = name;
        this.setDetailTime = setTime;
        this.bSetDetail = setDetailYN;

    }

    // 호출할 다이얼로그 함수를 정의한다.
    public void callFunction(final TextView main_label, final String name, final int[] setTime) {

        // 커스텀 다이얼로그를 정의하기위해 Dialog클래스를 생성한다.
        final Dialog dlg = new Dialog(context);

        // 액티비티의 타이틀바를 숨긴다.
        dlg.requestWindowFeature(Window.FEATURE_NO_TITLE);

        // 커스텀 다이얼로그의 레이아웃을 설정한다.
        dlg.setContentView(R.layout.activity_custom_dialog);

        // 커스텀 다이얼로그를 노출한다.
        dlg.show();

        // 커스텀 다이얼로그의 각 위젯들을 정의한다.
        final NumberPicker tenMinBtn = (NumberPicker) dlg.findViewById(R.id.tenMinBtn);
        final NumberPicker minBtn = (NumberPicker) dlg.findViewById(R.id.MinBtn);
        final NumberPicker tenSecBtn = (NumberPicker) dlg.findViewById(R.id.tenSecBtn);
        final NumberPicker secBtn = (NumberPicker) dlg.findViewById(R.id.secBtn);
        final TextView colonTv = dlg.findViewById(R.id.colonTv);

        final LinearLayout numberPicLinear = dlg.findViewById(R.id.numberPicLinear);
        final TextView guideText = dlg.findViewById(R.id.guideText);

        final Button okButton = (Button) dlg.findViewById(R.id.okButton);
        final Button cancelButton = (Button) dlg.findViewById(R.id.cancelButton);
        final Button setDetailBtn = (Button) dlg.findViewById(R.id.setDetailBtn);

        if(name.equals("SET") || name.equals("CYCLE"))
        {
            colonTv.setVisibility(View.INVISIBLE);      //colonTv TextView 숨기기
            tenMinBtn.setVisibility(View.INVISIBLE);    //tenMinBtn NumberPicker 숨기기
            minBtn.setVisibility(View.INVISIBLE);       //minBtn NumberPicker 숨기기

            tenSecBtn.setVisibility(View.VISIBLE);    //tenSecBtn NumberPicker 보이기
            secBtn.setVisibility(View.VISIBLE);       //secBtn NumberPicker 보이기
            numberPicLinear.setVisibility(View.VISIBLE);  //NumberPicker Layout 보이기
            guideText.setVisibility(View.INVISIBLE);  //안내문구 안보이게

            tenSecBtn.setMinValue(0);
            tenSecBtn.setMaxValue(9);

            secBtn.setMinValue(0);
            secBtn.setMaxValue(9);

            //SET 다이얼로그면 고급설정 버튼 보이게 변경
            if(name.equals("SET"))
            {
                setDetailBtn.setVisibility(View.VISIBLE);

                //기존에 쉐어드에 저장된 SET 고급 설정이 있다면 실행
                if(bSetDetail)
                {
                    tenSecBtn.setVisibility(View.INVISIBLE);    //tenSecBtn NumberPicker 숨기기
                    secBtn.setVisibility(View.INVISIBLE);       //secBtn NumberPicker 숨기기
                    numberPicLinear.setVisibility(View.INVISIBLE);  //NumberPicker Layout 보이기

                    guideText.setVisibility(View.VISIBLE);      //SET 고급설정이 되어 있다면, 안내 문구 보이게

                }

            }

            //카스텀 다이얼로그 생성시 이름이 SET 이면 index = 0; 아니면(CYCLE) index = 1;
            index = name.equals("SET") ? 0 : 1;

            int counts = (int) setTime[index] % 10;
            int tenCounts = counts / 10;

            tenSecBtn.setValue(tenCounts);
            secBtn.setValue(counts);
        }
        else
        {
            tenMinBtn.setMinValue(0);
            tenMinBtn.setMaxValue(5);

            minBtn.setMinValue(0);
            minBtn.setMaxValue(9);

            tenSecBtn.setMinValue(0);
            tenSecBtn.setMaxValue(5);

            secBtn.setMinValue(0);
            secBtn.setMaxValue(9);

            if(name.equals("준비"))
            {
                index = 0;
            }
            else if(name.equals("운동"))
            {
                index = 1;
            }
            else if(name.equals("휴식"))
            {
                index = 2;
            }

            int minutes = (int) setTime[index] / 60;    //60으로 나눠진 값
            int tenMin = minutes / 10;                  //나눠진 값에서 10으로 나눠진 값 (10분 단위)
            int min = minutes % 10;                     //나눠진 값에서 10으로 나눈뒤 나머지 값 (1분 단위)

            int seconds = (int) setTime[index] % 60;    //60초로 나누고 나머지 값
            int tenSec = seconds / 10;                  //나머지 값에서 10으로 나눠진 값 (10초단위)
            int sec = seconds % 10;                     //나머지 값에서 10으로 나눈뒤 나머지 값 (1초단위)


            tenMinBtn.setValue(tenMin);
            minBtn.setValue(min);

            tenSecBtn.setValue(tenSec);
            secBtn.setValue(sec);
        }


        okButton.setOnClickListener(new View.OnClickListener() {
            @Override
            public void onClick(View view) {

                if(name.equals("SET") || name.equals("CYCLE"))
                {
                    int count = tenSecBtn.getValue() * 10 + secBtn.getValue();

                    setTime[index] = count;

                    main_label.setText( Integer.toString(count) + "\n" + name);


                }
                else    //준비, 운동, 휴식 일때
                {
                    int time = tenMinBtn.getValue() * 600 + minBtn.getValue() * 60 + tenSecBtn.getValue() * 10 + secBtn.getValue();

                    setTime[index] = time;

                    int minutes = (int) time / 60;
                    int seconds = (int) time % 60;
                    String timeLeftFormatted = String.format(Locale.getDefault(),"%02d:%02d", minutes, seconds);

                    main_label.setText(name + "\n" + timeLeftFormatted);


                }


                // 커스텀 다이얼로그를 종료한다.
                dlg.dismiss();
            }
        });

        cancelButton.setOnClickListener(new View.OnClickListener() {
            @Override
            public void onClick(View view) {
                Toast.makeText(context, "취소 했습니다.", Toast.LENGTH_SHORT).show();

                // 커스텀 다이얼로그를 종료한다.
                dlg.dismiss();
            }
        });

    }
}
activity_custom_dialog.xml
<?xml version="1.0" encoding="utf-8"?>
<LinearLayout xmlns:android="http://schemas.android.com/apk/res/android"
    xmlns:app="http://schemas.android.com/apk/res-auto"
    xmlns:tools="http://schemas.android.com/tools"
    android:layout_width="match_parent"
    android:layout_height="match_parent"
    android:background="#ffffff"
    android:orientation="vertical"
    tools:context=".CustomDialog">

    <LinearLayout
        android:layout_width="match_parent"
        android:layout_height="60dp"
        android:background="@color/colorAccent"
        android:orientation="horizontal">

        <TextView
            android:id="@+id/title"
            android:layout_width="0dp"
            android:layout_height="match_parent"
            android:layout_weight="1"
            android:gravity="center_vertical|center_horizontal"
            android:text="시간 입력"
            android:textColor="#ffffff"
            android:textSize="16dp" />

        <Button
            android:id="@+id/setDetailBtn"
            android:layout_marginLeft="26sp"
            android:layout_width="wrap_content"
            android:layout_height="match_parent"
            android:visibility="gone"
            android:text="고급"
            android:textColor="#000000" />

    </LinearLayout>


    <View
        android:layout_width="match_parent"
        android:layout_height="1dp"
        android:background="#000000" />

    <androidx.constraintlayout.widget.ConstraintLayout
        android:layout_width="match_parent"
        android:layout_height="wrap_content">

        <LinearLayout
            android:id="@+id/numberPicLinear"
            android:layout_width="match_parent"
            android:layout_height="match_parent"
            android:orientation="horizontal"
            app:layout_constraintBottom_toBottomOf="parent"
            app:layout_constraintEnd_toEndOf="parent"
            app:layout_constraintStart_toStartOf="parent"
            app:layout_constraintTop_toTopOf="parent">

            <NumberPicker
                android:id="@+id/tenMinBtn"
                android:layout_width="0sp"
                android:layout_height="wrap_content"
                android:layout_weight="1"
                android:descendantFocusability="blocksDescendants" />

            <NumberPicker
                android:id="@+id/MinBtn"
                android:layout_width="0sp"
                android:layout_height="wrap_content"
                android:layout_weight="1"
                android:descendantFocusability="blocksDescendants" />

            <TextView
                android:id="@+id/colonTv"
                android:layout_width="0sp"
                android:layout_height="match_parent"
                android:layout_weight="0.2"
                android:gravity="center_vertical|center_horizontal"
                android:text=":"
                android:textColor="#000000"
                android:textSize="40sp"
                android:textStyle="bold" />

            <NumberPicker
                android:id="@+id/tenSecBtn"
                android:layout_width="0sp"
                android:layout_height="wrap_content"
                android:layout_weight="1"
                android:descendantFocusability="blocksDescendants" />

            <NumberPicker
                android:id="@+id/secBtn"
                android:layout_width="0sp"
                android:layout_height="wrap_content"
                android:layout_weight="1"
                android:descendantFocusability="blocksDescendants" />
        </LinearLayout>

        <TextView
            android:id="@+id/guideText"
            android:layout_width="match_parent"
            android:layout_height="match_parent"
            android:gravity="center_horizontal|center_vertical"
            android:text="SET 기본 설정을 원하시면, 상단에 고급 버튼을 눌러\nSET 고급 설정을 해지해주세요."
            android:textColor="#000000"
            android:textSize="25sp"
            android:visibility="invisible"
            app:layout_constraintBottom_toBottomOf="parent"
            app:layout_constraintEnd_toEndOf="parent"
            app:layout_constraintStart_toStartOf="parent"
            app:layout_constraintTop_toTopOf="parent" />

    </androidx.constraintlayout.widget.ConstraintLayout>


    <View
        android:layout_width="match_parent"
        android:layout_height="1dp"
        android:background="#000000" />

    <LinearLayout
        android:layout_width="match_parent"
        android:layout_height="60dp"
        android:orientation="horizontal">

        <Button
            android:id="@+id/okButton"
            android:layout_width="match_parent"
            android:layout_height="60dp"
            android:layout_weight="1"
            android:background="#ffffff"
            android:gravity="center"
            android:text="확인"
            android:textColor="#000000"
            android:textSize="16dp" />

        <View
            android:layout_width="1dp"
            android:layout_height="match_parent"
            android:background="#000000" />

        <Button
            android:id="@+id/cancelButton"
            android:layout_width="match_parent"
            android:layout_height="60dp"
            android:layout_weight="1"
            android:background="#ffffff"
            android:gravity="center"
            android:text="취소"
            android:textColor="#000000"
            android:textSize="16dp" />
    </LinearLayout>

    <View
        android:layout_width="match_parent"
        android:layout_height="1dp"
        android:background="#000000" />
</LinearLayout>
지금까지 스틱 코드를 이용해서 자주 사용하는 커스텀 다이얼로그 코드를 업로드하고
불러와서 빠르게 구현하는 것을 해보았습니다.
스틱코드 코드 업로드, 불러오기 기능을 활용하면
다양한 방법으로 자주 사용하는 코드를 업로드해서 코딩 시간을 단축시켜줄 수 있을 것 같네요.
편리한 기능입니다.
'안드로이드 자바' 카테고리의 다른 글
| [Java][Android] Volley를 이용한 회원가입, 로그인(HTTP통신) (2) | 2021.03.26 |
|---|---|
| [JAVA][안드로이드] TelephonyManager를 이용한 mp3 플레이어 제어 빠르게 구현 하기 (0) | 2021.03.25 |
| [Java][Android] 안드로이드 스튜디오 - 폰트(글꼴) 일괄 적용하기 (0) | 2021.03.22 |
| [Kotlin][Android] WebView를 사용해서 웹 페이지 띄우기 (0) | 2021.03.21 |
| [Java][Android] 리사이클러뷰 검색 필터링 구현하기 (0) | 2021.03.20 |


