안녕하세요
오늘은 인터넷에 있는 이미지를 앱 화면에 띄어보겠습니다.
이를 위해 AsyncTask를 상속받는 방법으로 구현보겠습니다.
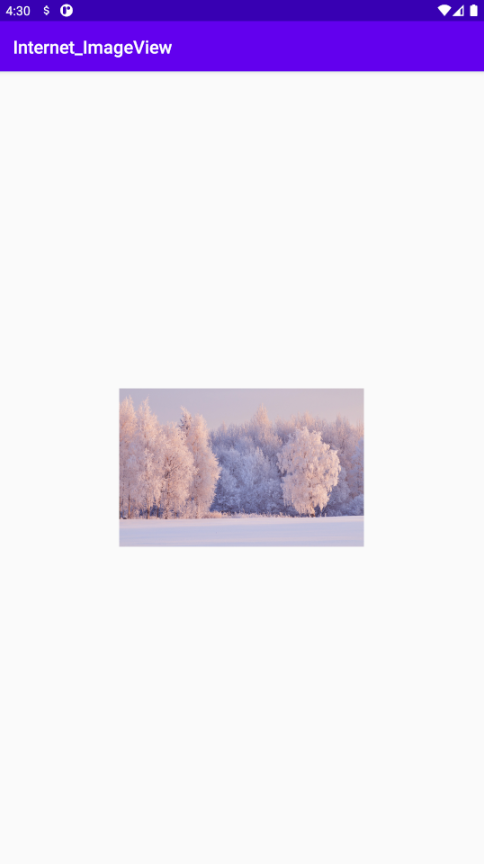
* 결과
먼저 아래 스틱코드 링크에서 즐겨찾기 추가를 해주세요
https://stickode.com/detail.html?no=2399
스틱코드
stickode.com
1. AsyncTask 란
AsyncTask는 직역하면 비동기 작업이라는 뜻이다.
동기방식은 설계가 매우 간단하고 직관적이지만 결과가 주어질 때까지 아무것도 못하고 대기해야 하는 단점이 있고,
비동기방식은 동기보다 복잡하지만 결과가 주어지는데 시간이 걸리더라도 그 시간 동안 다른 작업을 할 수 있으므로 자원을 효율적으로 사용할 수 있는 장점이 있습니다.
출처: https://private.tistory.com/24 [공부해서 남 주자]
2. AsyncTask 의 구성 요소
안드로이드에서는 UI를 메인스레드가 담당한다. 그래서 다른 스레드를 만들어서 그곳에서 작업한 이후 메인스레드에게 결과값을 넘겨준다.
이 과정에서 AsyncTask 클래스가 가지고 있는 5가지 메소드를 살펴 볼 필요가 있다.
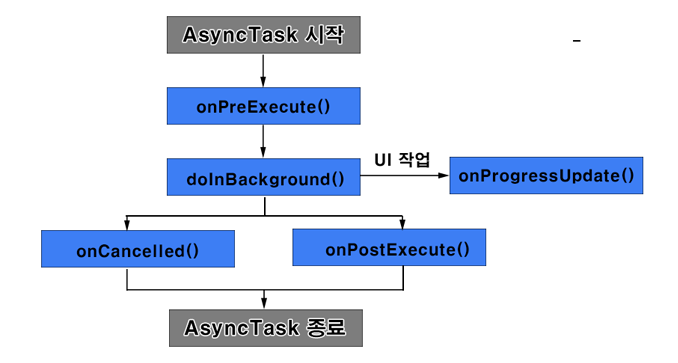
1) onPreExecute()
Background 작업 시작 전에 UI 작업을 진행 합니다.
2) doInBackground()
Background 작업을 진행 합니다.
3) onPostExecute()
Background 작업이 끝난 후 UI 작업을 진행 한다.
4) onPostExecute()
수행 종료 후 결과를 반환한다.
5) onCancelled()
스레드가 작업을 중단한다.
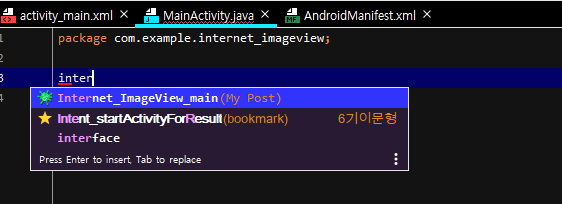
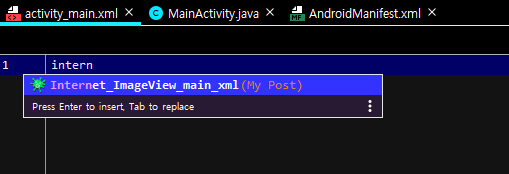
1. MainActivity.java
Internet_ImageView_main 이라는 태그를 입력하면 스틱코드 탭이 생성되어 원하는 코드를 한번에 불러 올 수 있습니다.
import android.graphics.Bitmap;
import android.graphics.BitmapFactory;
import android.os.AsyncTask;
import android.os.Bundle;
import android.widget.ImageView;
import androidx.appcompat.app.AppCompatActivity;
import java.io.IOException;
import java.net.MalformedURLException;
import java.net.URL;

public class MainActivity extends AppCompatActivity {

    ImageView iv_image;

    @Override
    protected void onCreate(Bundle savedInstanceState) {
        super.onCreate(savedInstanceState);
        setContentView(R.layout.activity_main);

        iv_image = findViewById(R.id.imageView1);

        new DownloadFilesTask().execute("https://www.shutterstock.com/ko/blog/wp-content/uploads/sites/17/2017/12/shutterstock_116222914.jpg?w=760&h=492");
    }

    private class DownloadFilesTask extends AsyncTask<String,Void, Bitmap> {
        @Override
        protected Bitmap doInBackground(String... strings) {
            Bitmap bmp = null;
            try {
                String img_url = strings[0]; //url of the image
                URL url = new URL(img_url);
                bmp = BitmapFactory.decodeStream(url.openConnection().getInputStream());
            } catch (MalformedURLException e) {
                e.printStackTrace();
            } catch (IOException e) {
                e.printStackTrace();
            }
            return bmp;
        }

        @Override
        protected void onPreExecute() {
            super.onPreExecute();
        }


        @Override
        protected void onPostExecute(Bitmap result) {
            // doInBackground 에서 받아온 total 값 사용 장소
            iv_image.setImageBitmap(result);
        }
    }
}
해당 코드의 " " 부분에서 원하는 url으로 변경 할 수 있습니다.
new DownloadFilesTask().execute("https://www.shutterstock.com/ko/blog/wp-content/uploads/sites/17/2017/12/shutterstock_116222914.jpg?w=760&h=492");2. activity_main.xml
<?xml version="1.0" encoding="utf-8"?>
<androidx.constraintlayout.widget.ConstraintLayout xmlns:android="http://schemas.android.com/apk/res/android"
    xmlns:app="http://schemas.android.com/apk/res-auto"
    xmlns:tools="http://schemas.android.com/tools"
    android:layout_width="match_parent"
    android:layout_height="match_parent"
    tools:context=".MainActivity">

    <ImageView
        android:id="@+id/imageView1"
        android:layout_width="272dp"
        android:layout_height="345dp"
        app:layout_constraintBottom_toBottomOf="parent"
        app:layout_constraintEnd_toEndOf="parent"
        app:layout_constraintStart_toStartOf="parent"
        app:layout_constraintTop_toTopOf="parent"
        tools:srcCompat="@tools:sample/avatars" />


</androidx.constraintlayout.widget.ConstraintLayout>
3. build.gradle
<uses-permission android:name="android.permission.INTERNET"/>'안드로이드 자바' 카테고리의 다른 글
| [JAVA][Android] AR core 객체를 삭제하는 법 (0) | 2021.09.08 |
|---|---|
| [JAVA][Android]안드로이드 스튜디오 QR코드 만들기 (2) | 2021.09.06 |
| [JAVA][Android] URI to STRING , STRING to URI 변환하기 (0) | 2021.08.31 |
| [JAVA][Android] Context 메뉴 만들기 (0) | 2021.08.30 |
| [JAVA][Android] SharedPreferences 데이터 저장 및 불러오기 (0) | 2021.08.28 |


