안드로이드 코틀린 로그인 / 회원가입
이번 예제에서는 아이디 중복확인이나 정규식 사용과 같은 과정은 생략하고 아주 간단한 회원가입 / 로그인 기능을 구현해볼 예정입니다.
저는 요즘 핫한 스틱코드를 작성해서 좀 더 빠르게 기능을 만들어 보았습니다. 각 코드블럭마다 스틱코드를 활용한 부분은 링크를 달아놓을테니 참고해주세요.
빌드 스크립트 설정
코틀린 안드로이드 익스텐션(이하 ‘익스텐션’)을 사용하려면 프로젝트에 기본적으로 코틀린 개발 환경 (코틀린 빌드 플러그인 적용 및 프로젝트 의존성에 코틀린 표준 라이브러리 추가)이 되어 있어야 합니다.
plugins {
    id 'kotlin-android-extensions'
}
로그인 / 회원가입 관련 XML 만들기
우선 로그인/회원가입에 필요한 간단한 XML을 만들었습니다. 중복확인이나 정규식 사용과 같은 과정은 생략했기 때문에 2개의 editText와 로그인, 가입하기 버튼으로만 구성된 로그인 화면을 만들어 보았습니다.
activity_main.xml
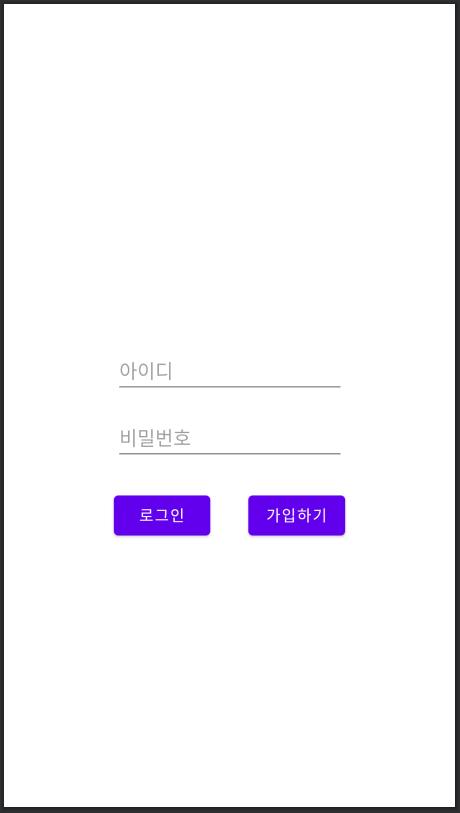
<?xml version="1.0" encoding="utf-8"?>
<androidx.constraintlayout.widget.ConstraintLayout xmlns:android="http://schemas.android.com/apk/res/android"
    xmlns:app="http://schemas.android.com/apk/res-auto"
    xmlns:tools="http://schemas.android.com/tools"
    android:layout_width="match_parent"
    android:layout_height="match_parent"
    tools:context=".MainActivity">

    <EditText
        android:id="@+id/edit_id"
        android:layout_width="wrap_content"
        android:layout_height="wrap_content"
        android:layout_marginTop="312dp"
        android:ems="10"
        android:hint="아이디"
        android:inputType="textPersonName"
        app:layout_constraintEnd_toEndOf="parent"
        app:layout_constraintHorizontal_bias="0.502"
        app:layout_constraintStart_toStartOf="parent"
        app:layout_constraintTop_toTopOf="parent" />

    <EditText
        android:id="@+id/edit_pw"
        android:layout_width="wrap_content"
        android:layout_height="wrap_content"
        android:layout_marginTop="16dp"
        android:ems="10"
        android:hint="비밀번호"
        android:inputType="textPassword"
        app:layout_constraintEnd_toEndOf="parent"
        app:layout_constraintHorizontal_bias="0.502"
        app:layout_constraintStart_toStartOf="parent"
        app:layout_constraintTop_toBottomOf="@+id/edit_id" />

    <Button
        android:id="@+id/btn_login"
        android:layout_width="wrap_content"
        android:layout_height="wrap_content"
        android:layout_marginStart="100dp"
        android:layout_marginLeft="100dp"
        android:layout_marginTop="24dp"
        android:text="로그인"
        app:layout_constraintStart_toStartOf="parent"
        app:layout_constraintTop_toBottomOf="@+id/edit_pw" />

    <Button
        android:id="@+id/btn_register"
        android:layout_width="wrap_content"
        android:layout_height="wrap_content"
        android:layout_marginTop="24dp"
        android:layout_marginEnd="100dp"
        android:layout_marginRight="100dp"
        android:text="회원가입"
        app:layout_constraintEnd_toEndOf="parent"
        app:layout_constraintTop_toBottomOf="@+id/edit_pw" />

</androidx.constraintlayout.widget.ConstraintLayout>
회원가입 화면 역시 editText 3개와 버튼 1개만 이용해서 간단하게 만들어 보았습니다.
activity_register.xml
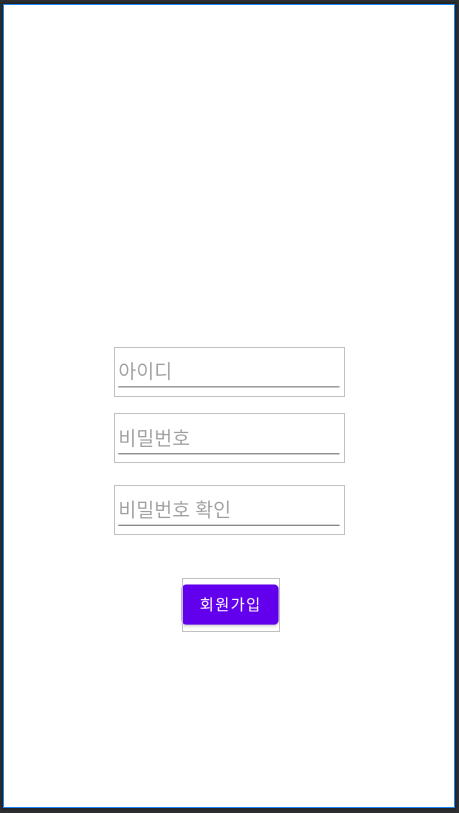
<?xml version="1.0" encoding="utf-8"?>
<androidx.constraintlayout.widget.ConstraintLayout xmlns:android="http://schemas.android.com/apk/res/android"
    xmlns:app="http://schemas.android.com/apk/res-auto"
    xmlns:tools="http://schemas.android.com/tools"
    android:layout_width="match_parent"
    android:layout_height="match_parent"
    tools:context=".Register">

    <EditText
        android:id="@+id/edit_id"
        android:layout_width="wrap_content"
        android:layout_height="wrap_content"
        android:layout_marginTop="312dp"
        android:ems="10"
        android:hint="아이디"
        android:inputType="textPersonName"
        app:layout_constraintEnd_toEndOf="parent"
        app:layout_constraintHorizontal_bias="0.502"
        app:layout_constraintStart_toStartOf="parent"
        app:layout_constraintTop_toTopOf="parent" />

    <EditText
        android:id="@+id/edit_pw"
        android:layout_width="wrap_content"
        android:layout_height="wrap_content"
        android:layout_marginTop="16dp"
        android:ems="10"
        android:hint="비밀번호"
        android:inputType="textPassword"
        app:layout_constraintEnd_toEndOf="parent"
        app:layout_constraintHorizontal_bias="0.502"
        app:layout_constraintStart_toStartOf="parent"
        app:layout_constraintTop_toBottomOf="@+id/edit_id" />

    <EditText
        android:id="@+id/edit_pw_re"
        android:layout_width="wrap_content"
        android:layout_height="wrap_content"
        android:layout_marginTop="20dp"
        android:ems="10"
        android:hint="비밀번호 확인"
        android:inputType="textPassword"
        app:layout_constraintEnd_toEndOf="parent"
        app:layout_constraintHorizontal_bias="0.502"
        app:layout_constraintStart_toStartOf="parent"
        app:layout_constraintTop_toBottomOf="@+id/edit_pw" />

    <Button
        android:id="@+id/btn_register"
        android:layout_width="wrap_content"
        android:layout_height="wrap_content"
        android:layout_marginTop="40dp"
        android:layout_marginEnd="160dp"
        android:layout_marginRight="160dp"
        android:text="회원가입"
        app:layout_constraintEnd_toEndOf="parent"
        app:layout_constraintTop_toBottomOf="@+id/edit_pw_re" />

</androidx.constraintlayout.widget.ConstraintLayout>
회원가입 화면의 코드부터 먼저 작성해보도록 하겠습니다.
Register.kt 전체 코드
class Register : AppCompatActivity() {

    val TAG: String = "Register"
    var isExistBlank = false
    var isPWSame = false

    override fun onCreate(savedInstanceState: Bundle?) {
        super.onCreate(savedInstanceState)
        setContentView(R.layout.activity_register)

        btn_register2.setOnClickListener {
            Log.d(TAG, "회원가입 버튼 클릭")

            val id = edit_id.text.toString()
            val pw = edit_pw.text.toString()
            val pw_re = edit_pw_re.text.toString()

            // 유저가 항목을 다 채우지 않았을 경우
            if(id.isEmpty() || pw.isEmpty() || pw_re.isEmpty()){
                isExistBlank = true
            }
            else{
                if(pw == pw_re){
                    isPWSame = true
                }
            }

            if(!isExistBlank && isPWSame){

                // 회원가입 성공 토스트 메세지 띄우기
                Toast.makeText(this, "회원가입 성공", Toast.LENGTH_SHORT).show()

                // 유저가 입력한 id, pw를 쉐어드에 저장한다.
                val sharedPreference = getSharedPreferences("file name", Context.MODE_PRIVATE)
                val editor = sharedPreference.edit()
                editor.putString("id", id)
                editor.putString("pw", pw)
                editor.apply()

                // 로그인 화면으로 이동
                val intent = Intent(this, MainActivity::class.java)
                startActivity(intent)

            }
            else{

                // 상태에 따라 다른 다이얼로그 띄워주기
                if(isExistBlank){   // 작성 안한 항목이 있을 경우
                    dialog("blank")
                }
                else if(!isPWSame){ // 입력한 비밀번호가 다를 경우
                    dialog("not same")
                }
            }

        }
    }

    // 회원가입 실패시 다이얼로그를 띄워주는 메소드
    fun dialog(type: String){
        val dialog = AlertDialog.Builder(this)

        // 작성 안한 항목이 있을 경우
        if(type.equals("blank")){
            dialog.setTitle("회원가입 실패")
            dialog.setMessage("입력란을 모두 작성해주세요")
        }
        // 입력한 비밀번호가 다를 경우
        else if(type.equals("not same")){
            dialog.setTitle("회원가입 실패")
            dialog.setMessage("비밀번호가 다릅니다")
        }

        val dialog_listener = object: DialogInterface.OnClickListener{
            override fun onClick(dialog: DialogInterface?, which: Int) {
                when(which){
                    DialogInterface.BUTTON_POSITIVE ->
                        Log.d(TAG, "다이얼로그")
                }
            }
        }

        dialog.setPositiveButton("확인",dialog_listener)
        dialog.show()
    }


}
회원가입 버튼 (Register.kt)
// 회원가입 버튼
btn_register2.setOnClickListener {
    Log.d(TAG, "회원가입 버튼 클릭")

    // editText로부터 유저가 입력한 값들을 받아온다
    val id = edit_id.text.toString()
    val pw = edit_pw.text.toString()
    val pw_re = edit_pw_re.text.toString()

    // 유저가 입력항목을 다 채우지 않았을 경우
    if(id.isEmpty() || pw.isEmpty() || pw_re.isEmpty()){
        isExistBlank = true
    }
    else{
        // 입력한 비밀번호가 같은지 확인
        if(pw == pw_re){
            isPWSame = true
        }
    }

    if(!isExistBlank && isPWSame){

        // 유저가 입력한 id, pw를 쉐어드에 저장한다.
        val sharedPreference = getSharedPreferences("file name", Context.MODE_PRIVATE)
        val editor = sharedPreference.edit()
        editor.putString("id", id)
        editor.putString("pw", pw)
        editor.apply()

         // 회원가입 성공 토스트 메세지 띄우기
        Toast.makeText(this, "회원가입 성공", Toast.LENGTH_SHORT).show()

        val intent = Intent(this, MainActivity::class.java)
        startActivity(intent)

    }
    else{
        // 상태에 따라 다른 다이얼로그 띄워주기
        if(isExistBlank){   // 작성 안한 칸이 있을 경우
            dialog("blank")
        }
        else if(!isPWSame){ // 입력한 비밀번호가 다를 경우
            dialog("not same")
        }
    }

}
회원가입 버튼을 클릭 하면 우선 유저가 입력한 아이디, 비밀번호, 비밀번호 확인란의 값들을 가져옵니다.
가져온 값들 중 입력 안 한 항목이 있는지 확인합니다.
입력한 비밀번호가 같은지 확인합니다.
1. 모든 항목이 입력되었고, 입력한 비밀번호가 같다면
유저가 입력한 id, pw값을 쉐어드프리퍼런스를 통해 저장합니다.
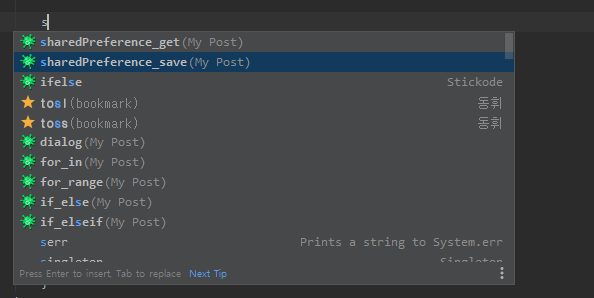
저는 스틱코드를 활용해 쉐어드프리퍼런스를 활용한 데이터 저장, 불러오기 코드를 작성해놨기 때문에 위 사진처럼 간단하게 코드를 불러올 수 있습니다. 이것 이외에 액티비티 이동, 로그 작성 등 다양한 부분에서 스틱코드를 활용하여 좀 더 빠르게 기능을 만들 수 있습니다. 블럭마다 사용된 스틱코드에 대한 링크를 남겨드릴테니 참고하세요.
stickode.com/detail.html?no=1861 - 안드로이드 SharedPreference
쉐어드프리퍼런스를 통해 id, pw를 저장한 후 회원가입 성공 Toast메세지를 띄워주고 로그인 화면(MainActivity.kt)로 이동합니다.
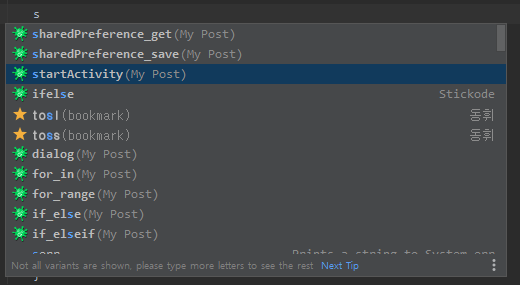
MainActivity로 이동하는 코드 또한 스틱코드를 이용해서 한번에 불러올 수 있습니다.
stickode.com/detail.html?no=1862 - 안드로이드 Intent
2. 1번의 조건이 만족하지 않는 경우
회원가입 실패 다이얼로그를 보여줍니다. 저는 dialog() 메소드를 만들어서 사용했습니다.
dialog() 메소드 (Register.kt)
fun dialog(type: String){
    val dialog = AlertDialog.Builder(this)

    // 빈 칸 있을 경우
    if(type.equals("blank")){
        dialog.setTitle("회원가입 실패")
        dialog.setMessage("입력란을 모두 작성해주세요")
    }
    // 비밀번호 다를 경우
    else if(type.equals("not same")){
        dialog.setTitle("회원가입 실패")
        dialog.setMessage("비밀번호가 다릅니다")
    }

    val dialog_listener = object: DialogInterface.OnClickListener{
        override fun onClick(dialog: DialogInterface?, which: Int) {
            when(which){
                DialogInterface.BUTTON_POSITIVE ->
                    Log.d(TAG, "다이얼로그")
            }
        }
    }

    dialog.setPositiveButton("확인",dialog_listener)
    dialog.show()
}
type을 매개변수로 받아 빠진 항목이 있는 경우와 비밀번호가 다른 경우로 나눠서 각각 다른 다이얼로그를 보여줄 수 있도록 하였습니다.
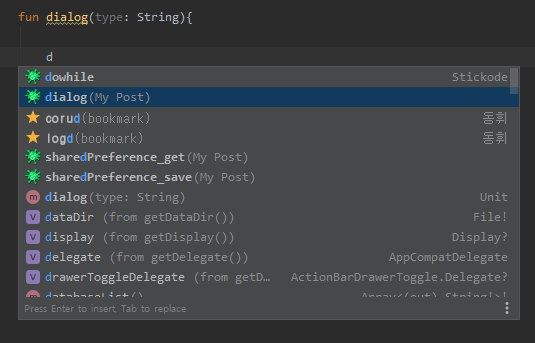
dialog() 메소드를 만들때도 마찬가지로 스틱코드로부터 기본 alert dialog 코드를 불러와서 빠르게 작성해보았습니다.
stickode.com/detail.html?no=1856 - 기본 Alert Dialog
stickode.com/detail.html?no=1864 - 안드로이드 Log, Toast 메세지
다음은 로그인 페이지의 코드를 작성해보도록 하겠습니다.
MainActivity.kt 전체 코드
사용된 스틱코드
stickode.com/detail.html?no=1861 - 안드로이드 SharedPreference
stickode.com/detail.html?no=1856 - 기본 Alert Dialog
stickode.com/detail.html?no=1862 - 안드로이드 Intent
stickode.com/detail.html?no=1864 - 안드로이드 Log, Toast 메세지
class MainActivity : AppCompatActivity() {
    val TAG: String = "MainActivity"

    override fun onCreate(savedInstanceState: Bundle?) {
        super.onCreate(savedInstanceState)
        setContentView(R.layout.activity_main)


        // 로그인 버튼
        btn_login.setOnClickListener {

            //editText로부터 입력된 값을 받아온다
            var id = edit_id.text.toString()
            var pw = edit_pw.text.toString()

            // 쉐어드로부터 저장된 id, pw 가져오기
            val sharedPreference = getSharedPreferences("file name", Context.MODE_PRIVATE)
            val savedId = sharedPreference.getString("id", "")
            val savedPw = sharedPreference.getString("pw", "")

            // 유저가 입력한 id, pw값과 쉐어드로 불러온 id, pw값 비교
            if(id == savedId && pw == savedPw){
                // 로그인 성공 다이얼로그 보여주기
                dialog("success")
            }
            else{
                // 로그인 실패 다이얼로그 보여주기
                dialog("fail")
            }
        }

        // 회원가입 버튼
        btn_register.setOnClickListener {
            val intent = Intent(this, Register::class.java)
            startActivity(intent)
        }

    }

    // 로그인 성공/실패 시 다이얼로그를 띄워주는 메소드
    fun dialog(type: String){
        var dialog = AlertDialog.Builder(this)

        if(type.equals("success")){
            dialog.setTitle("로그인 성공")
            dialog.setMessage("로그인 성공!")
        }
        else if(type.equals("fail")){
            dialog.setTitle("로그인 실패")
            dialog.setMessage("아이디와 비밀번호를 확인해주세요")
        }

        var dialog_listener = object: DialogInterface.OnClickListener{
            override fun onClick(dialog: DialogInterface?, which: Int) {
                when(which){
                    DialogInterface.BUTTON_POSITIVE ->
                        Log.d(TAG, "")
                }
            }
        }

        dialog.setPositiveButton("확인",dialog_listener)
        dialog.show()
    }
}
로그인 버튼 (MainActivity.kt)
// 로그인 버튼
btn_login.setOnClickListener {

    //editText로부터 입력된 값을 받아온다
    var id = edit_id.text.toString()
    var pw = edit_pw.text.toString()

    // 쉐어드로부터 저장된 id, pw 가져오기
    val sharedPreference = getSharedPreferences("file name", Context.MODE_PRIVATE)
    val savedId = sharedPreference.getString("id", "")
    val savedPw = sharedPreference.getString("pw", "")

    // 유저가 입력한 id, pw값과 쉐어드로 불러온 id, pw값 비교
    if(id == savedId && pw == savedPw){
        // 로그인 성공 다이얼로그 보여주기
        dialog("success")
    }
    else{
        // 로그인 실패 다이얼로그 보여주기
        dialog("fail")
    }
}
로그인 버튼 클릭 시, editText에 유저가 입력한 id, pw값을 가져옵니다.
그 후, 쉐어드프리퍼런스를 이용해 저장된 id, pw 값을 불러옵니다.
유저가 입력한 id, pw 값이 쉐어드프리퍼런스를 통해 불러온 id, pw 값과 일치한다면 로그인 성공 다이얼로그를 보여줍니다.
일치하지 않는다면 로그인 실패 다이얼로그를 보여줍니다.
dialog() 메소드 (MainActivity.kt)
fun dialog(type: String){
    var dialog = AlertDialog.Builder(this)

    if(type.equals("success")){
        dialog.setTitle("로그인 성공")
        dialog.setMessage("로그인 성공!")
    }
    else if(type.equals("fail")){
        dialog.setTitle("로그인 실패")
        dialog.setMessage("아이디와 비밀번호를 확인해주세요")
    }

    var dialog_listener = object: DialogInterface.OnClickListener{
        override fun onClick(dialog: DialogInterface?, which: Int) {
            when(which){
                DialogInterface.BUTTON_POSITIVE ->
                    Log.d(TAG, "")
            }
        }
    }

    dialog.setPositiveButton("확인",dialog_listener)
    dialog.show()
}
Register.kt 에서와 마찬가지로 dialog() 메소드를 만들어 회원가입 성공, 실패에 따라 다른 문구를 보여줄 수 있도록 하였습니다.
가입하기 버튼 (MainActivity.kt)
// 회원가입 버튼
// 클릭 시 Register 액티비티로 이동
btn_register.setOnClickListener {
    val intent = Intent(this, Register::class.java)
    startActivity(intent)
}
가입하기 버튼을 클릭하면 회원가입 화면으로 이동하도록 하였습니다.
이 예제에서 사용된 스틱코드
stickode.com/detail.html?no=1861 - 안드로이드 SharedPreference
stickode.com/detail.html?no=1856 - 기본 Alert Dialog
stickode.com/detail.html?no=1862 - 안드로이드 Intent
stickode.com/detail.html?no=1864 - 안드로이드 Log, Toast 메세지
위 코드 이외에도 for문, if문과 같이 자주 사용하는 간단한 코드도 스틱코드를 사용해 작성했습니다.
'안드로이드 코틀린' 카테고리의 다른 글
| [Kotlin][Android] retrofit2 이용한 HTTP 통신 (0) | 2021.03.15 |
|---|---|
| [Kotlin][Android] 당겨서 새로고침 기능 만들기 (0) | 2021.03.10 |
| [Kotlin][Android] 안드로이드 스피너 2탄 스피너 커스텀하기 (0) | 2021.02.21 |
| [Kotlin][Android]안드로이드 스피너 만들기 (0) | 2021.02.13 |
| [Kotlin][Android] SQLite 를 활용한 간단 회원가입/로그인 구현 (0) | 2021.02.04 |


