728x90
이번 시간에는 Shared Preferences를 사용하여 이미지를 저장해보겠습니다.

버튼을 누르면 이미지가 바뀌고 저장됩니다. 앱을 종료한 후 다시 실행하면 이전에 바뀌었던 이미지가 저장되어 있는 것을 확인 할 수 있습니다.
Shared Preferences에서 이미지를 저장하기 위해서는
shared preferences의 저장, 불러오기 기능을 알아야 하고
String 과 비트맵의 상호 변환을 알아야 합니다.
스틱코드의 여러 포스팅 중에서 아래 링크의 포스팅을 즐겨찾기 합니다.
stickode.com/detail.html?no=2192
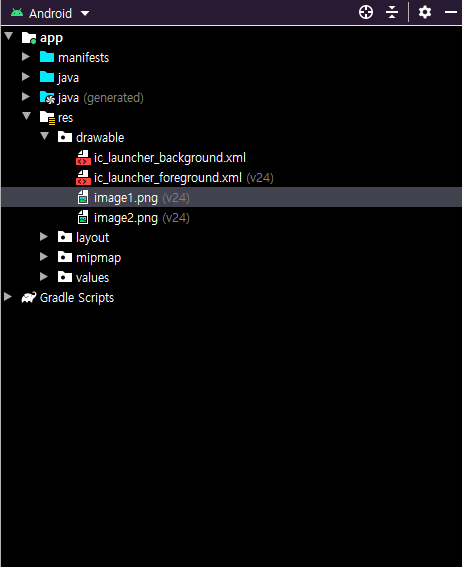
그리고 이미지 2개를 준비해주시고 drawble 안에 넣어주세요(예제는 png파일입니다.)


1. MainActivity.java
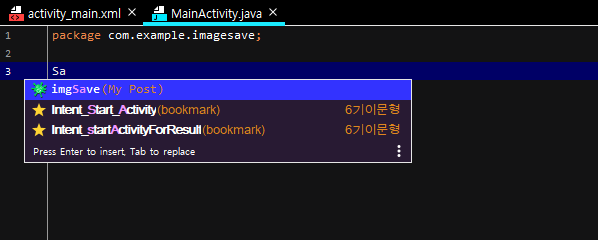
즐겨찾기 해놓은 코드를 태그만 입력해서 모두 불러 올 수 있습니다.
아래 사진처럼 태그를 입력하여 해당 코드를 더블 클릭하면
즐겨찾기 해놓은 코드가 생성됩니다.

package com.example.imagesave;

import androidx.appcompat.app.AppCompatActivity;
import android.content.SharedPreferences;
import android.graphics.Bitmap;
import android.graphics.BitmapFactory;
import android.graphics.drawable.BitmapDrawable;
import android.os.Bundle;
import android.util.Base64;
import android.view.View;
import android.widget.Button;
import android.widget.ImageView;
import java.io.ByteArrayOutputStream;

public class MainActivity extends AppCompatActivity {

    @Override
    protected void onCreate(Bundle savedInstanceState) {
        super.onCreate(savedInstanceState);
        setContentView(R.layout.activity_main);

        final ImageView imageView1= findViewById(R.id.imageView1); //화면에 보이는 이미지뷰를 연결
        final ImageView imageView2= findViewById(R.id.imageView2);


        Bitmap icon1 = BitmapFactory.decodeResource(getResources(), R.drawable.image1);  // image1을 비트맵으로 변환
        final Bitmap icon2 = BitmapFactory.decodeResource(getResources(), R.drawable.image2);  // image2를 비트맵으로 변환


        SharedPreferences getImg1 = getSharedPreferences("imgSave1",MODE_PRIVATE);
        String str1 = getImg1.getString("imgSave1","");

        //String형을 BitMap으로 변환
        byte[] encodeByte1 = Base64.decode(str1, Base64.DEFAULT);
        Bitmap bitmap1 = BitmapFactory.decodeByteArray(encodeByte1, 0, encodeByte1.length);


        SharedPreferences getImg2 = getSharedPreferences("imgSave2",MODE_PRIVATE);
        String str2 = getImg2.getString("imgSave2","");


        byte[] encodeByte2 = Base64.decode(str2, Base64.DEFAULT);
        Bitmap bitmap2 = BitmapFactory.decodeByteArray(encodeByte2, 0, encodeByte2.length);


         if(bitmap1==null){
             imageView1.setImageBitmap(icon1); //image1의 비트맵을 이미지뷰에 세팅

         }else if(bitmap1!=null){
             imageView2.setImageBitmap(bitmap1);
         }


        if(bitmap2==null){
            imageView2.setImageBitmap(icon2);   //image2의 비트맵을 이미지뷰에 세팅

        }else if(bitmap2!=null){
            imageView1.setImageBitmap(bitmap2);
        }


        Button btn   = (Button) findViewById(R.id.button);


        btn.setOnClickListener(new View.OnClickListener() {
            @Override
            public void onClick(View v) {


                BitmapDrawable drawable1 = (BitmapDrawable) imageView1.getDrawable();
                BitmapDrawable drawable2 = (BitmapDrawable) imageView2.getDrawable();


                Bitmap bitmap1 = drawable1.getBitmap();
                imageView2.setImageBitmap(bitmap1);

                //Bitmap을 String형으로 변환
                ByteArrayOutputStream baos1= new ByteArrayOutputStream();
                bitmap1.compress(Bitmap.CompressFormat.PNG, 70, baos1);
                byte[] bytes1 = baos1.toByteArray();
                String temp1 = Base64.encodeToString(bytes1, Base64.DEFAULT);

                SharedPreferences imgSave1 = getSharedPreferences("imgSave1",MODE_PRIVATE);
                SharedPreferences.Editor editor1 = imgSave1.edit();
                editor1.putString("imgSave1", temp1);
                editor1.commit();


                Bitmap bitmap2 = drawable2.getBitmap();
                imageView1.setImageBitmap(bitmap2);

                ByteArrayOutputStream baos2= new ByteArrayOutputStream();
                bitmap2.compress(Bitmap.CompressFormat.PNG, 70, baos2);
                byte[] bytes2 = baos2.toByteArray();
                String temp2 = Base64.encodeToString(bytes2, Base64.DEFAULT);

                SharedPreferences imgSave2 = getSharedPreferences("imgSave2",MODE_PRIVATE);
                SharedPreferences.Editor editor2 = imgSave2.edit();
                editor2.putString("imgSave2", temp2);
                editor2.commit();

            }
        });


    }
}
2. activity_main.xml
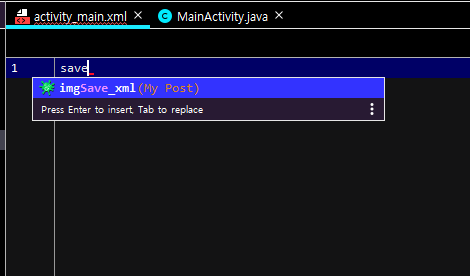
마찬가지로 태그만 입력해서 스틱코드에서 미리 즐겨찾기 해놓은 코드를 손쉽게 불러옵니다.

<?xml version="1.0" encoding="utf-8"?>
<androidx.constraintlayout.widget.ConstraintLayout xmlns:android="http://schemas.android.com/apk/res/android"
    xmlns:app="http://schemas.android.com/apk/res-auto"
    xmlns:tools="http://schemas.android.com/tools"
    android:layout_width="match_parent"
    android:layout_height="match_parent"
    tools:context=".MainActivity">

    <ImageView
        android:id="@+id/imageView1"
        android:layout_width="192dp"
        android:layout_height="203dp"
        app:layout_constraintBottom_toBottomOf="parent"
        app:layout_constraintEnd_toEndOf="parent"
        app:layout_constraintHorizontal_bias="0.497"
        app:layout_constraintStart_toStartOf="parent"
        app:layout_constraintTop_toTopOf="parent"
        app:layout_constraintVertical_bias="0.323"
        tools:srcCompat="@tools:sample/avatars" />

    <ImageView
        android:id="@+id/imageView2"
        android:layout_width="wrap_content"
        android:layout_height="wrap_content"
        app:layout_constraintBottom_toBottomOf="parent"
        app:layout_constraintEnd_toEndOf="parent"
        app:layout_constraintHorizontal_bias="0.498"
        app:layout_constraintStart_toStartOf="parent"
        app:layout_constraintTop_toBottomOf="@+id/imageView1"
        app:layout_constraintVertical_bias="0.441"
        tools:srcCompat="@tools:sample/avatars" />

    <Button
        android:id="@+id/button"
        android:layout_width="wrap_content"
        android:layout_height="wrap_content"
        android:text="이미지 바꾸기"
        app:layout_constraintBottom_toBottomOf="parent"
        app:layout_constraintEnd_toEndOf="parent"
        app:layout_constraintHorizontal_bias="0.83"
        app:layout_constraintStart_toStartOf="parent"
        app:layout_constraintTop_toTopOf="parent"
        app:layout_constraintVertical_bias="0.095" />

</androidx.constraintlayout.widget.ConstraintLayout>
'안드로이드 자바' 카테고리의 다른 글
| [JAVA][Android] 윈도우 오버레이 (2) | 2021.07.06 |
|---|---|
| [Java][Android] 동적 UI 생성 (0) | 2021.07.04 |
| [Java][Android] 구글맵 빠르게 적용하기 (0) | 2021.06.30 |
| [JAVA][Android] Shared Preferences 사용하여 숫자, 문자 저장하고 불러오기 (0) | 2021.06.27 |
| [Java][Android] 안드로이드 전광판 만들기 (0) | 2021.06.22 |


