안녕하세요~
오늘은 OCR(Optical character recognition) 기능을 구현해 보겠습니다. OCR는 인간이 종이 위에 써 놓은 글씨를 인지하여 텍스트 데이터로 바꿔주는 기능을 말해요. 이 포스팅에서는 스틱코드를 사용하여 글자가 들어 있는 이미지에서 글자를 인식하는 간단한 앱을 만들어보겠습니다.
스틱코드?
STICKODE
stickode.com
# 환경 세팅
1. 라이브러리 추가

▶ 해당 기능을 사용하기 위해서는 tess-two라는 모듈이 필요합니다. 위 그림처럼 build.gaddle(moudle) 파일을 열어서 맨 아래 한 줄을 추가하고 동기화시켜줍니다. 최신 버전은 여기서 확인하실 수 있습니다.
2. Language Data 추가

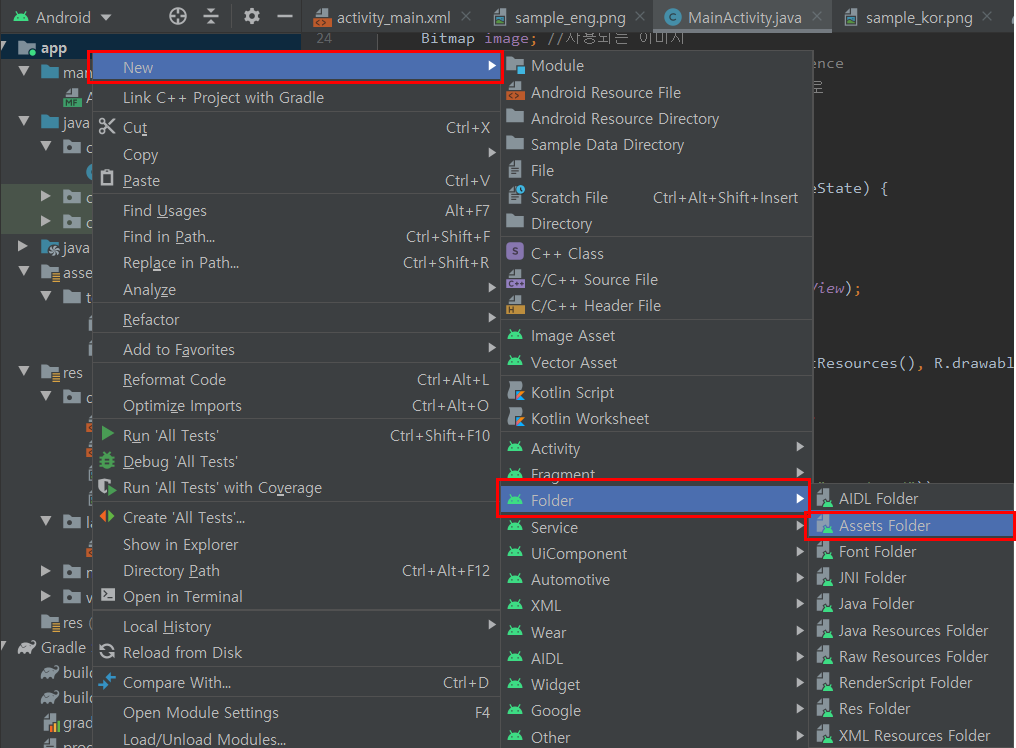
▶ 인식할 언어 데이터도 추가해줍니다. 영어와 한글을 인식해서 텍스트로 옮기기 위해 두 가지 언어 데이터를 추가해줬습니다. 언어 데이터는 여기에서 다운로드할 수 있습니다.
assets 폴더가 없으신 분들은 [우클릭] -> [New] -> [Forder] -> [Asset Folder]를 만드시면 됩니다.

3. 샘플 이미지 추가


▶ 영어와 한글을 각각 테스트해보기 위해 샘플 이미지를 준비했습니다.
# 레이아웃 그리기

▶ 분석할 이미지를 띄워주는 화면과 OCR을 동작시키는 버튼, 그리고 결과를 출력하는 화면을 만들어 줍니다. 아래는 레이아웃 전체 소스입니다.
activity_main.xml
<?xml version="1.0" encoding="utf-8"?>
<RelativeLayout xmlns:android="http://schemas.android.com/apk/res/android"
    xmlns:tools="http://schemas.android.com/tools"
    android:id="@+id/activity_main"
    android:layout_width="match_parent"
    android:layout_height="match_parent"
    tools:context="com.example.stickcodeocr.MainActivity">

    <RelativeLayout
        android:layout_width="match_parent"
        android:layout_height="250dp"
        android:background="#ffffff"
        android:id="@+id/ImageContainer">

        <ImageView
            android:layout_width="match_parent"
            android:layout_height="match_parent"
            android:id="@+id/imageView"
            android:src="@drawable/sample_eng"/>

    </RelativeLayout>

    <RelativeLayout
        android:layout_width="match_parent"
        android:layout_height="42dp"
        android:layout_below="@id/ImageContainer"
        android:clickable="true"
        android:onClick="processImage"
        android:background="#166e78"
        android:id="@+id/OCRButtonContainer">

        <TextView
            android:layout_width="wrap_content"
            android:layout_height="wrap_content"
            android:text="RUN OCR"
            android:textSize= "18dp"
            android:textColor="#ffffff"
            android:layout_centerVertical="true"
            android:layout_centerHorizontal="true"
            android:clickable="true"
            android:onClick="processImage"/>

    </RelativeLayout>

    <RelativeLayout
        android:layout_width="wrap_content"
        android:layout_height="wrap_content"
        android:layout_below="@id/OCRButtonContainer"
        android:padding="10dp">

        <TextView
            android:layout_width="wrap_content"
            android:layout_height="wrap_content"
            android:text="여기에 결과 출력"
            android:id="@+id/OCRTextView"
            android:textSize="15dp"
            android:textColor="#169cdf"
            android:layout_centerVertical="true"
            android:layout_centerHorizontal="true"
            android:background="#fff"
            />
    </RelativeLayout>


</RelativeLayout>
# OCR 기능 구현
MainActivity.java
public class MainActivity extends AppCompatActivity {

    Bitmap image; //사용되는 이미지
    private TessBaseAPI mTess; //Tess API reference
    String datapath = "" ; //언어데이터가 있는 경로
    TextView OCRTextView; // OCR 결과뷰

    @Override
    protected void onCreate(Bundle savedInstanceState) {
        super.onCreate(savedInstanceState);
        setContentView(R.layout.activity_main);

        OCRTextView = findViewById(R.id.OCRTextView);

        //이미지 디코딩을 위한 초기화
        image = BitmapFactory.decodeResource(getResources(), R.drawable.sample_eng); //샘플이미지파일
        //언어파일 경로
        datapath = getFilesDir()+ "/tesseract/";

        //트레이닝데이터가 카피되어 있는지 체크
        checkFile(new File(datapath + "tessdata/"));

        //Tesseract API 언어 세팅
        String lang = "eng";

		//OCR 세팅
        mTess = new TessBaseAPI();
        mTess.init(datapath, lang);
    }
▶ 필요한 샘플 이미지 파일과 언어 데이터를 OCR 모듈에 세팅해줍니다. 그리고 MainActivity 아래쪽에 스틱코드를 이용해서 OCR 동작 기능을 추가해줍니다.

    /***
     *  이미지에서 텍스트 읽기
     */
    public void processImage(View view) {
            String OCRresult = null;
            mTess.setImage(image);
            OCRresult = mTess.getUTF8Text();

            "OCRTextView".setText(OCRresult);
            }


    /***
     *  언어 데이터 파일, 디바이스에 복사
     */
    private void copyFiles() {
            try{
            String filepath = datapath + "파일경로";
            AssetManager assetManager = getAssets();
            InputStream instream = assetManager.open("파일경로");
            OutputStream outstream = new FileOutputStream(filepath);
            byte[] buffer = new byte[1024];
            int read;
            while ((read = instream.read(buffer)) != -1) {
            outstream.write(buffer, 0, read);
            }
            outstream.flush();
            outstream.close();
            instream.close();

            } catch (FileNotFoundException e) {
                e.printStackTrace();
            } catch (IOException e) {
                e.printStackTrace();
            }
    }


    /***
     *  디바이스에 언어 데이터 파일 존재 유무 체크
     * @param dir
     */
    private void checkFile(File dir) {
        //디렉토리가 없으면 디렉토리를 만들고 그후에 파일을 카피
        if(!dir.exists()&& dir.mkdirs()) {
            copyFiles();
        }
        //디렉토리가 있지만 파일이 없으면 파일카피 진행
        if(dir.exists()) {
            String datafilepath = datapath+ "파일경로";
            File datafile = new File(datafilepath);
            if(!datafile.exists()) {
                copyFiles();
            }
        }
    }
▶ 스틱코드를 사용해 코드를 불러왔습니다. 이제 불러온 코드에 OCR 결과를 보여줄 뷰에 연결시켜 줍니다.


▶ 결과를 보여주는 뷰와 연결시켜줬습니다. 이제 기능 구현은 끝났는데요 마지막으로 테스트해보겠습니다.
# 테스트
1. 영어


2. 한글


▶ 한글의 경우 정확도가 아쉬웠지만, 영어 / 한글 모두 정상적으로 동작하는 걸 확인할 수 있었습니다.
'안드로이드 자바' 카테고리의 다른 글
| [JAVA][Android] 달력 빠르게 만들기 (0) | 2021.06.18 |
|---|---|
| [JAVA][Android] intent를 사용하여 이미지 보내기 (2) | 2021.06.16 |
| [JAVA][Android] 라이브 방송 화면 만들기 (0) | 2021.06.11 |
| [JAVA][android] WiFi정보 스캔 빠르게 구현하기 (0) | 2021.06.09 |
| [JAVA][Android] 로또 QR 코드 웹뷰 띄워주기 (0) | 2021.06.08 |


