안녕하세요.
오늘은 네이버 로그인 API를 사용하는 예제를 진행해보겠습니다.
1. Naver Developers 설정
https://developers.naver.com/apps/#/list
애플리케이션 - NAVER Developers
developers.naver.com
위 링크에 접속해서 로그인하면 다음과 같은 화면을 볼 수 있는데요. 여기서 Application 등록 버튼을 클릭합니다.

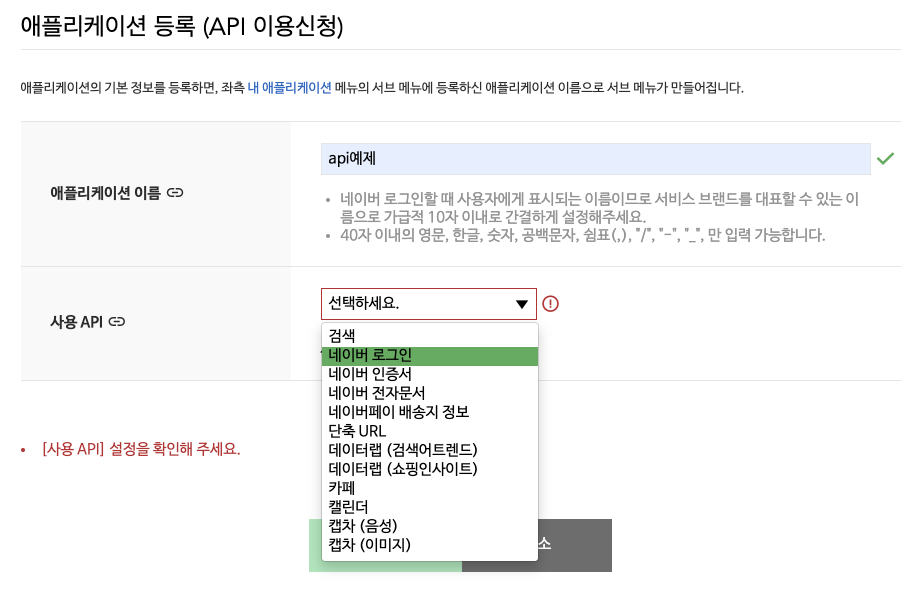
그리고 앱의 이름을 입력한 후 사용 API에서 네이버 로그인을 선택합니다.
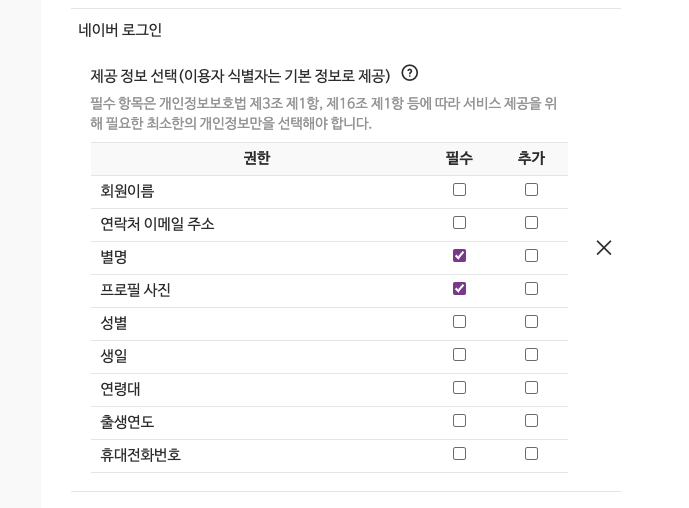
그리고 앱에서 필요한 제공 정보에 체크 합니다.
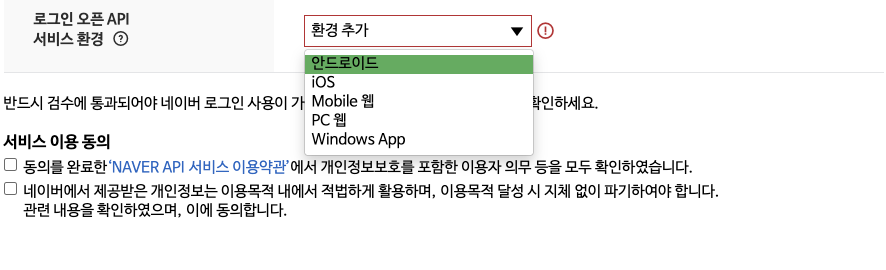
다음으로 api 서비스 환경을 안드로이드로 선택합니다.
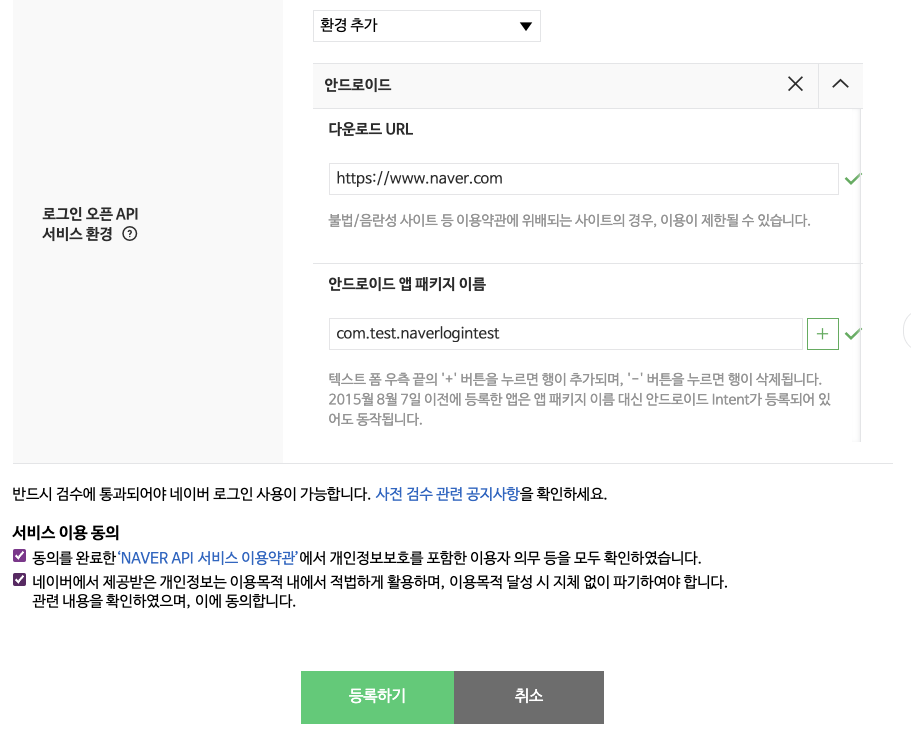
그리고 앱을 다운로드 할 수 있는 URL을 입력합니다.
이 글은 예제여서 별도의 URL이 없기 때문에 네이버 주소를 입력하였습니다.
앱 패키지 이름은 안드로이드 스튜디오에서 확인 후 입력하고, 서비스 이용 동의에 체크 후 등록하기를 클릭합니다.
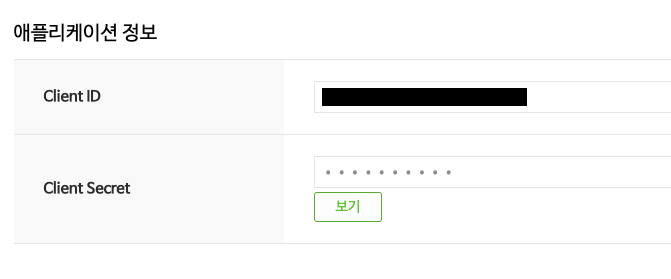
등록이 완료되면 이렇게 Client ID와 Client Secret 이 발급됩니다.
2. 안드로이드 의존성 추가
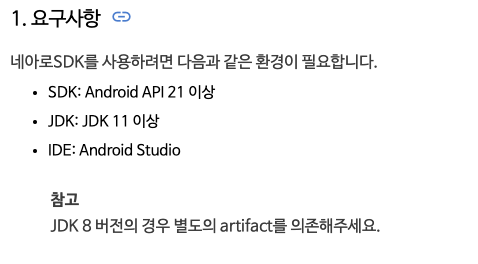
이제 안드로이드 스튜디오에 네이버 아이디 로그인 SDK (줄여서 네아로SDK)를 추가해보겠습니다.
우선 네아로 SDK를 사용하기 위한 요구사항은 다음과 같습니다.
앱수준 build.gradle에 네아로 sdk 에 대한 의존성을 추가합니다
implementation 'com.navercorp.nid:oauth:5.9.1'
다음은 네아로 sdk에서 사용하는 라이브러리 목록입니다.
중복된 라이브러리가 있다면 제외하고 의존성을 추가하시면 됩니다.
implementation 'org.jetbrains.kotlin:kotlin-stdlib:1.6.21'
implementation 'org.jetbrains.kotlinx:kotlinx-coroutines-android:1.3.9'
implementation 'androidx.appcompat:appcompat:1.3.1'
implementation 'androidx.legacy:legacy-support-core-utils:1.0.0'
implementation 'androidx.browser:browser:1.4.0'
implementation 'androidx.constraintlayout:constraintlayout:1.1.3'
implementation 'androidx.security:security-crypto:1.1.0-alpha06'
implementation 'androidx.core:core-ktx:1.3.0'
implementation 'androidx.fragment:fragment-ktx:1.3.6'
implementation 'androidx.lifecycle:lifecycle-viewmodel-ktx:2.4.0'
implementation 'com.squareup.retrofit2:retrofit:2.9.0'
implementation 'com.squareup.retrofit2:converter-gson:2.9.0'
implementation 'com.squareup.moshi:moshi-kotlin:1.11.0'
implementation 'com.squareup.okhttp3:logging-interceptor:4.2.1'
implementation 'com.airbnb.android:lottie:3.1.0'
3. 로그인 하기
네이버 로그인은 두가지 방법으로 구현이 가능합니다.
첫 번째는 NidOAuthLoginButton 객체를 레이아웃에 추가하여 사용하는 방법이고,
두 번째는 NaverIdLoginSDK.authenticate() 메서드를 직접 실행하는 방법입니다.
저는 첫번째 방법을 사용해서 간단하게 구현해보겠습니다.
두번째 방법은 다음 네이버 개발자 문서를 참고하시면 확인 가능합니다.
Android - LOGIN
Android Android용 네아로SDK는 서드파티 애플리케이션에서 네이버 로그인이 제공하는 로그인, 로그아웃, 토큰 관리 등의 기능을 쉽게 구현할 수 있게 합니다. Github을 참고해 주세요. 문의사항이 있
developers.naver.com
3-1. 레이아웃 작성
activity_main.xml
<?xml version="1.0" encoding="utf-8"?>
<androidx.constraintlayout.widget.ConstraintLayout xmlns:android="http://schemas.android.com/apk/res/android"
    xmlns:app="http://schemas.android.com/apk/res-auto"
    xmlns:tools="http://schemas.android.com/tools"
    android:id="@+id/main"
    android:layout_width="match_parent"
    android:layout_height="match_parent"
    tools:context=".MainActivity">

    <TextView
        android:id="@+id/textView"
        android:layout_width="300dp"
        android:layout_height="wrap_content"
        android:text="네이버 로그인 테스트"
        android:textAlignment="center"
        app:layout_constraintBottom_toBottomOf="parent"
        app:layout_constraintEnd_toEndOf="parent"
        app:layout_constraintStart_toStartOf="parent"
        app:layout_constraintTop_toTopOf="parent" />

    <com.navercorp.nid.oauth.view.NidOAuthLoginButton
        android:id="@+id/btn_login"
        android:layout_width="wrap_content"
        android:layout_height="50dp"
        android:layout_marginBottom="50dp"
        app:layout_constraintBottom_toBottomOf="parent"
        app:layout_constraintEnd_toEndOf="parent"
        app:layout_constraintStart_toStartOf="parent" />

</androidx.constraintlayout.widget.ConstraintLayout>
위처럼 layout 에 NidOAuthLoginButton을 추가합니다.
3-2. MainActivity 작성
import android.os.Bundle;
import android.util.Log;
import android.view.View;
import android.widget.TextView;

import androidx.annotation.NonNull;
import androidx.appcompat.app.AppCompatActivity;

import com.navercorp.nid.NaverIdLoginSDK;
import com.navercorp.nid.oauth.OAuthLoginCallback;
import com.navercorp.nid.oauth.view.NidOAuthLoginButton;

public class MainActivity extends AppCompatActivity {

    @Override
    protected void onCreate(Bundle savedInstanceState) {
        super.onCreate(savedInstanceState);
        setContentView(R.layout.activity_main);

        //뷰 객체 연결
        TextView textView = findViewById(R.id.textView);
        NidOAuthLoginButton btnLogin = findViewById(R.id.btn_login);

        //네아로 객체 초기화
        NaverIdLoginSDK.INSTANCE.initialize(this, getString(R.string.naver_client_id),
                getString(R.string.naver_client_secret), getString(R.string.app_name));


        btnLogin.setOAuthLogin(new OAuthLoginCallback() {
            @Override
            public void onSuccess() {
                // 로그인 성공시
                // 액세스 토큰 가져오기
                String accessToken = NaverIdLoginSDK.INSTANCE.getAccessToken();
                textView.setText(accessToken);
                btnLogin.setVisibility(View.GONE);
            }

            @Override
            public void onFailure(int httpStatus, @NonNull String message) {
                // 통신 오류
                Log.e("네아로", "onFailure: httpStatus - " + httpStatus + " / message - " + message);
            }

            @Override
            public void onError(int errorCode, @NonNull String message) {
                // 네이버 로그인 중 오류 발생
                Log.e("네아로", "onError: errorCode - " + errorCode + " / message - " + message);
            }
        });
    }
}
위 코드 실행시 다음 영상처럼 액세스 토큰이 불러와진다면 로그인 성공입니다.
다음 시간에는 받은 액세스 토큰을 사용해서 네이버 프로필 정보를 요청하여 닉네임과 프로필 이미지를 앱에 가져와 띄우는 예제를 진행해보겠습니다.
'안드로이드 자바' 카테고리의 다른 글
| [JAVA][Android] ChatGPT API로 챗봇 만들기 - (3) Retrofit2 사용해서 챗봇에게 응답받기 (2) | 2024.06.03 |
|---|---|
| [JAVA][Android] 네이버 회원 프로필 조회 API 사용하기 (2) | 2024.06.02 |
| [JAVA][Android]글자크기 맞춰 drawbleStart 이미지 크기 자동조절하기 (0) | 2024.05.11 |
| [JAVA][Android] ChatGPT API로 챗봇 만들기 - (2) 리사이클러뷰 만들기 (0) | 2024.05.09 |
| [JAVA][Android] ChatGPT API로 챗봇 만들기 - (1) ChatGPT API 사용하기 (0) | 2024.05.03 |
