안드로이드 자바
[JAVA][Android] Textview의 텍스트 생략 기호(...) 사용 또는 텍스트 흐름 효과주기
teamnova
2022. 1. 19. 12:00
728x90
이번시간에는 Textview의 텍스트 생략 기호(...) 사용해보고
텍스트 흐름 효과 주기를 해보겠습니다.
1. MainActivity
public class MainActivity extends AppCompatActivity {

    TextView textView;

    @Override
    protected void onCreate(Bundle savedInstanceState) {
        super.onCreate(savedInstanceState);
        setContentView(R.layout.activity_main);

        textView = findViewById(R.id.text_view);
        textView.setSelected(true);
    }
}
2. xml 코드
<?xml version="1.0" encoding="utf-8"?>
<LinearLayout xmlns:android="http://schemas.android.com/apk/res/android"
    android:layout_width="match_parent"
    android:orientation="vertical"
    android:layout_marginHorizontal="10dp"
    android:layout_height="match_parent">


    <TextView
        android:layout_marginTop="10dp"
        android:layout_width="match_parent"
        android:layout_height="wrap_content"
        android:text="none"/>
    <TextView
        android:layout_width="match_parent"
        android:layout_height="wrap_content"
        android:maxLines="1"
        android:ellipsize="none"
        android:textColor="@android:color/white"
        android:text="[STICKODE] 스틱코드와 함께 내 코드를 등록하고 IDE에서 쉽게 불러서 쓰세요!!!!"
        android:background="#1D6ECC" />

    <TextView
        android:layout_marginTop="10dp"
        android:layout_width="match_parent"
        android:layout_height="wrap_content"
        android:text="start"/>
    <TextView
        android:layout_width="match_parent"
        android:layout_height="wrap_content"
        android:maxLines="1"
        android:ellipsize="start"
        android:textColor="@android:color/white"
        android:text="[STICKODE] 스틱코드와 함께 내 코드를 등록하고 IDE에서 쉽게 불러서 쓰세요!!!!"
        android:background="#1D6ECC"/>

    <TextView
        android:layout_marginTop="10dp"
        android:layout_width="match_parent"
        android:layout_height="wrap_content"
        android:text="middle"/>
    <TextView
        android:layout_width="match_parent"
        android:layout_height="wrap_content"
        android:maxLines="1"
        android:ellipsize="middle"
        android:textColor="@android:color/white"
        android:text="[STICKODE] 스틱코드와 함께 내 코드를 등록하고 IDE에서 쉽게 불러서 쓰세요!!!!"
        android:background="#1D6ECC" />

    <TextView
        android:layout_marginTop="10dp"
        android:layout_width="match_parent"
        android:layout_height="wrap_content"
        android:text="end"/>
    <TextView
        android:layout_width="match_parent"
        android:layout_height="wrap_content"
        android:maxLines="1"
        android:ellipsize="end"
        android:textColor="@android:color/white"
        android:text="[STICKODE] 스틱코드와 함께 내 코드를 등록하고 IDE에서 쉽게 불러서 쓰세요!!!!"
        android:background="#1D6ECC"/>


    <TextView
        android:layout_marginTop="10dp"
        android:layout_width="match_parent"
        android:layout_height="wrap_content"
        android:text="marquee"/>
    <TextView
        android:id="@+id/text_view"
        android:layout_width="match_parent"
        android:layout_height="wrap_content"

        android:ellipsize="marquee"
        android:singleLine="true"
        android:focusable="true"
        android:marqueeRepeatLimit="marquee_forever"

        android:textColor="@android:color/white"
        android:text="[STICKODE] 스틱코드와 함께 내 코드를 등록하고 IDE에서 쉽게 불러서 쓰세요!!!!"
        android:background="#1D6ECC"/>

</LinearLayout>
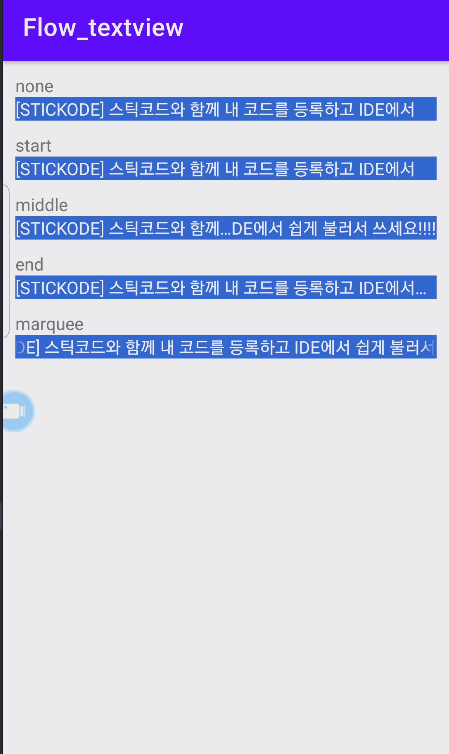
※ android:ellipsize - TextView의 텍스트가 범위를 넘어서면 생략 기호 사용
none, start, middle, end, marquee 값 사용 가능.
- none (0) : 생략기호(...) 사용하지 않음.
- start (1) : 생략기호(...)를 텍스트의 앞 시작 부분에 표시
- middle (2) : 생략기호(...)를 텍스트의 중간 부분에 표시
- end (3) : 생략기호(...)를 텍스트의 끝 부분에 표시
- marquee (4) : 텍스트가 오른쪽에서 왼쪽으로 흘러가도록 만들기.
※ marquee 사용법
1. xml 코드(Textview)에 하기 내용 필요
 android:ellipsize="marquee"
 android:singleLine="true"
 android:focusable="true"
 android:marqueeRepeatLimit="marquee_forever"
2. MainActivity : 해당 textview를 .setSelected 해줘야한다.
textView.setSelected(true);