예전에 작성했던 모션 레이아웃 포스팅을 보면
포스팅한 코드와 동일하게 작성했을 때 생기는 오류가 있어서 해당사항 수정하여 다시 올려보겠습니다.
예전에 올린 모션 레이아웃 링크 입니다. 참고하실 분들은 참고해주세요
https://stickode.tistory.com/353
[Java][Android] 모션 레이아웃
MotionLayout은 앱에서 모션과 위젯 애니메이션을 관리하는 데 사용할 수 있는 레이아웃 유형입니다. MotionLayout은 ConstraintsLayout의 서브클래스이며 ConstraintsLayout의 다양한 레이아웃 기능을 기초로 합
stickode.tistory.com
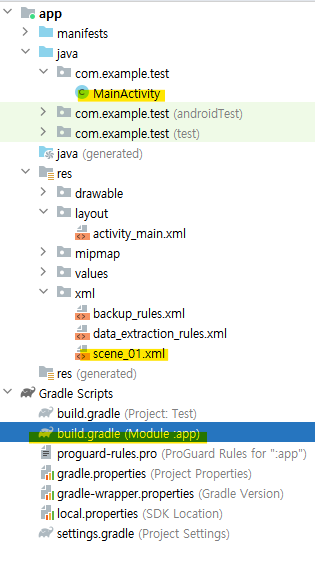
모션 레이아웃을 구현하기 위해 필요한 파일들을 노란색으로 표시했습니다.

build.gradle에 들어가 의존성 추가를 해주세요
dependencies {
        implementation 'androidx.constraintlayout:constraintlayout:2.0.0-beta1'
    }
activity_main.xml 에 들어가 아래와 같이 코드 작성을 해주세요
<?xml version="1.0" encoding="utf-8"?>
<androidx.constraintlayout.motion.widget.MotionLayout
    xmlns:android="http://schemas.android.com/apk/res/android"
    xmlns:app="http://schemas.android.com/apk/res-auto"
    xmlns:tools="http://schemas.android.com/tools"
    android:layout_width="match_parent"
    android:layout_height="match_parent"
    tools:context=".MainActivity"
    app:layoutDescription="@xml/scene_01"
    android:id="@+id/motionLayout"
    tools:showPaths="true"
    >

    <View
        android:id="@+id/button"
        android:layout_width="64dp"
        android:layout_height="64dp"
        android:background="@color/black"
        android:text="Button" />

</androidx.constraintlayout.motion.widget.MotionLayout>
3. scene_01.xml 파일에 들어가 다음과 같이 코드를 작성해주세요
MotionScene 만들기: 이전 MotionLayout 예에서 app:layoutDescription 속성은 MotionScene을 참조합니다. MotionScene은 상응하는 레이아웃의 모든 모션 설명을 포함하는 XML 리소스 파일입니다. 레이아웃 정보를 모션 설명과 별도로 유지하기 위해 각 MotionLayout에서 개별 MotionScene을 참조합니다. MotionScene의 정의는 MotionLayout의 비슷한 정의보다 우선합니다.
다음은 그림 1의 기본 가로 모션을 설명하는 MotionScene 파일의 예입니다.
<?xml version="1.0" encoding="utf-8"?>
<MotionScene xmlns:android="http://schemas.android.com/apk/res/android"
    xmlns:motion="http://schemas.android.com/apk/res-auto">

    <Transition
        motion:constraintSetStart="@+id/start"
        motion:constraintSetEnd="@+id/end"
        motion:duration="1000">
        <OnSwipe
            motion:touchAnchorId="@+id/button"
            motion:touchAnchorSide="right"
            motion:dragDirection="dragRight" />
    </Transition>

    <ConstraintSet android:id="@+id/start">
        <Constraint
            android:id="@+id/button"
            android:layout_width="64dp"
            android:layout_height="64dp"
            android:layout_marginStart="8dp"
            motion:layout_constraintBottom_toBottomOf="parent"
            motion:layout_constraintStart_toStartOf="parent"
            motion:layout_constraintTop_toTopOf="parent" />
    </ConstraintSet>

    <ConstraintSet android:id="@+id/end">
        <Constraint
            android:id="@+id/button"
            android:layout_width="64dp"
            android:layout_height="64dp"
            android:layout_marginEnd="8dp"
            motion:layout_constraintBottom_toBottomOf="parent"
            motion:layout_constraintEnd_toEndOf="parent"
            motion:layout_constraintTop_toTopOf="parent" />
    </ConstraintSet>

</MotionScene>
- <Transition>에는 모션의 기본 정의가 포함되어 있습니다.
- motion:constraintSetStart 및 motion:constraintSetEnd는 모션의 엔드포인트 참조입니다. 이러한 엔드포인트는 나중에 MotionScene의 <ConstraintSet> 요소에 정의됩니다.
- motion:duration은 모션이 완료되는 데 걸리는 시간을 밀리초 단위로 지정합니다.
- <OnSwipe>를 사용하면 터치를 통해 모션을 제어할 수 있습니다.
- motion:touchAnchorId는 스와이프하고 드래그할 수 있는 뷰를 나타냅니다.
- motion:touchAnchorSide는 오른쪽에서 보기를 드래그하는 것을 나타냅니다.
- motion:dragDirection은 드래그의 진행 방향을 나타냅니다. 예를 들어 motion:dragDirection="dragRight"는 오른쪽으로 드래그하면 진행률이 증가한다는 의미입니다.
- <ConstraintSet>를 통해서는 모션을 설명하는 다양한 제약조건을 정의합니다. 이 예에서는 모션의 엔드포인트마다 한 개씩 ConstraintSet를 정의합니다. 이 엔드포인트는 세로로는 가운데에 위치합니다(app:layout_constraintTop_toTopOf="parent" 및 app:layout_constraintBottom_toBottomOf="parent" 사용). 가로로는 화면의 맨 왼쪽과 오른쪽에 엔드포인트가 있습니다.