오늘은 간단한 예제를 통해 안드로이드 서비스의 동작 방식을 익혀 보도록 하겠습니다.
Service ?
백그라운드에서 오랜 작업을 수행할 수 있는 앱 구성요소로써 사용자 인터페이스가 제공되지 않는 특징이 있습니다.
크게 Background, Foreground, Bound 이렇게 3가지의 형태의 서비스가 존재합니다.
Background
앱이 켜져 있을때만 동작하는 서비스
앱이 꺼지면 함께 꺼짐
Foreground
앱이 꺼져도 여전히 동작하는 서비스
하지만 유저에게 서비스가 작동하고 있음을 알려줘야함
Bound
바인딩된 구성요소가 아직 살아있는 경우에만 실행되는 서비스
생명주기
서비스의 생명 주기는 StartService(), StartForeground 로 호출되었을때와
bindService() 로 호출되었을때의 생명주기가 다르게 형성되어있습니다.
도식화 해보자면 다음과 같습니다.

두가지 모두를 한꺼번에 이해하면 좋겠지만 일단은 바인딩 되지 않은 상태의 서비스의 사용과
Background 와 Foreground 서비스이 두가지 서비스의 차이를 알아보기위한 예제를 작성해 보겠습니다.
예제
먼저 새로운 프로젝트를 생성하고
MyBackgroundService 클래스를 생성해 줍니다.
package com.example.service_ex;

import android.app.Service;
import android.content.Intent;
import android.os.IBinder;
import android.util.Log;

import androidx.annotation.Nullable;
// 서비스 사용시 매니페스트에 등록하여 시스템에 이 서비스에 대해 알려줄것

public class MyBackgroundService extends Service {
    @Nullable
    @Override
    public IBinder onBind(Intent intent) {
        return null;
    }

    // startService() 혹은  startForegroundService() 를 호출하여 서비스를 시작할때마다 호출됨
    @Override
    public int onStartCommand(Intent intent, int flags, int startId) {

        new Thread(new Runnable() {
            @Override
            public void run() {
                while (true) {

                    Log.e("Service", "서비스가 실행 중입니다...");
                    try {
                        Thread.sleep(2000);
                    } catch (Exception e) {
                        e.printStackTrace();
                    }

                }
            }
        }).start();

        return super.onStartCommand(intent, flags, startId);
    }
}
StartService(), StartForeground 로 선언된 서비스는 onCreate 를 거쳐 onStartCommand 에 선언된 코드를 실행하게 됩니다.
예제의 코드는 2초마다 한번씩 서비스가 실행되고 있는지 log 를 남겨주게 됩니다.
Service 는 작성후 매니페스트에 등록하여 시스템에 이 서비스에 대해 알려줍니다.
다음 과 같이 서비스를 를 매니페스트 application 태그 안에 등록해 줍니다.
<service android:name=".MyBackgroundService"></service>이제 MainActivity 에서 다음과 같이 작성하여 액티비티가 실행되면 서비스가 실행되게 코드를 작성해 줍니다.
public class MainActivity extends AppCompatActivity {

    @Override
    protected void onCreate(Bundle savedInstanceState) {
        super.onCreate(savedInstanceState);
        setContentView(R.layout.activity_main);

        Intent serviceIntent = new Intent(this, MyBackgroundService.class);// MyBackgroundService 를 실행하는 인텐트 생성
        startService(serviceIntent);// 서비스 인텐트를 전달한 서비스 시작 메서드 실행


    }
}
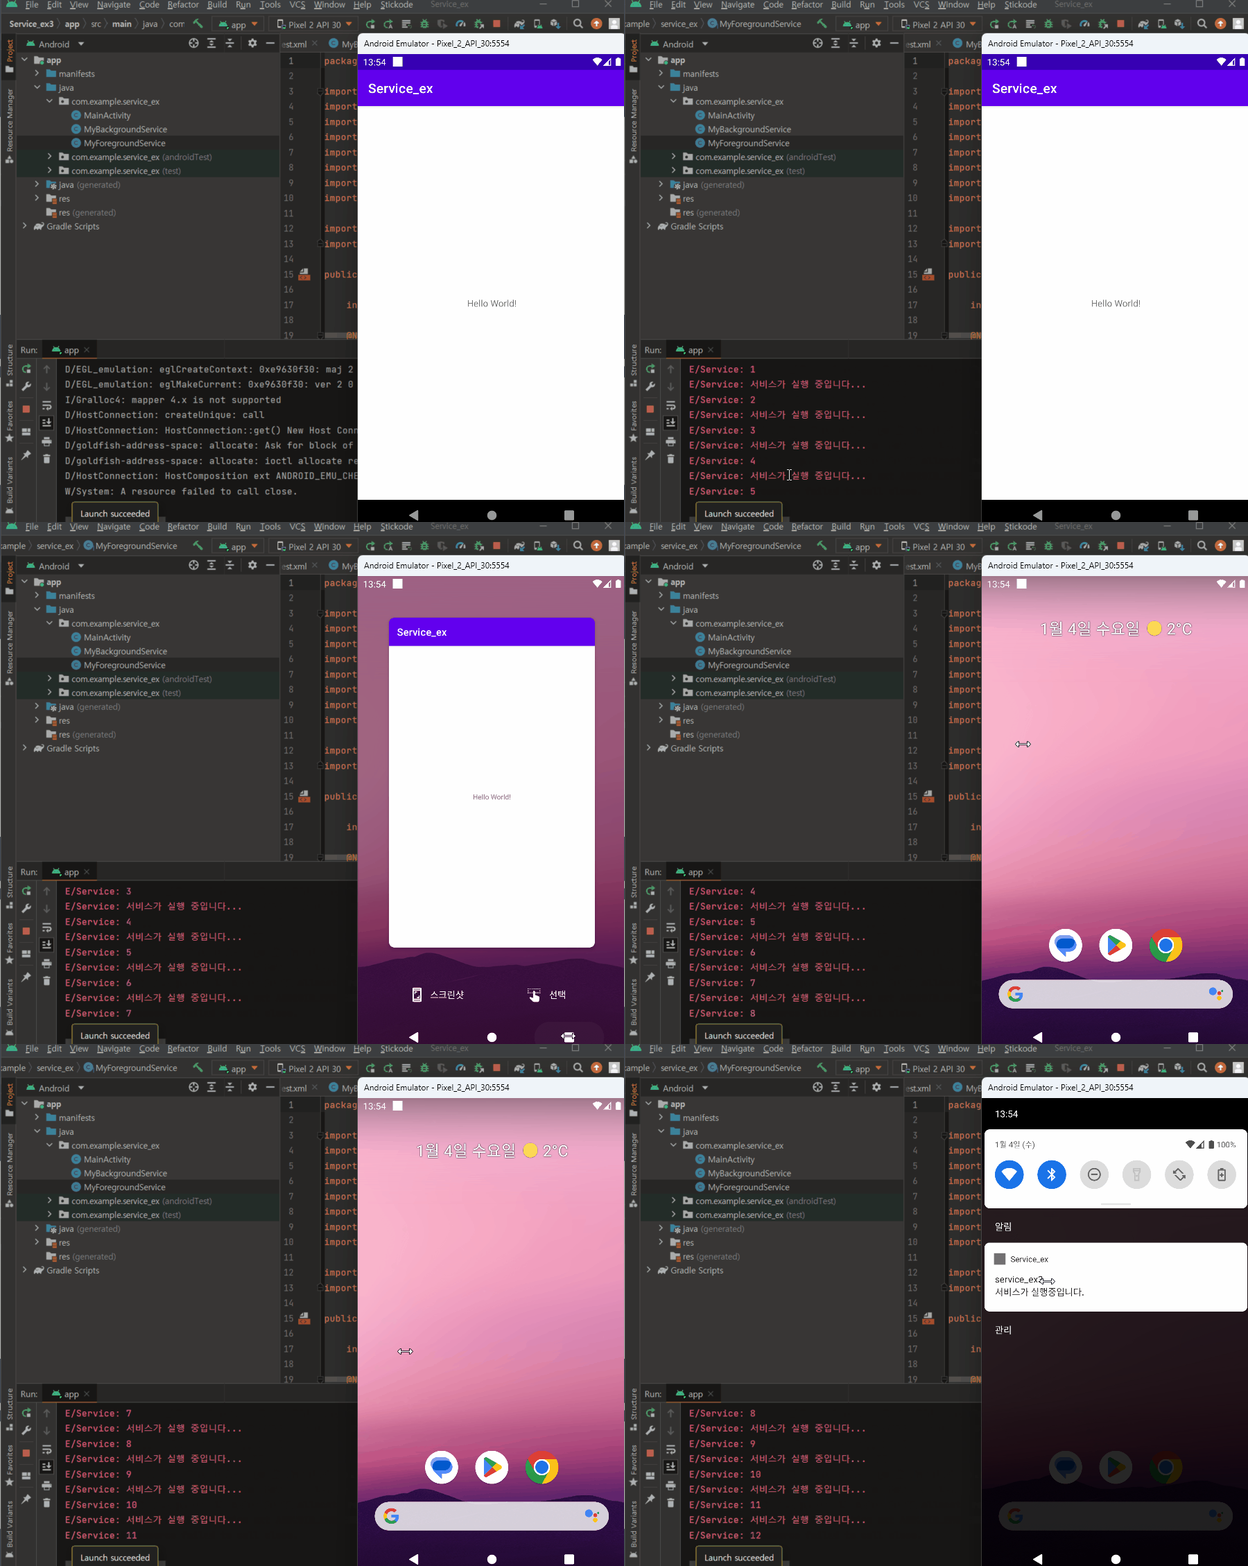
이제 코드를 실행해서 서비스가 동작하는걸 확인하고 앱을 꺼보도록 하겠습니다.

정상적으로 서비스가 실행 되다가 앱이 죽으면 더이상 서비스가 작동하지 않는걸 확인할 수 있습니다.
이처럼 startService() 로 실행된 서비스는 앱이 꺼지면 같이 꺼지게 됩니다.
안드로이드 공식 홈페이지에 따르면
앱이 API 레벨 26 이상을 대상으로 전용 앱이 포그라운드에 있지 않을 때 시스템에서 백그라운드 서비스 실행에 대한 서비스 실행에 대한 제한을 적용한다고 합니다.
그렇다면 앱이 꺼진 상황에서도 서비스를 작동하게 하려면 어떤 과정을 거쳐야 할까요?
이를 대응하기위해 안드로이드가 제공하는 서비스가 바로 Foreground 서비스 입니다.
현재 작동되는 서비스를 Foreground 서비스로 바꿔보도록 하겠습니다.
같은 내용을 가진 또다른 서비스를 생성합니다.
저는 MyForegroundService 로 생성하겠습니다.
package com.example.service_ex;

import android.app.Service;
import android.content.Intent;
import android.os.IBinder;
import android.util.Log;

import androidx.annotation.Nullable;

public class MyForegroundService extends Service {

    int count = 0;

    @Nullable
    @Override
    public IBinder onBind(Intent intent) {
        return null;
    }

    @Override
    public int onStartCommand(Intent intent, int flags, int startId) {

        new Thread(new Runnable() {
            @Override
            public void run() {
                while (true) {

                    Log.e("Service", "서비스가 실행 중입니다...");
                    Log.e("Service", ""+ count);
                    try {
                        Thread.sleep(2000);
                        count++;
                    } catch (Exception e) {
                        e.printStackTrace();
                    }

                }
            }
        }).start();

        return super.onStartCommand(intent, flags, startId);
    }


}
그리고 Mainactivity 코드를 다음과같이 변경해 주겠습니다.
package com.example.service_ex;

import androidx.appcompat.app.AppCompatActivity;

import android.content.Intent;
import android.os.Build;
import android.os.Bundle;

public class MainActivity extends AppCompatActivity {

    @Override
    protected void onCreate(Bundle savedInstanceState) {
        super.onCreate(savedInstanceState);
        setContentView(R.layout.activity_main);

        Intent serviceIntent = new Intent(this, MyForegroundService.class);// MyBackgroundService 를 실행하는 인텐트 생성
        if (Build.VERSION.SDK_INT >= Build.VERSION_CODES.O) { // 현재 안드로이드 버전 점검
            startForegroundService(serviceIntent);// 서비스 인텐트를 전달한 foregroundService 시작 메서드 실행
        }else {
            startService(serviceIntent);// 서비스 인텐트를 전달한 서비스 시작 메서드 실행
        }
    }
}
serviceIntent 의 참조되는 클래스를 새로만든 MyForegroundService 로 변경해주고
안드로이드 버전을 점검하여 API 26 레벨(O버전) 이상 인 경우 startForgroundService 로 해당 서비스를 작동시키는 코드를 추가해 주었습니다.
앞서 서비스를 매니페스트에 등록했던것 처럼 새로운 Service 를 사용하기 때문에 마찬가지로 매니페스트에 서비스를 등록해 주겠습니다.
<service android:name=".MyForegroundService"></service>
그리고 추가로 ForegroundService 의 경우 앱 자체에 ForgroundService 를 사용하겠다는 권한을 부여해 줘야합니다. 이또한 매니페스트에 등록해 주겠습니다.
<uses-permission> 의 경우 <manifest>태그 안에 작성해 주셔야 합니다.
<uses-permission android:name="android.permission.FOREGROUND_SERVICE"></uses-permission>자 이제는 앱이 꺼져도 서비스가 살아 있게 될까요?
안타깝게도 이렇게 작성하고 코드를 실행하고 아무것도 하지 않아도 약 10초가 지난후 다음과 같은 에러를 마주하게 됩니다.

왜그런가알아봤더니...
- 새로운 Context.startForegroundService() 메서드가 포그라운드 서비스를 시작합니다. 앱이 백그라운드에 있는 중에도 시스템은 앱이 Context.startForegroundService()를 호출하도록 허용합니다. 그러나 앱은 서비스가 생성된 후 5초 이내에 해당 서비스의 startForeground() 메서드를 호출해야 합니다.
네.. 5초 안에 startForeground() 메서드를 호출해야 한다고 합니다.
startForeground() 메서드는 0이 아닌 식별자 int id 와 Notification 객체를 파라미터로 받는 메서드 입니다.
구체적인 Notification 을 작성하는 방법은 오늘 언급하지 않겠습니다.
MyForegroundService 를 다음과 같이 수정해 줍니다.
package com.example.service_ex;

import android.app.Notification;
import android.app.NotificationChannel;
import android.app.NotificationManager;
import android.app.Service;
import android.content.Intent;
import android.os.Build;
import android.os.IBinder;
import android.util.Log;

import androidx.annotation.Nullable;
import androidx.annotation.RequiresApi;

public class MyForegroundService extends Service {

    int count = 0;

    @Nullable
    @Override
    public IBinder onBind(Intent intent) {
        return null;
    }

    @RequiresApi(api = Build.VERSION_CODES.O)
    @Override
    public int onStartCommand(Intent intent, int flags, int startId) {

        new Thread(new Runnable() {
            @Override
            public void run() {
                while (true) {

                    Log.e("Service", "서비스가 실행 중입니다...");
                    Log.e("Service", ""+ count);

                    try {
                        Thread.sleep(2000);
                        count++;
                    } catch (Exception e) {
                        e.printStackTrace();
                    }

                }
            }
        }).start();

        final String CHANNELID = "Foreground Service ID";
        NotificationChannel channel = new NotificationChannel(
                CHANNELID,
                CHANNELID,
                NotificationManager.IMPORTANCE_LOW);

        getSystemService(NotificationManager.class).createNotificationChannel(channel);
        Notification.Builder notification = new Notification.Builder(this, CHANNELID)
                .setContentText("서비스가 실행중입니다.")
                .setContentTitle("service_ex3")
                .setSmallIcon(R.drawable.ic_launcher_background);

        startForeground(888, notification.build());

        return super.onStartCommand(intent, flags, startId);
    }


}
onStartCommend 안에 Notification 을 생성해주고 해당 객체를 추가하여 startForeground() 메서드를 실행시키는 코드를 작성해 주었습니다.
그리고 다시 실행시켜보면..

이제 앱을 종료하더라도 서비스가 유지되는걸 확인하실 수 있습니다.
여전히 문제점은 남아있습니다.
1. 마지막에 확인되는것 처럼 유저에게 서비스가 실행되고 있음을 알리는 Notification 이 노출되어있고
2. 현재 코드대로라면 다시 앱을 실행시켰을때 서비스가 중복되게 될것입니다.
다음주에는 위 문제를 해결하는 방법에 대해 이어서 작성해 보겠습니다.
'안드로이드 자바' 카테고리의 다른 글
| [Android][Java] Color picker - 색상선택 창 띄우기 (0) | 2023.03.16 |
|---|---|
| [Android][Java] 뷰(View)의 크기 및 간격 공통 관리 하기 (0) | 2023.03.15 |
| [Android][Java] BarChart 그리기 (0) | 2023.03.12 |
| [Android][Java] 브로드캐스트리시버를 이용해 문자 수신 받기 (0) | 2023.03.11 |
| [Android][Java] nextFocusDown 이용해서 EditText 포커스 변경하기 (0) | 2023.03.10 |

