스플래시(Splash)화면이란?
앱 실행시 브랜드 로고나 이벤트 광고 등 지나가는 화면을 말합니다.
Lottie란?
에어비엔비에서 만든 After Effect 애니메이션을 랜더링하여 애니메이션으로 보여주는 라이브러리입니다.
[참고]
먼저, build.gradle 파일 안에 Lottie라는 라이브러리를 사용하기 위해 아래 화면처럼 추가하고 Sync Now 버튼을 누르시면 라이브러리가 적용됩니다.

implementation "com.airbnb.android:lottie:3.6.1"
다음 로티에 사용할 애니메이션을 다운로드 받기 위해 아래 주소로 접속합니다
주소로 접속하면 아래와 같은 화면이 나옵니다.

여기서 Go TO My Dashboard -> Download free animations from the community 버튼을 눌러서 이동하면
아래와 같은 화면이 나옵니다. 여기서 예제에 사용할 애니메이션을 다운로드 받습니다.

다운로드 받으실 때 LOTTIE JSON 파일로 다운로드를 받습니다.

다운로드 받은 JSON 파일을 아래와 같은 위치(res/raw)에 저장합니다.

다음 예제에 사용할 화면을 만들어 보겠습니다.
먼저 프로젝트 폴더에서 New -> Kotlin File/Class 클릭 후 파일을 만들어 줍니다.
저는 SplashActivity 파일을 생성하겠습니다.

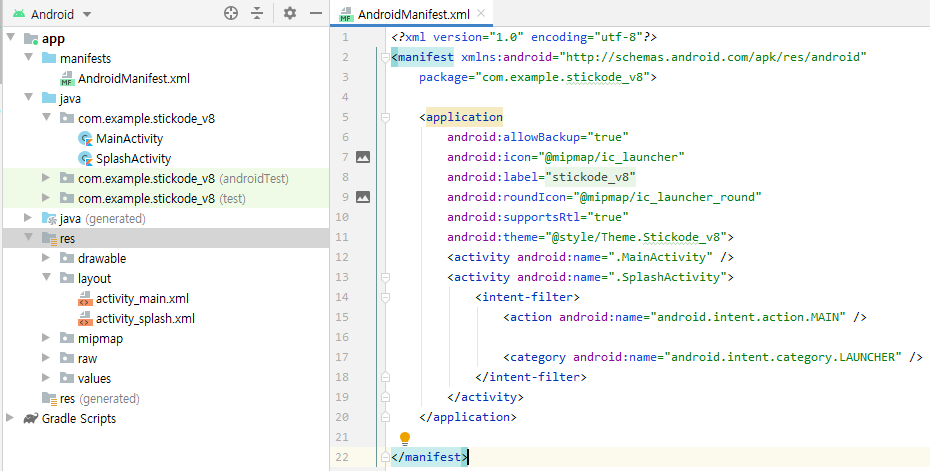
생성한 다음 AndroidManifest.xml 파일을 아래 사진과 같이 수정해줍니다.

<AndroidManifest.xml>
    <application
        android:allowBackup="true"
        android:icon="@mipmap/ic_launcher"
        android:label="@string/app_name"
        android:roundIcon="@mipmap/ic_launcher_round"
        android:supportsRtl="true"
        android:theme="@style/Theme.Stickode_v8">
        <activity android:name=".MainActivity" />
        <activity android:name=".SplashActivity">
            <intent-filter>
                <action android:name="android.intent.action.MAIN" />

                <category android:name="android.intent.category.LAUNCHER" />
            </intent-filter>
        </activity>
    </application>
다음 화면에 사용할 xml 파일들을 생성해줍니다.
<activity_main.xml>
<?xml version="1.0" encoding="utf-8"?>
<androidx.constraintlayout.widget.ConstraintLayout xmlns:android="http://schemas.android.com/apk/res/android"
    xmlns:app="http://schemas.android.com/apk/res-auto"
    xmlns:tools="http://schemas.android.com/tools"
    android:layout_width="match_parent"
    android:layout_height="match_parent"
    tools:context=".MainActivity">

    <TextView
        android:layout_width="wrap_content"
        android:layout_height="wrap_content"
        android:text="메인 화면"
        app:layout_constraintBottom_toBottomOf="parent"
        app:layout_constraintLeft_toLeftOf="parent"
        app:layout_constraintRight_toRightOf="parent"
        app:layout_constraintTop_toTopOf="parent" />

</androidx.constraintlayout.widget.ConstraintLayout>
<activity_splash.xml>
<?xml version="1.0" encoding="utf-8"?>
<androidx.constraintlayout.widget.ConstraintLayout
    xmlns:android="http://schemas.android.com/apk/res/android"
    xmlns:app="http://schemas.android.com/apk/res-auto"
    android:layout_width="match_parent"
    android:layout_height="match_parent">

    <com.airbnb.lottie.LottieAnimationView
        android:id="@+id/loading_image"
        android:layout_width="150dp"
        android:layout_height="150dp"
        app:lottie_rawRes="@raw/splash_roding"
        app:layout_constraintStart_toStartOf="parent"
        app:layout_constraintEnd_toEndOf="parent"
        app:layout_constraintTop_toTopOf="parent"
        app:layout_constraintBottom_toBottomOf="parent"
        app:lottie_autoPlay="true"/>

</androidx.constraintlayout.widget.ConstraintLayout>
다음 코드를 작성해 보겠습니다.
스틱코드를 활용한다면, 클래스에서 'ko' 까지만 작성했을 때 로티 생성 이벤트가 나타납니다.

로티 생성 이벤트를 누를 경우 코드가 자동으로 완성이 됩니다.

그 다음 나머지 코드 들을 추가 해 줍니다.(핸들러 사용, 인텐트 사용)
추가 해주면 아래와 같이 코드가 완성됩니다.
핸들러는 3초간 지연시키는 역할을 하며, 인텐트는 다음 페이지로 넘어가기 위한 역할을 합니다.

<최종코드>
import android.content.Intent
import android.os.Handler
import com.airbnb.lottie.LottieAnimationView
import android.os.Bundle
import androidx.appcompat.app.AppCompatActivity


class SplashActivity : AppCompatActivity() {

    override fun onCreate(savedInstanceState: Bundle?) {
        super.onCreate(savedInstanceState)
        setContentView(R.layout.activity_splash)

        var lodingImage = findViewById(R.id.loading_image) as LottieAnimationView

        // 애니메이션 시작
        lodingImage.playAnimation()

        val handler: Handler = Handler()
            handler.postDelayed({
             val intent = Intent(this, MainActivity::class.java)
            startActivity(intent)
            finish()
        },3000)
    }
}
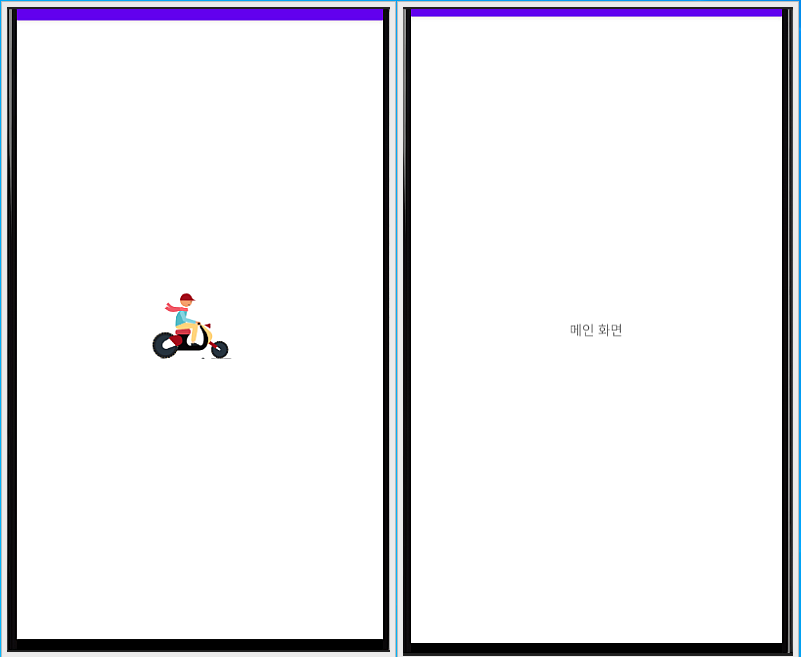
프로젝트를 실행하면 아래와 같이 애니메이션이 실행되면서 3초 후에 다음 페이지로 넘어가는 것을 확인할 수 있습니다.

사용한 스틱코드
stickode.com/detail.html?no=2004
'안드로이드 코틀린' 카테고리의 다른 글
| [Kotlin][Android] SeekBar 시크바 기본 사용법 (0) | 2021.04.16 |
|---|---|
| [Kotlin][Android] Floating Action Menu 만들기 (0) | 2021.04.09 |
| [Kotlin][Android] retrofit2 이용한 HTTP 통신 (0) | 2021.03.15 |
| [Kotlin][Android] 당겨서 새로고침 기능 만들기 (0) | 2021.03.10 |
| [Kotlin][Android] 안드로이드 스피너 2탄 스피너 커스텀하기 (0) | 2021.02.21 |


