728x90
오늘은 라디오 버튼에 대해서 알아볼게요
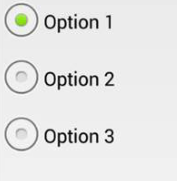
우선 라디오 버튼을 아래처럼 생겼습니다.

라디오 버튼을 사용하면 세트에서 한 가지 옵션을 선택할 수 있습니다. 사용 가능한 모든 옵션을 사용자에게 나란히 표시하려면 상호 배타적인 옵션 세트에 라디오 버튼을 사용해야 합니다
클릭 이벤트에 응답
사용자가 라디오 버튼 중 하나를 선택하면 상응하는 RadioButton 객체가 클릭 시 이벤트를 수신합니다.
버튼의 클릭 이벤트 핸들러를 정의하려면 XML 레이아웃의 <RadioButton> 요소에 android:onClick 속성을 추가합니다. 이 속성 값은 클릭 이벤트에 응답하여 호출하려는 메서드의 이름이어야 합니다. 그런 다음 레이아웃을 호스팅하는 Activity가 상응하는 메서드를 구현해야 합니다.
예를 들어 다음은 RadioButton 객체입니다
<?xml version="1.0" encoding="utf-8"?>
<RadioGroup xmlns:android="http://schemas.android.com/apk/res/android"
    android:layout_width="match_parent"
    android:layout_height="wrap_content"
    android:orientation="vertical">
    <RadioButton android:id="@+id/radio_pirates"
        android:layout_width="wrap_content"
        android:layout_height="wrap_content"
        android:text="@string/pirates"
        android:onClick="onRadioButtonClicked"/>
    <RadioButton android:id="@+id/radio_ninjas"
        android:layout_width="wrap_content"
        android:layout_height="wrap_content"
        android:text="@string/ninjas"
        android:onClick="onRadioButtonClicked"/>
</RadioGroup>
이 레이아웃을 호스팅하는 Activity 내에서 다음 메서드가 두 라디오 버튼의 클릭 이벤트를 처리합니다.
fun onRadioButtonClicked(view: View) {
    if (view is RadioButton) {
        // Is the button now checked?
        val checked = view.isChecked

        // Check which radio button was clicked
        when (view.getId()) {
            R.id.radio_pirates ->
                if (checked) {
                    // Pirates are the best
                }
            R.id.radio_ninjas ->
                if (checked) {
                    // Ninjas rule
                }
        }
    }
}
'안드로이드 코틀린' 카테고리의 다른 글
| [Kotlin][Android] fragment navigation 라이브러리 (0) | 2022.05.31 |
|---|---|
| [Kotlin][Android] 버튼 눌렀을 때 전화걸기로 연결하기 (0) | 2022.05.29 |
| [Android][Kotlin] gif 이미지로 스플래시(Splash) 화면 만들기 (1) | 2022.05.19 |
| [Kotlin][Android] 상태바 - Status bar 다루기 (색깔 바꾸기) (0) | 2022.05.18 |
| [Kotlin][Android] osmdroid marker표시 및 지도 상에서 위치 얻기 (0) | 2022.05.16 |

