이번 시간에는 Fragment 안에 Fragment를 사용한 중첩 구조에서, BackStack을 쌓고 하나씩 종료하는 방법에 대해서 알아보겠습니다.
구조는 다음과 같습니다.
MainActivity - Fragment A - FragmentA1
- FragmentA2
- Fragment B - FragmentB1
- FragmentB2
1. 메인 Activity를 생성합니다. 그리고 Fragment A, B 전환 버튼을 만들어 줍니다.
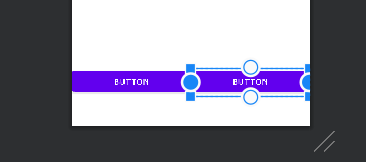
A, B 버튼을 누른채로 화면과 같이 오른쪽 마우스 클릭 -> Horizontal Chain을 생성합니다.

가로축으로 체인이 생성되면서 두 버튼이 일정 간격으로 떨어져서 위치하게 됩니다.
하지만 보통 BottomNav에서는 LinearLayout 가로 정렬에서 Weight를 1:1로 적용한 것처럼 두 버튼의 너비가 합쳐서 가로축을 꽉 채웠으면 좋겠다는 생각을 합니다.
1에서 Horizontal Chain을 채운 채로, 버튼의 Width를 0dp로 조정하면 마치, LinearLayout에서 Weight를 주는 것과 비슷한 효과를 만들 수 있습니다.
위에는 Fragment를 담아야 함으로, FragmentContainerView를 만들어줍니다. 그리고 이번엔 버튼중 하나와 FragmentContainerView에 Vertical Chain을 걸어줍니다. 이때, FragmentContainerView에 height를 0으로 걸어주면, 두 버튼 영역을 제외하고 Fragment가 가득 찬 모습을 확인할 수 있습니다.
하나의 레이아웃을 하나의 Activity와 나머지 Fragment들이 전부 재사용할 거기 때문에, 상단에 Fragment 등을 구분하고 이를 표시해주기 위한 textView를 상단에 하나 만들어줍니다.
적절한 이름과 부족한 제약속성을 채워줍니다.
그렇게 만들어진 xml 파일은 다음과 같습니다.
<!-- 파일명 layout.xml -->

<?xml version="1.0" encoding="utf-8"?>
<androidx.constraintlayout.widget.ConstraintLayout xmlns:android="http://schemas.android.com/apk/res/android"
    xmlns:app="http://schemas.android.com/apk/res-auto"
    xmlns:tools="http://schemas.android.com/tools"
    android:layout_width="match_parent"
    android:layout_height="match_parent"
    tools:context="com.rai.MainActivity">

    <TextView
        android:id="@+id/tv_fragment_id"
        android:layout_width="match_parent"
        android:layout_height="wrap_content"
        android:text="ID"
        android:textSize="40sp"
        app:layout_constraintBottom_toTopOf="@+id/v_container"
        app:layout_constraintStart_toStartOf="parent"
        app:layout_constraintTop_toTopOf="parent" />

    <androidx.fragment.app.FragmentContainerView
        android:id="@+id/v_container"
        android:layout_width="match_parent"
        android:layout_height="0dp"
        app:layout_constraintBottom_toTopOf="@+id/btn_a_fragment"
        app:layout_constraintStart_toStartOf="parent"
        app:layout_constraintTop_toBottomOf="@+id/tv_fragment_id" />

    <Button
        android:id="@+id/btn_a_fragment"
        android:layout_width="0dp"
        android:layout_height="wrap_content"
        android:text="Button"
        app:layout_constraintBottom_toBottomOf="parent"
        app:layout_constraintEnd_toStartOf="@+id/btn_b_fragment"
        app:layout_constraintHorizontal_bias="0.5"
        app:layout_constraintStart_toStartOf="parent"
        app:layout_constraintTop_toBottomOf="@+id/v_container" />

    <Button
        android:id="@+id/btn_b_fragment"
        android:layout_width="0dp"
        android:layout_height="wrap_content"
        android:text="Button"
        app:layout_constraintEnd_toEndOf="parent"
        app:layout_constraintHorizontal_bias="0.5"
        app:layout_constraintStart_toEndOf="@+id/btn_a_fragment"
        app:layout_constraintTop_toTopOf="@+id/btn_a_fragment" />
</androidx.constraintlayout.widget.ConstraintLayout>
다음은 Fragment 를 생성하겠습니다.
A, A1, A2, B, B1, B2 Fragment를 생성합니다.
onCreateView에서 layout을 inflate 하는 곳에 아까 만들었던 layout.xml을 inflate하도록 설정합니다.
같은 레이아웃을 쓰면 구분하기가 어렵기 때문에, 이를 구분하기 위하여 만든 TextView에 Class이름이 표기되도록 합시다.
onViewCreated안에 view.findViewById<TextView>(R.id.tv_fragment_id).text = this.javaClass.name을 넣어줍시다.
class FragmentA : Fragment() {

    override fun onCreate(savedInstanceState: Bundle?) {
        super.onCreate(savedInstanceState)
    }

    override fun onCreateView(inflater: LayoutInflater, container: ViewGroup?, savedInstanceState: Bundle?): View? {
        return inflater.inflate(R.layout.layout, container, false)
    }

    override fun onViewCreated(view: View, savedInstanceState: Bundle?) {
        super.onViewCreated(view, savedInstanceState)
        view.findViewById<TextView>(R.id.tv_fragment_id).text= this.javaClass.name
    }


}
반복작업이므로, Fragment A를 생성하고 복사해서 클래스 이름만 바꿔주겠습니다.

다음과 같이 A ~ B2까지 만드시면 됩니다.
그리고 다음으로 Fragment 바꾸는 함수와 BackStack단위로 종료하는 함수를 만들 건데, 함수를 만들어 모든 Fragment에 복사해서 넣으면 번거롭고 코드 중복이 발생하므로, 부모를 하나 만들어서 상속해주기로 합시다.
따라서 부모에 해당하는 Fragment를 만듭니다. 이름은 fragment를 담는 fragment이므로, ContainerFragment로 합시다.
Kotlin의 경우 기본적으로 class의 상속을 허용하지 않기 때문에, 상속이 가능하다는 의미에서 class 앞에 open을 붙여줍시다.
    open class ContainerFragment : Fragment() // 클래스 앞에 open을 붙여줍니다.

    // in ContainerFragment Class

    fun changeFragment(fragment: Fragment, id: FragmentContainerViewID, tag : String? = null) {
        val transaction = childFragmentManager.beginTransaction();
        transaction.replace(id, fragment, tag);
        transaction.addToBackStack(null);
        transaction.commit()
    }
fragment 관리는 각각 자식 fragment가 하기 때문에 만드려는 fragment를 자식에게서 넘겨받고
부모는 현재 FragmentContainerView를 모르므로 (현재 예제에서는 모든 fragment가 같은 레이아웃을 공유하고 있으나 이를 응용하는 과정에서 fragment마다 독립된 레이아웃을 가질 수 있으므로), 자식으로부터 view ID를 넘겨받습니다.
맨 처음에는 Activity가 Fragment를 관리하므로 Activity에도 추가합니다.
다만, Activity의 경우 ContainerView는 알고있으므로, 굳이 넘겨줄 필요 없을 것 같습니다.
또한 fragment는 하위 fragment를 childFragmentManager로 관리하지만,
Activity에서는 SupportFragment에서 관리하기 떄문에 이를 바꿔줍니다.
    // in MainActivity Class

    private fun changeFragment(fragment: Fragment, tag : String? = null) {
        val transaction = supportFragmentManager.beginTransaction();
        transaction.replace(R.id.v_container, fragment, tag);
        transaction.addToBackStack(null);
        transaction.commit()
    }
이제 changeFramgnet까지 끝났으므로, 추가하는 로직을 작성합시다.
// main Activity

override fun onCreate(savedInstanceState: Bundle?) {
    super.onCreate(savedInstanceState)
    setContentView(R.layout.layout)

    findViewById<Button>(R.id.btn_a_fragment).setOnClickListener {
        changeFragment(FragmentA())
    }

    findViewById<Button>(R.id.btn_b_fragment).setOnClickListener {
        changeFragment(FragmentB())
    }
}

// 상속 Fragment에서 ContainerFragment()로 바꾸셔야 합니다.
// fragmentA
class FragmentA : ContainerFragment()

override fun onViewCreated(view: View, savedInstanceState: Bundle?) {
    super.onViewCreated(view, savedInstanceState)
    view.findViewById<TextView>(R.id.tv_fragment_id).text= this.javaClass.name

    view.findViewById<Button>(R.id.btn_a_fragment).setOnClickListener {
        changeFragment(FragmentA1(), R.id.btn_a_fragment)
    }

    view.findViewById<Button>(R.id.btn_b_fragment).setOnClickListener {
        changeFragment(FragmentA2(), R.id.btn_a_fragment)
    }
}

// fragmentB
class FragmentB : ContainerFragment()

override fun onViewCreated(view: View, savedInstanceState: Bundle?) {
    super.onViewCreated(view, savedInstanceState)
    view.findViewById<TextView>(R.id.tv_fragment_id).text= this.javaClass.name

    view.findViewById<Button>(R.id.btn_a_fragment).setOnClickListener {
        changeFragment(FragmentB1(), R.id.v_container)
    }

    view.findViewById<Button>(R.id.btn_b_fragment).setOnClickListener {
        changeFragment(FragmentB2(), R.id.v_container)
    }
}
실행해보세요.
왼쪽 버튼과 오른쪽 버튼을 누르면 Fragment가 쌓이는 것을 보실 수 있습니다.
동영상 서비스가 종료되어 해당 콘텐츠를 재생할 수 없습니다.
Fragment A위에는 A1, A2가
Fragment B위에는 B1, B2가 쌓이는 것을 확인하실 수 있습니다.
Fragment B -> A-> A1 -> A2를 쌓은 후, Back버튼을 눌러보세요.
그러면 A2가 꺼지면서 A1이 나와야 하는데, B가 나타날 겁니다.
순차적으로 종료하기 위해서 저희는 backPressed 함수를 오버라이딩해서 처리할 겁니다.
Container Fragment로 와서 popFragment 함수를 작성합시다.
대략적으로 저희들이 원하는 바를 정리해봅시다.
popFragment에서는 현재 화면에 보이는 Fragment에 backStack이 있는 경우, 해당 Fragment를 POP합니다.
하지만, 없는 경우 아무것도 하지 않습니다.
pop을 했는지 안했는지 반환을 해야, pop을 하지 않은 경우는 상위 화면에서 pop을 할 수 있으므로, 해당 여부를 Boolean으로 반환해줍시다.
그리고 현재 보이는 Fragment를 가져오기 위해서는 현 화면의 fragmentContainerView의 ID를 가져와야 하는데, pop은 상위 fragment 혹은 Activity에서 호출되기 때문에 현재 화면의 fragmentContainerView의 ID를 가지고 있지 않습니다.
change할 때, fragmentContainerView의 ID를 넘겨주니까 그때 멤버변수로 갈무리 합시다.
open class ContainerFragment : Fragment() {

    private var mFragmentId = -1

    fun changeFragment(fragment: Fragment, fragmentId: Int, tag : String? = null) {
        mFragmentId = fragmentId

        val transaction = childFragmentManager.beginTransaction();
        transaction.replace(fragmentId, fragment, tag);
        transaction.addToBackStack(null);
        transaction.commit()
    }
}
이제 본격적으로 popFragment 함수를 작성합니다.
// class ContainerFragment

fun popFragment() : Boolean {
    if (mFragmentId == -1) {
        return false;
    }

    val fv : FragmentContainerView = getView()?.findViewById<View>(mFragmentId) as FragmentContainerView
    val fragment = fv.getFragment<Fragment>()
    if (fragment is ContainerFragment) {
        if (fragment.popFragment()) {
            return true
        }
    }

    val backStackCount = childFragmentManager.backStackEntryCount
    if (backStackCount > 0) {
        childFragmentManager.popBackStackImmediate()
        return true
    }

    return false
}
마지막으로 Activity에서 onBackPressed() 함수에서 작성한 함수까지 이어주도록 합시다.
    override fun onBackPressed() {
        val containerView = findViewById<FragmentContainerView>(R.id.v_container)
        val fragment = containerView.getFragment<Fragment>()

        if (fragment as? ContainerFragment != null) {
            if (fragment.popFragment()) {
                return
            }
        }

        val backStackCount = supportFragmentManager.backStackEntryCount
        if (backStackCount > 0) {
            supportFragmentManager.popBackStackImmediate()
            return
        }

        super.onBackPressed()
    }
BackButton시, 쌓인 스택부터 순차적으로 종료되는 것을 확인할 수 있습니다.
동영상 서비스가 종료되어 해당 콘텐츠를 재생할 수 없습니다.
==== 전체 코드 ===
// layout.xml

<?xml version="1.0" encoding="utf-8"?>
<androidx.constraintlayout.widget.ConstraintLayout xmlns:android="http://schemas.android.com/apk/res/android"
    xmlns:app="http://schemas.android.com/apk/res-auto"
    xmlns:tools="http://schemas.android.com/tools"
    android:layout_width="match_parent"
    android:layout_height="match_parent"
    tools:context="com.rai.MainActivity">

    <TextView
        android:id="@+id/tv_fragment_id"
        android:layout_width="match_parent"
        android:layout_height="wrap_content"
        android:text="ID"
        android:textSize="40sp"
        app:layout_constraintBottom_toTopOf="@+id/v_container"
        app:layout_constraintStart_toStartOf="parent"
        app:layout_constraintTop_toTopOf="parent" />

    <androidx.fragment.app.FragmentContainerView
        android:id="@+id/v_container"
        android:layout_width="match_parent"
        android:layout_height="0dp"
        app:layout_constraintBottom_toTopOf="@+id/btn_a_fragment"
        app:layout_constraintStart_toStartOf="parent"
        app:layout_constraintTop_toBottomOf="@+id/tv_fragment_id" />

    <Button
        android:id="@+id/btn_a_fragment"
        android:layout_width="0dp"
        android:layout_height="wrap_content"
        android:text="Button"
        app:layout_constraintBottom_toBottomOf="parent"
        app:layout_constraintEnd_toStartOf="@+id/btn_b_fragment"
        app:layout_constraintHorizontal_bias="0.5"
        app:layout_constraintStart_toStartOf="parent"
        app:layout_constraintTop_toBottomOf="@+id/v_container" />

    <Button
        android:id="@+id/btn_b_fragment"
        android:layout_width="0dp"
        android:layout_height="wrap_content"
        android:text="Button"
        app:layout_constraintEnd_toEndOf="parent"
        app:layout_constraintHorizontal_bias="0.5"
        app:layout_constraintStart_toEndOf="@+id/btn_a_fragment"
        app:layout_constraintTop_toTopOf="@+id/btn_a_fragment" />
</androidx.constraintlayout.widget.ConstraintLayout>

// MainActivity


class MainActivity : AppCompatActivity() {
    override fun onCreate(savedInstanceState: Bundle?) {
        super.onCreate(savedInstanceState)
        setContentView(R.layout.layout)

        findViewById<Button>(R.id.btn_a_fragment).setOnClickListener {
            changeFragment(FragmentA())
        }

        findViewById<Button>(R.id.btn_b_fragment).setOnClickListener {
            changeFragment(FragmentB())
        }

    }

    private fun changeFragment(fragment: Fragment, tag : String? = null) {
        val transaction = supportFragmentManager.beginTransaction();
        transaction.replace(R.id.v_container, fragment, tag);
        transaction.addToBackStack(null);
        transaction.commit()
    }

    override fun onBackPressed() {
        val containerView = findViewById<FragmentContainerView>(R.id.v_container)
        val fragment = containerView.getFragment<Fragment>()

        if (fragment as? ContainerFragment != null) {
            if (fragment.popFragment()) {
                return
            }
        }

        val backStackCount = supportFragmentManager.backStackEntryCount
        if (backStackCount > 0) {
            supportFragmentManager.popBackStackImmediate()
            return
        }

        super.onBackPressed()
    }


}

// ContainerFragment
open class ContainerFragment : Fragment() {

    private var mFragmentId = -1

    override fun onCreateView(inflater: LayoutInflater, container: ViewGroup?, savedInstanceState: Bundle?): View? {
        return super.onCreateView(inflater, container, savedInstanceState)
    }

    override fun onViewCreated(view: View, savedInstanceState: Bundle?) {
        super.onViewCreated(view, savedInstanceState)

    }

    fun changeFragment(fragment: Fragment, fragmentId: Int, tag : String? = null) {
        mFragmentId = fragmentId

        val transaction = childFragmentManager.beginTransaction();
        transaction.replace(fragmentId, fragment, tag);
        transaction.addToBackStack(null);
        transaction.commit()
    }

    fun popFragment() : Boolean {
        if (mFragmentId == -1) {
            return false;
        }

        val fv : FragmentContainerView = getView()?.findViewById<View>(mFragmentId) as FragmentContainerView
        var fragment = fv.getFragment<Fragment>()

        if (fragment as? ContainerFragment != null) {
            if (fragment.popFragment()) {
                return true
            }
        }

        val backStackCount = childFragmentManager.backStackEntryCount

        if (backStackCount > 0) {
            childFragmentManager.popBackStackImmediate()
            return true
        }

        return false
    }
}

// Fragment A

class FragmentA : ContainerFragment() {

    override fun onCreate(savedInstanceState: Bundle?) {
        super.onCreate(savedInstanceState)
    }

    override fun onCreateView(inflater: LayoutInflater, container: ViewGroup?, savedInstanceState: Bundle?): View? {
        return inflater.inflate(R.layout.layout, container, false)
    }

    override fun onViewCreated(view: View, savedInstanceState: Bundle?) {
        super.onViewCreated(view, savedInstanceState)
        view.findViewById<TextView>(R.id.tv_fragment_id).text= this.javaClass.name.split(".").last()

        view.findViewById<Button>(R.id.btn_a_fragment).setOnClickListener {
            changeFragment(FragmentA1(), R.id.v_container)
        }

        view.findViewById<Button>(R.id.btn_b_fragment).setOnClickListener {
            changeFragment(FragmentA2(), R.id.v_container)
        }
    }


}

// Fragment B

class FragmentB : ContainerFragment() {

    override fun onCreate(savedInstanceState: Bundle?) {
        super.onCreate(savedInstanceState)
    }

    override fun onCreateView(inflater: LayoutInflater, container: ViewGroup?, savedInstanceState: Bundle?): View? {
        return inflater.inflate(R.layout.layout, container, false)
    }

    override fun onViewCreated(view: View, savedInstanceState: Bundle?) {
        super.onViewCreated(view, savedInstanceState)
        view.findViewById<TextView>(R.id.tv_fragment_id).text= this.javaClass.name.split(".").last()

        view.findViewById<Button>(R.id.btn_a_fragment).setOnClickListener {
            changeFragment(FragmentB1(), R.id.v_container)
        }

        view.findViewById<Button>(R.id.btn_b_fragment).setOnClickListener {
            changeFragment(FragmentB2(), R.id.v_container)
        }
    }
}

// A1, A2, B1, B2 <- 클래스 이름만 다름

class FragmentA1 : Fragment() {

    override fun onCreate(savedInstanceState: Bundle?) {
        super.onCreate(savedInstanceState)
    }

    override fun onCreateView(inflater: LayoutInflater, container: ViewGroup?, savedInstanceState: Bundle?): View? {
        return inflater.inflate(R.layout.layout, container, false)
    }

    override fun onViewCreated(view: View, savedInstanceState: Bundle?) {
        super.onViewCreated(view, savedInstanceState)
        view.findViewById<TextView>(R.id.tv_fragment_id).text= this.javaClass.name.split(".").last()
    }


}
# 몇 가지 추가사항
1. 중복이 안되게 하고싶습니다. ex) A1 버튼 2번 눌러도 A1이 두번 생성되는 게 아니라, 한번 생성되게 끔.
// change 함수에서, tag로 class이름 던져주기
changeFragment(FragmentA(), R.id.v_container, "FragmentA")


// changeFragment 재정의 -> ContainerFragment의 경우,

    fun changeFragment(fragment: Fragment, fragmentId: Int, tag : String? = null) {
        mFragmentId = fragmentId

        val fragments = childFragmentManager.fragments;
        if (fragments.size != 0) {
            val f = fragments.get(fragments.size - 1);
            if (f.tag != null && f.tag == tag) {
                return
            }
        }

        val transaction = childFragmentManager.beginTransaction();
        transaction.replace(fragmentId, fragment, tag);
        transaction.addToBackStack(null);
        transaction.commit()
    }

 // changeFragment 재정의 -> MainActivity의 경우

     private fun changeFragment(fragment: Fragment, tag : String? = null) {

        val fragments = supportFragmentManager.fragments;
        if (fragments.size != 0) {
            val f = fragments.get(fragments.size - 1);
            if (f.tag != null && f.tag == tag) {
                return
            }
        }

        val transaction = supportFragmentManager.beginTransaction();
        transaction.replace(R.id.v_container, fragment, tag);
        transaction.addToBackStack(null);
        transaction.commit()
    }
2. Fragment를 좌우로 바꿀 때 Fragment 상태가 유지되게 하고싶어요.
// 유지되게 하고 싶은 FragmnetClass를 싱글턴으로 바꿀 것.
// 해당 클래스를 FragmentA라고 가정함.

class FragmentA : ContainerFragment() {

    companion object {
        var INSTANCE : FragmentA ? = null

        fun getInstance() : FragmentA {
            if (INSTANCE == null) {
                INSTANCE = FragmentA()
            }

            return INSTANCE!!
        }
    }

    override fun onDestroy() {
        super.onDestroy()
        INSTANCE = null;
    }
}

// 이후 ChangeFragment시 FragmentA()가 아닌, FragmentA.getInstance()를 넘겨줌
changeFragment(FragmentA.getInstance())
동영상 서비스가 종료되어 해당 콘텐츠를 재생할 수 없습니다.
3. FragmentA1 이후에도 더 fragment를 중첩되게 하고싶습니다. (fragmentA -> fragmnetA1 -> {fragmentAA1, AA2 ....}
-> FragmentA1도 ContainerFragment()를 상속하면 됩니다.
'안드로이드 코틀린' 카테고리의 다른 글
| [Kotlin][Android] 쉐어드 프리퍼런스 사용하기 (0) | 2022.05.01 |
|---|---|
| [Kotlin][Android] 안드로이드 코루틴(Coroutine) 으로 타이머 기능 만들기 (0) | 2022.04.25 |
| [Kotlin][Android] 삼각형 그리기 (OpenGL) (0) | 2022.04.16 |
| [Kotlin][Android] AAC ViewModel + LiveData+ Databinding 이용 숫자 증감 (0) | 2022.04.11 |
| [Android][kotlin] EditText Submit처럼 사용하기 (0) | 2022.04.06 |
