라디오 버튼이란?
라디오 버튼은 여러 옵션 중 한 가지 옵션을 선택할 수 있도록 만들어주는 뷰입니다.
각 라디오 버튼을 하나의 라디오 그룹(Radio Group)으로 그룹화해줘야 합니다.
만약, 제시할 옵션을 나란히 표시할 필요가 없다면 스피너(spinner)를 사용해보세요.
https://developer.android.com/guide/topics/ui/controls/radiobutton
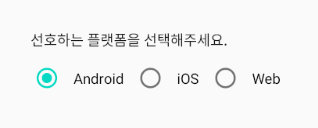
라디오 버튼 예시
라디오 버튼은 orientation 속성을 이용하여 horizontal 혹은 vertical로 정렬할 수 있습니다.

활용 예제
선택된 라디오 버튼에 따라 TextView에 표시되는 텍스트를 바꾸는 예제를 만들어보겠습니다.

<activity_main.xml>
라디오 버튼 사용을 위해 xml 파일에서 라디오 버튼을 선언해야 합니다.
스틱코드에서 라디오버튼 코드를 즐겨찾기를 누른 뒤,
xml 파일에서 rad 까지만 입력해도 라디오버튼 및 라디오그룹을 불러낼 수 있는 코드가 나옵니다.

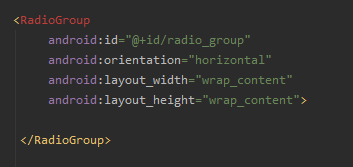
가장 먼저 첫번째 항목을 클릭하여 horizontal radio group을 불러옵니다
xml 파일에 자동으로 Radio Group의 기본 코드가 작성됩니다.
그 후, Radio Group 내에 Radio Button을 추가해줍니다.
이전과 마찬가지로 rad 라고 입력하면 뜨는 항목 중 두번째 항목을 클릭해주세요.

목록 중 두번째 항목을 클릭하면
xml 파일에 자동으로 Radio Button 내용이 입력됩니다.
사용 중인 레이아웃에 맞춰 필요한 부분을 마저 입력해줍니다.
또한, 여러개의 항목을 만들어 주기위해 Radio Button을 조금 더 추가해줍니다.

그 후, 선택 값이 띄워질 텍스트뷰와 질문 텍스트뷰를 추가해줍니다.
tex 까지만 입력했을 때 나오는 첫번째 항목을 클릭하면 textview의 기본 내용이 입력됩니다.

텍스트뷰를 추가한 activity_main.xml 의 전체코드입니다.
<?xml version="1.0" encoding="utf-8"?>
<androidx.constraintlayout.widget.ConstraintLayout
    xmlns:android="http://schemas.android.com/apk/res/android"
    xmlns:app="http://schemas.android.com/apk/res-auto"
    xmlns:tools="http://schemas.android.com/tools"
    android:layout_width="match_parent"
    android:layout_height="match_parent"
    tools:context=".MainActivity">


    <TextView
        android:id="@+id/question"
        android:layout_width="wrap_content"
        android:layout_height="wrap_content"
        android:layout_marginBottom="8dp"
        android:text="좋아하는 계절은?"
        app:layout_constraintBottom_toTopOf="@+id/radio_group"
        app:layout_constraintStart_toStartOf="@+id/radio_group" />

    <RadioGroup
        android:id="@+id/radio_group"
        android:layout_width="wrap_content"
        android:layout_height="wrap_content"
        android:orientation="horizontal"
        app:layout_constraintBottom_toBottomOf="parent"
        app:layout_constraintEnd_toEndOf="parent"
        app:layout_constraintStart_toStartOf="parent"
        app:layout_constraintTop_toTopOf="parent">

        <RadioButton
            android:id="@+id/radio_button_spring"
            android:layout_width="wrap_content"
            android:layout_height="wrap_content"
            android:text="봄"
            android:layout_marginEnd="10dp"
            />

        <RadioButton
            android:id="@+id/radio_button_summer"
            android:layout_width="wrap_content"
            android:layout_height="wrap_content"
            android:text="여름"
            android:layout_marginEnd="10dp" />

        <RadioButton
            android:id="@+id/radio_button_fall"
            android:layout_width="wrap_content"
            android:layout_height="wrap_content"
            android:text="가을"
            android:layout_marginEnd="10dp" />


        <RadioButton
            android:id="@+id/radio_button_winter"
            android:layout_width="wrap_content"
            android:layout_height="wrap_content"
            android:text="겨울"
            android:layout_marginEnd="10dp"/>

    </RadioGroup>

    <TextView
        android:id="@+id/selected_season"
        android:layout_width="wrap_content"
        android:layout_height="wrap_content"
        android:layout_marginTop="24dp"
        android:hint="선택된 계절"
        app:layout_constraintEnd_toEndOf="parent"
        app:layout_constraintStart_toStartOf="parent"
        app:layout_constraintTop_toBottomOf="@+id/radio_group" />


</androidx.constraintlayout.widget.ConstraintLayout>
<MainActivity>
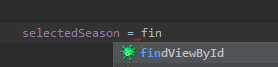
클래스에서 각 항목들을 findViewById로 선언해야합니다.
스틱코드를 활용하면 간편하게 코드 작성이 가능합니다.
먼저, 선택된 항목을 띄워줄 텍스트 뷰와, 라디오 그룹을 선언해줍니다.

다음으로, 클릭한 radio button에 따라 텍스트를 변경해주기 위해 리스너를 추가합니다.

rad 까지 입력했을 때 나오는 radio group listener를 클릭하면,
라디오 그룹에서 활용 할 수 있는 리스너 코드가 입력됩니다.
자신의 view 이름에 맞게 수정하고,
항목이 눌렸을 때의 코드를 입력하면 됩니다.

클릭되는 값마다 textview 에 다른 값이 출력될 수 있도록
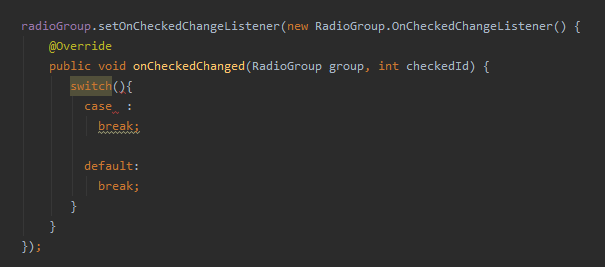
switch문을 활용해보도록 하겠습니다.

스틱코드를 통해 불러낸 switch문을 조금 다듬어줍니다.
textview에 선택한 계절에 맞는 단어가 출력되도록 코드를 추가해줍니다.

실행화면 입니다!

텍스트뷰를 추가한 MainActivity의 전체코드입니다.
public class MainActivity extends AppCompatActivity {

    TextView selectedSeason;
    RadioGroup radioGroup;


    @Override
    protected void onCreate(Bundle savedInstanceState) {
        super.onCreate(savedInstanceState);
        setContentView(R.layout.activity_main);

        selectedSeason = findViewById(R.id.selected_season);
        radioGroup = findViewById(R.id.radio_group);

        radioGroup.setOnCheckedChangeListener(new RadioGroup.OnCheckedChangeListener() {
            @Override
            public void onCheckedChanged(RadioGroup group, int checkedId) {
                switch (checkedId){
                    case R.id.radio_button_spring:
                        selectedSeason.setText("봄");
                        break;
                    case R.id.radio_button_summer:
                        selectedSeason.setText("여름");
                        break;
                    case R.id.radio_button_fall:
                        selectedSeason.setText("가을");
                        break;
                    case R.id.radio_button_winter:
                        selectedSeason.setText("겨울");
                        break;
                }
            }
        });

    }

}
활용한 스틱코드
RadioButton, RadioGroup > stickode.com/detail.html?no=1908
TextView > stickode.com/detail.html?no=742
findViewById > https://stickode.com/detail.html?no=682
'안드로이드 자바' 카테고리의 다른 글
| [Java][Android] 촬영한 사진의 썸네일을 이미지뷰에 넣기 (0) | 2021.02.24 |
|---|---|
| [Java][Android] check box 란? , 체크박스 빠르게 커스텀하기 (2) | 2021.02.23 |
| [Java][Android] 당겨서 새로고침 빠르게 구현하기 (2) | 2021.02.20 |
| [Java][Android] 내 스마트폰 mp3 파일 플레이어 빠르게 구현하기 (4) | 2021.02.18 |
| [Java][Android] 안드로이드 뷰페이저 (0) | 2021.02.17 |


